Categories
Studio Lights Education

7 Tips for Using the Foreground in Portrait Photography

What is Foreground

In portrait photography, the foreground generally refers to the scene that is close to the lens in front of the subject. If these scenes are used properly, they can add atmosphere to the picture, beautify and highlight the subject, and at the same time, they can also explain the time and place of the characters. In addition, the foreground also plays a certain role in the performance of the character’s character and state. Usually, trees, flowers, roads, and water surfaces are used as the foreground, and people and objects can also be selected as the foreground.
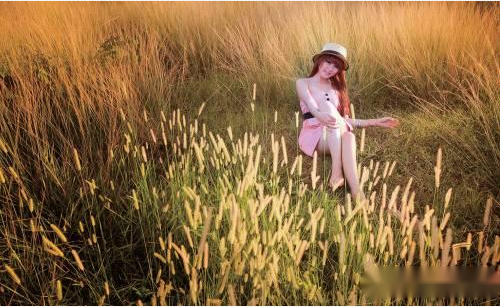
With the transparent thatch grass as the foreground, it sets off the picture, and the atmosphere is very beautiful.

Focal Length: 30mm, Aperture: F8, Shutter Speed: 1/250s, Sensitivity: ISO100

1. Use the Foreground to Set off the Subject and Render the Atmosphere

Using foreground blur to set off the scene and highlight the subject is also a very important form of expression. Similar to the background blur, the foreground can also be blurred by blurring, the foreground is close to or close to the lens, and using a large aperture to blur the foreground can not only highlight the subject, but also make the picture more dreamy and soft.

In addition, you can make full use of the foreground object as a frame to form a framed composition. This composition method can enrich the scene level of the picture, strengthen the sense of space of the picture, and can also decoratively beautify the picture and enhance the sense of form of the picture. When shooting, you can often consider using windows, doors, branches, shadows or hands to create a “frame” for the subject.

2. Blend the Model into the Environment by Blurring the Foreground

In addition to decorating the picture with the background, the foreground is also a very important form to set off the atmosphere of the scene. The foreground can be blurred by blurring, so as to highlight the main character.

This shooting method is very common when shooting outdoors. For example, you can place the model in the reeds or wildflowers, and blend the model with the environment by blurring the foreground, adding a sense of harmony to the picture.
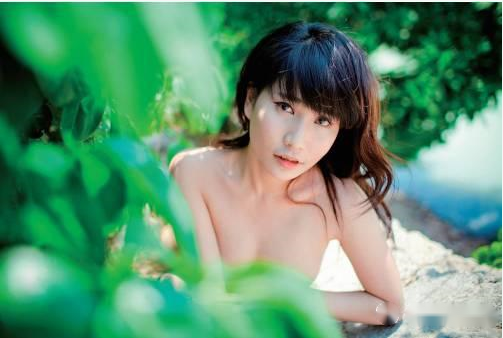
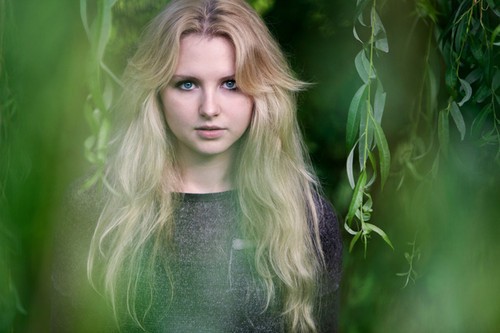
The leaves are blurred because they are closer to the camera, highlighting the beauty in the picture, and the picture is natural and fresh.

Focal Length: 80mm, Aperture: F2.2, Shutter Speed: 1/320s, Sensitivity: ISO100

3. Use the Foreground to Enhance the Sense of Space and Perspective of the Picture

When shooting portraits, you can use the characteristics of large foreground images and deep tones to form a volume contrast or a contrast of color tones with distant scenes to enhance the sense of space in the picture. This is actually a specific application of the principle of perspective in photography. Moreover, it can be inferred from the perspective principle that the greater the difference between the proportion of the area occupied by the foreground and the characters in the picture, the stronger the sense of space in the picture.
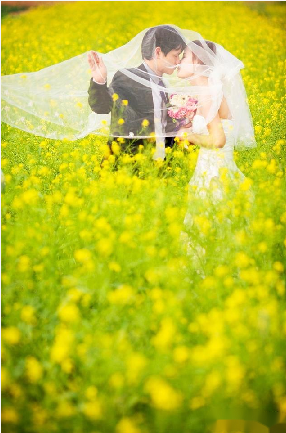
The large canola flower in the foreground echoes the kissing lovers in the foreground, showing good wishes for life.

Focal Length: 135mm, Aperture: F2.8, Shutter Speed: 1/200s, Sensitivity: ISO100

4. Delicate, Delicate Faces are Expressed by Face-to-Face Metering

For shooting portraits, the skin is the part that needs to be highlighted. And to express delicate, smooth skin, metering is a very important job. To be precise, when shooting portraits, you should use center-weighted average metering or spot metering mode to meter the skin of the person.

If it is in a strong light environment in the afternoon, we recommend to find a shadowy place to shoot. If the environmental conditions do not allow it, you can meter the highlight areas of the skin and fill in the shadow areas.

When shooting outdoors, if the light is strong, use the skin of the person as the exposure standard when shooting. And appropriately increase the exposure compensation of half or 2/3 stops. So that the skin can get enough light to appear smooth and delicate. The exposure of other areas does not need to be too scruples. Because compared with other areas, girls are more concerned about their skin.
When shooting outdoors, use the telephoto end to zoom in on the model’s face to fill the frame, then perform metering, lock the exposure. And then recompose the shot to get a portrait with delicate skin.

Focal length: 200mm Aperture: F2.8 Shutter speed: 1/200s Sensitivity: ISO100

5. Increase Exposure Compensation When Shooting Light-colored Images

When there are mostly light colors in the picture, the camera will get inaccurate data based on the metering results. At this time, we should  increase the exposure to increase the brightness of the picture.

When the subject is wearing light-color clothes and shooting in a white environment, you should increase the exposure compensation . So that the picture can truly reproduce the shooting scene and obtain a more accurate exposure effect.
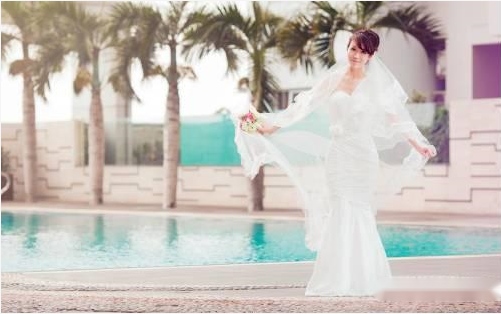
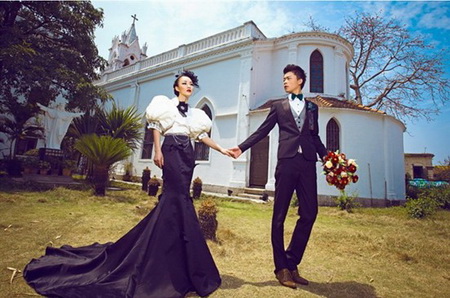
Because the model was wearing a white wedding dress and was in a light-toned environment, exposure compensation was added during the shoot. And this result in a bright, high-key image.

Focal Length: 35mm, Aperture: F2.2, Shutter Speed: 1/640s, Sensitivity: ISO100

6. Decrease Exposure Compensation When Shooting Dark Images

If the subject is in a dark environment and dressed in black clothes, the camera’s own metering system will increase the exposure value accordingly according to its own metering results. This will result in a grayish picture. We should reduce the exposure compensation in order to correctly restore the perception of dark colors. In order to make the girl’s skin fairer, you can use the reflector to fill the face.
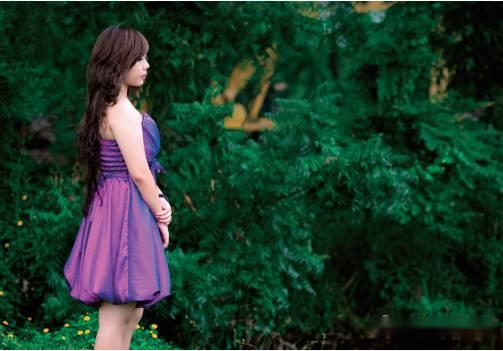
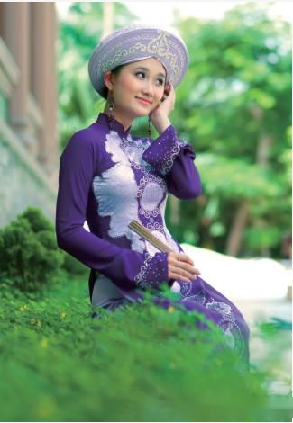
As we reduced the exposure compensation when shooting, the dark green leaves were even more darken. So the girl in purple standing in front of the leaves appeared highlight.

Focal Length: 90mm, Aperture: F2.8, Shutter Speed: 1/200s, Sensitivity: ISO400

7. Use Exposure Compensation to Remove Clutter from the Frame

When the environment in the picture is cluttered and not conducive to highlighting the subject, overexposure can be used to remove the details that are not conducive to expressing the subject.

This method is suitable for environments with relatively large amounts of light. When the subject is brighter and the environment is darker, you can use the method of reducing exposure compensation. In this way, the darker environments in the picture are in the dark, no cluttered details can be seen in the picture. And the characters are properly exposed. Against a darker background, the skin appears fairer.

When shooting in a brighter environment, you can shoot by increasing the exposure compensation. This can cause cluttered details in the environment to be overexposed and lose some detail. While people who would otherwise be darker will have their faces brightened by exposure compensation.

In general, this way of shooting is to ensure that the subject is properly exposed, while ignoring the details of the environment.

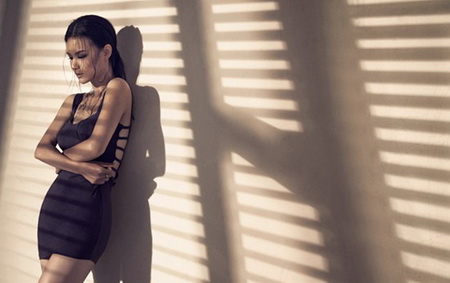
Due to the low light in the shooting environment, photographers need to reduce the exposure compensation when shooting. That darkened the cluttered environment and made the model stand out more in the picture.

Focal length: 50mm Aperture: F1.8 Shutter speed: 1/250s Sensitivity: ISO100
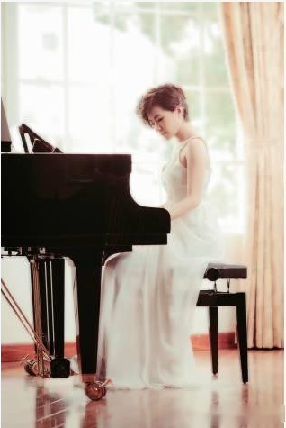
When shooting in a bright environment, in order to make the cluttered background not stand out, the exposure compensation is increased when shooting. So that the background almost expose to be white. The bright picture set off the model’s temperament more elegant.

Focal length: 45mm Aperture: F3.2 Shutter speed: 1/250s Sensitivity: ISO400
Categories
Studio Lights Education

Exposure Compensation EV Value_Part II

Application of Exposure Compensation Function

Set the exposure value according to the light and shade

  1. Since the digital camera can roughly see the brightness of the scene from the LCD screen when shooting. Especially when the shutter is pressed halfway, the picture will show an approximate final image. At this time, pay attention to its picture effect and brightness. If it is obviously brighter or darker, it means that the camera’s automatic metering accuracy has a large deviation, and it is necessary to force exposure compensation. However, sometimes, the brightness displayed when shooting is different from the actual shooting result.
  2. Since the digital camera can browse the picture immediately after shooting, at this time, the brightness of the shot picture can be seen more accurately, and there will be no discrepancy. If the result of the shot is noticeably brighter or darker, take another shot to force exposure compensation.
  3. When performing exposure compensation, if the photo is too dark, increase the EV value. Every 1.0 increase in EV value is equivalent to doubling the amount of light ingested. If the photo is too bright, you need to reduce the EV value. Every 1.0 decrease in EV value is equivalent to doubling the amount of light ingested. The compensation interval can be adjusted in 1/2 or 1/3 units according to different cameras.

     Exposure Compensation Value

    1. The shooting environment is dark, and the brightness needs to be increased. When the flash does not work, you can compensate for the exposure and increase the exposure appropriately. For example, the statue of Jesus in a church shot outdoors through a window is difficult to see clearly with the human eye without any lighting. The photographer added +2.0EV exposure compensation, without flash, the effect is clearer than the naked eye.
    2. When the white object being photographed looks gray or not white enough in the photo, increase the exposure. Simply put, it is “more white and more”. This seems to run counter to the basic principles and habits of exposure, but it is not. This is because the camera’s metering tends to focus on the subject in the center, and the white subject will make the camera mistakenly think that the environment is bright, resulting in underexposure. This is also a common problem that most beginners are prone to. White subjects are easy to cause underexposure, and the exposure should be increased.
    3. When you are shooting in front of a very bright background, such as a sunny window, a backlit scene, etc., increase the exposure or use a flash. When shooting this pavilion in backlight, in order to avoid the darkness inside the pavilion, +1.0EV exposure compensation was added, and the effect was very good.

     Exposure values ​​for different locations

    1. When you are shooting people on the beach, snow, sunny or a white background, increase the exposure and use the flash, otherwise the subject will be dark.
    1. When shooting a snow scene, the background light is reflected strongly by the snow, and the metering deviation of the camera is particularly large. At this time, the exposure should be increased, otherwise the white snow will turn gray.
    2. When shooting black objects, when you see the color change and gray in the photo, you should reduce the exposure to make the black more pure.
    3. When you’re shooting in front of a black background, you also need to lower the exposure a bit to avoid overexposing the subject.
    4. It is necessary to increase the exposure compensation to obtain sufficient exposure for night scene shooting. For night scene shooting, you should turn off the flash, increase the exposure value, and prolong the exposure time of the camera to achieve the effect of brilliant lights. This is especially important for automatic digital cameras that do not have manual adjustment modes. Many people who use digital cameras feel that the ability to shoot night scenes is very poor. In fact, not using the correct exposure method of the camera is one of the important reasons.

    Compensation for flash and exposure

    1. The combination of slow sync flash and exposure compensation. The flash of some old digital cameras may not have a slow sync mode. That is very unfavorable for shooting people in night scenes. But as long as you use its exposure compensation function, you can get satisfactory results. For cameras that already have slow-sync flash, proper exposure compensation can accentuate the brilliant night lights even more.
    2. The environment is still bright when it is cloudy and foggy. However, the illumination of the actual object is obviously insufficient. If exposure compensation is not available, it may result in a dark photo. Appropriate exposure compensation, plus 0.3 to 0.7 can make the scene brightness more natural.
    1. In some artistic photography, such as taking high-key photos, it is necessary to increase the exposure compensation to form a photo with a large contrast. So as to better express the author’s shooting intention. Similarly, at some point, if you need to deliberately reduce the brightness of the photo, you should reduce the exposure compensation.

    The Cifficulty of Using Exposure Compensation—-Stable Overriding Everything

    Exposure compensation in digital cameras is achieved by extending the shutter time or increasing the aperture size. Therefore, after increasing the exposure compensation, pay attention to keeping the camera steady, otherwise the picture will shake and blur.

    The clarity of the LCD screen will affect your judgment. When shooting, we can judge whether the image is bright and clear based on the image condition displayed on the LCD screen. However, the clarity of the camera’s LCD screen is different, the viewing angle is different. And its own brightness settings are different, which will affect your judgment.

    Usually, the picture seen on the LCD screen is brighter and less contrasting than the result of the shot. A photo that looks good on the LCD screen may actually look dim. Be mentally prepared for this. What it looks like is the clearest, you need to practice more and master the characteristics of your camera.

    When shooting conditions are not good, it is best to use a variety of different exposure modes to shoot in order to choose a well-exposed photo in the future. It is worth noting that now, many mid-to-high-end digital cameras have the exposure bracketing function. In this mode, the photographer can automatically use standard, high and low exposure values ​​to take 3 consecutive shots when shooting, and you can choose the best one. This greatly facilitates the shooting, after all, there is no need to shoot multiple times.

    Since the shutter time or aperture size of the camera is little, the adjustment range of 2EV is not always possible. Therefore, exposure compensation is not a panacea. It may still be underexposed in too dark environments. At this time, consider matching the flash or increasing the ISO sensitivity of the camera to improve the brightness of the picture.

    The Importance of Experience

    Practical practice and a solid knowledge of photography are a must for properly adjusting exposure. Before taking more important pictures, make sure that the camera’s exposure compensation settings are correct.

    Good application and reasonable use of exposure compensation can greatly improve the success rate of your photography works. Take pictures with clear picture, suitable brightness, comfortable viewing, and improve shooting quality.

    The solution described in this article is especially suitable for the majority of friends who have low- and medium-grade home digital cameras. Correct use of this function can greatly compensate for the lack of performance of your equipment in metering.

    Different from traditional cameras, the “LCD framing, instant shooting” capability of digital cameras allows you to roughly understand the effect of exposure when framing. Proper adjustments are made in a timely manner to reduce or improve the underexposure or overexposure of the default shot. This will reduce the risk of a failed shot. This process also improves your shooting experience and technique.

Categories
Studio Lights Education

Portrait Photography – Tips for Using Light Quality

The Importance of Light to Photography

The importance of light in photography cannot be overstated. Light is the soul of portrait photography. In our portrait photography, when there is light exposure, the picture will produce light and shade levels, tones, lines and tones.

According to the characteristics of light, light is mainly divided into direct light and scattered light. Different properties of light play different roles in photography. Direct light and diffuse light in natural light correspond to hard light and soft light in studio photography, respectively.

Next, this article mainly introduces the use of light quality in portrait photography.

Direct Light

1. Natural direct light

On a sunny day, the sun shines directly on the subject without any blocking. The side of the subject that receives light will produce bright tones, while the side that does not receive direct light will form a distinct shadow. This light is called direct light. Under direct light, there will be a very obvious brightness contrast between the light-receiving surface and the non-lighting surface. Therefore, it is easy to produce a three-dimensional effect.

The direct light at noon is relatively sufficient, the contrast of the scene is strong, and the tone appears hard. It works best for subjects who are strong and resolute, or subjects with rough skin. Shooting in direct sunlight, due to the strong light, we should use the fill light tool to properly fill the shadows of the characters.

The lighting methods of direct sunlight are mainly side lighting, side backlighting, and backlighting. The fill light tool can use a reflector, electronic flash or external light.

Sunrise and sunset are the best moments for photographers to take portraits. At this time, the direct sunlight is relatively soft, and the picture will form a harmonious and rich tone and tone. In terms of expression, silhouette or semi-silhouette portraits can be expressed.

2. Hard light in the studio (direct light source)

Usually, it refers to the light that can create a contrast between light and dark on the surface of the scene. The biggest feature of hard light is that it can produce clear shadows. The difficulty is to control the contrast between the light and dark of the picture and the light ratio of the picture. However, when shooting with hard light, the easiest way to control the light ratio of the picture is to use a reflector to fill in the light, and use this reflected light to reduce the contrast between the light and dark of the character’s face.

Indoor hard light portraits (direct light)

Hard lights are great for creating light and shadow effects. Light and shadow are important means of rendering the atmosphere of the picture and shaping the mood of the characters. The light in the picture can affect the emotions of the characters. It is not only reflected in the portrayal of the expressions of the characters, but also in the tone, light and shadow and atmosphere of the picture. It is very important to create the right mood of the picture with the light.

When using hard light to express portraits in indoor studios, we can also use auxiliary light sources or reflectors for transition due to the large contrast of hard light sources. We should preserve the details of the dark part as much as possible. And the intensity of the hard light source of the auxiliary fill light must be weaker than that of the main light. Common accessories for hard light sources include standard cover, radome, beam snoot, and condenser cover.

Scattered Light

1. Scattered light under natural light

When clouds or other objects block sunlight, the light can not directly illuminate the subject . Any sunlight that is blocked by clouds, fog or tall buildings will be illuminated in a scattered shape, and the light will have a scattering effect. We call this type of light “scattered light”.

Because the light-receiving surface and shadow surface formed by scattered light are not obvious, and the contrast between light and dark is weak, the resulting picture effect is relatively flat and soft.

Cloudy, foggy, rainy days are all soft diffused light. Due to the flat light, when shooting portraits in natural light, the photographer can also use the flash or reflector for auxiliary lighting to improve the brightness of the subject, improve the light reception, and enhance the three-dimensional effect.

When the outdoor sunlight is too strong, it is not suitable to shoot portraits in strong direct light. At this time, you can look for shade to provide good conditions for shooting. There is not only soft scattered light in the shade, but also mottled shadows can add highlights to the picture. The rich light types under the shade of the trees make the picture very interesting, the scattered light evenly illuminates the model’s face, and the skin texture is perfectly reproduced.

2. Soft light in the studio (scattered light source)

In artificial light, any light with direct light properties is covered with astigmatism material (diffuser cloth, reflective umbrella, gauze, curtain, etc.) to illuminate the subject, which belongs to scattered light lighting.

Under scattered light illumination, the light ratio of the subject is small and the contrast is small. Soft tones and rich layers. It can express the texture of the subject’s skin very delicately.

Sunlight entering through windows is generally classified as scattered light. Its characteristics are: large lighting area, soft and uniform. It can not only reproduce the rich layers and textures, but also better express the three-dimensional effect. Ideal for indoor portraits.

The natural light from the window affects the bright side of the subject. The reflective strength of indoor walls, floors, furniture and other reflective surfaces directly affects the dark side of the subject, that is, the shadow part, which also determines the light ratio of the characters.

Soft light can highlight the texture of the character’s skin, making it whiter and more transparent. We can use all indoor studio soft boxes, soft walls, reflective umbrellas, etc. as light softening devices. We should control the light ratio of the soft light at about 1:2.

Categories
Studio Lights Education

Photography Skills_Part XIII

How ​​to Use Outdoor Natural Light Photography

Top light time:

The sun forms an angle of 60° to 90° with the ground, which is the moment when the sun is on top at noon. At this time, the sunlight is almost vertical, the light is stiff and dry, and the contrast between the light and dark of the scene is great.

Generally speaking, it is not appropriate to take pictures of people at this time. Because the top light is not conducive to the performance of the image. If you shoot landscapes, due to the large contrast, the air perspective effect is not good, the scenery is not moist, and the picture level is not rich. Therefore, people often say that top light is the dead time of photography. However, some people use the strong contrast of the top light to describe the resolute character of the characters, and take a typical portrait photo with a slightly tilted angle.

Skylight photography time:

Before dawn and sunrise and after sunset at dusk, this period is the time for skylight photography. At this time, there is no direct sunlight on the ground, the sky at sunrise or sunset is very bright, and the ground scene is illuminated by sky light. This light condition is not suitable for portraits, landscapes, etc. You can use the brightness contrast between the ground scene and the sky to shoot silhouettes.

Dusk is also a great time to take night shots. Because the sky still has a certain brightness at this time, it can lightly outline the outline of the ground scene. The night scene shot in this way has a more realistic atmosphere. In addition, the sky lighting, the color temperature is high, the color film environment is blue, and the warm-toned lighting can present a cold and warm night scene effect.

How ​​to Use Moonlight Photography

For photographers, the use of moonlight photography is very tempting.

Using moonlight photography, it is best to photograph the scene under the moonlight and the moon together to fully express the scenery of the moonlit night.

To take such pictures, it is very difficult to do with ordinary shooting methods. Because the brightness of the moonlight is very low, it is necessary to expose the moonscape for a long time. And the brightness of the moon and the scenery is very different. So it is impossible to use the same exposure.

In addition, the height and position of the moon can sometimes be difficult to arrange with the terrestrial scene. Barely make do, it is difficult to get a harmonious picture composition. Therefore, when shooting moonscapes, two exposures are generally used. The specific methods are as follows:

Filming angle

First, mount the camera on a tripod and choose a shooting angle. The scene under the moon is carefully arranged in the picture. And the position of the moon is reserved for the first exposure. Then, use the retake device on the camera to set the shutter while the film is still. And let the moon be exposed at the reserved position.

If you want to take a bigger picture of the moon, you can change to a telephoto lens when shooting the moon. This not only solves the contradiction of different exposure time, but also can place the moon in the ideal position. The moon can also be photographed larger. Thereby it reduces the spatial distance between the moon and the scene, giving people an artistic feeling.

If your camera doesn’t have a retake unit (also known as a multiple exposure unit), you can capture the moon and moonlight on two separate pieces of film. Then stacking the two negatives together and zooming in can also make the photo achieve the same effect.

Correct exposure

Correct exposure is important when shooting moonlit night scenes. However, it is difficult to measure the brightness of the scene under the moonlight with a light meter. And only through experiments can obtain a more accurate exposure. Here is a reference data that can be used as a starting point for the experiment. That is, it is set to use GB21° film. And when shooting the scene under the moonlight, use the aperture of f4 and expose for about 100 seconds. When shooting the moon, you can use an aperture of f8 and expose at a shutter speed of 1/250 sec or V125 sec. What is the effect? Give it a try.
When shooting the moonscape with color film, you can choose the light type film, the color of the shot is bluish. That can better render the atmosphere of the moonscape.


How ​​to Take Pictures Under Natural Light in the Factory Floor

The problems encountered in taking pictures in the production workshop are that the brightness of the scene is low and the contrast is high. Second, the production machine vibrates greatly. The third is that the operation of workers is sometimes faster. According to these characteristics, it should be done from the following aspects.

  1. In terms of light usage, although the workshop is illuminated by scattered light, there is no obvious projection. However, from the position of the skylight in the workshop and the bright side of the scene, it is still possible to distinguish the front light and the back light from the dark side. In order to prevent the picture from being dull and dull, it is advisable to use side lighting or side backlighting.
  2. When using side light or side backlight, the lighting on the machine or other light sources can be used as auxiliary lighting. However, the intensity of the auxiliary light cannot exceed the intensity of the original natural light.
    1. In the case of insufficient exposure, a large aperture should be used to obtain a higher shutter speed.
    2. When the aperture is large and the depth of field is small, you can use the top-view angle to shoot. Or increase the shooting distance to increase the clear range of the picture.
    3. If the depth of field is small, focus on the subject in the medium and close-up shots.
    4. When the worker moves too fast, he should take the action as if it is slow or at the moment of pause when changing the action.
    5. If the vibration of the workshop machine is large, it is not appropriate to use a tripod to fix the camera. But try to increase the shutter speed and shoot with a handheld camera.

    How ​​to Use Coating Light

    What is coating light

    When shooting still lifes and flowers in a very dark or completely dark environment, especially when shooting large objects such as machinery and equipment, grotto Buddha statues, etc., apply coating light. This simplifies lighting fixtures and achieves ideal lighting effects.

    The so-called coating light is a light source that only uses artificial light (an ordinary electric lamp, a strong iodine-tungsten lamp, or a candle with a very weak light). And the position of the light source is moved and the lighting angle is changed during the slow exposure process. And use light to coat and illuminate the photographed object.

    How ​​to use coating light correctly

    The operation method and required requirements for coating light are:

    1. Lighting scheme

    Use a light to illuminate the subject and carefully consider the framing angle. Mount the camera on a tripod and fix the shooting position. Then conceive the overall lighting effect (including lighting angle, light ratio, tone, etc.), and determine the lighting scheme.

    2. Experimental Coating Illumination

    Carry out trial lighting and trial coating according to the light usage concept. So as to further determine or correct the light usage plan. At the same time, measure and remember the amount of exposure that should be given to each part of the subject.

    3. Use the shutter release

    Open the camera B door with the release cable and lock it. Appropriately close the aperture to lengthen the entire exposure process time. So that the coating light can be easily carried out.

    Since the bulb is opened for exposure, the illumination time of the light source at a certain position is the exposure time. Therefore, whether the exposure amount is more or less, and the light ratio is large or small, it is all about mastering the long or short lighting time.

    4. Control the brightness and darkness of the background

    The subject is in a dark space and can be shot with a black background. If the subject is in front of a white wall or lined with white paper, after coating the subject with light, and then specifically lighting the white wall or white paper, you can shoot with a white background. According to this, according to the depth of the color of the subject itself, combined with the corresponding background, it can be shot into a low-key effect dominated by black or a high-key effect dominated by white.

    5. Eliminate shadows

    When applying light, if there is a bad projection on the background, or if the concave part of the subject itself is required to show obvious internal details, it can be specially coated with fill light to eliminate the projection. Or make the concave part have proper lighting.

    6. Avoid direct exposure to the lens

    When the position of the light source is changed by applying the coating light, the light can be temporarily extinguished according to the specific situation, or the light source can be coated while moving the light source. But in any case, you must pay attention at all times. And you must not let the light hit the lens directly, otherwise it will fall short.

Categories
Studio Lights Education

Photography Skills_Part XI

How ​​to Use Reflector for Photography

The role of the reflector

Reflectors are one of our most useful photographic aids, both economically and practically. It is convenient to manufacture, low cost and flexible to use.

The reflector reflects the “lost” light onto the subject. So that the light quantity of one lamp can play the role of two to three lamps. It also reveals layers and details in subjects, softening strong light. The general light technology can not play this role. Whether you’re shooting at home, in a studio, or anywhere else, and whether it’s illuminated by natural light, tungsten, or flash, reflectors serve the same purpose.

Select the reflector correctly

The reflector can be flexibly controlled in size, as large as a wall, and as small as a palm. We can make it according to the needs of the subject size. When taking color photos, it is generally necessary to use a reflector with a neutral surface (white, dust, or silver) to ensure that the light reflected by the reflector has the same color quality as the original light source. Gold and other brightly colored reflectors are only used where special effects are required.

When taking black and white photos, any type of reflector can be used, and black materials can also be used as a kind of “anti-reflector” that absorbs light to prevent unwanted and uncontrollable reflections.

In fact, there is no one-size-fits-all reflector. We should choose reflectors of different sizes and colors according to different themes. Therefore, after deciding on the subject of shooting and the use of reflectors, when selecting reflectors, you need to pay attention to the surface, size, color quality and weight of reflectors, as well as coordination with other cameras.

Of course, there is a wide range of reflectors to choose from, from professional large, folding reflectors with brackets, down to homemade ones, and even a blank sheet of paper.

Material and color of reflector

White reflectors are generally made of paper, cardboard or polystyrene. This matt reflector diffuses light beams, resulting in a very soft and even lighting effect. But that means a lot of light is wasted.

To create an effective illumination intensity, we need to place a white reflector near the subject. When fine, low-intensity reflectors are a must, the reflector surface is preferably gray. Matte silver reflectors are available from silver-coated paper, cardboard, fiber cloth and sheet metal.

You can also make homemade reflectors from cigarette-packed tinfoil, crumple it first and then evenly attach it to the support. The light reflected off the matte silver reflector surface is semi-diffuse. Compared with the white reflector, the light intensity reflected by the silver reflector is larger and the reflection angle is narrower.

A mirror with a flat surface reflects light close to the quality of the main light source. Unlike white or matt silver reflectors, we can use it to reflect light from a mirror when shooting still lifes for a tightly controlled lighting effect.

How ​​to use the reflector

There are two ways to use reflectors: passive and active. The passive type is what we use most common. We mainly place it opposite or close to the main light source in order to reflect the lost light onto the subject. This kind of reflection usually acts as a “fill light” for the shadow part of the subject. Since the reflector is auxiliary, it can use multiple pieces for auxiliary shooting.

In portraiture and still life photography, especially with glass or metal utensils, subtle light changes are necessary. To create the atmosphere, it is necessary to use multi-faceted reflectors at different angles and textures.

In short, the reflector has the advantage of observing and predicting the effect at any time compared with the flash as a supplementary light device. The disadvantage is that the reflective intensity is relatively small, and it is not easy to carry.

How ​​to Flexibly Adjust the Light Position

The light position is the position of the light source. It is related to the formation of different light and shadow effects such as forward light, side light, backlight or flat light, high-level light, and low-level light in photography. Therefore, the photographer always pays attention to the light position before shooting, and considers the shooting position according to the projection direction of the light, so as to obtain the ideal light and shadow effect. This is the choice of light angle we often say in photography.

Ideal light and shadow effect

What is the ideal lighting effect? In general, it should help to express the content of the picture, especially the main body of the picture, well or even beautifully. That is, the main subject or the main part of the frame. Otherwise, people will regard it as poor light and shadow effect and improper use of light.

Therefore, photography experts, photography books or related photography articles often warn that “top light and foot light should not be used when shooting portraits”, “the light and shadow of front-light photography are too dull”, “side-lighting, semi-light and semi-darkness, and mechanical equivalent ugly again.” However, the location of the light source is sometimes immutable, such as in scene light photography, where the inherent lighting of the scene cannot be arbitrarily arranged or moved by the photographer. Especially in natural light photography, the light source – the position of the sun will  not change by people’s will. What can we do to avoid top light in these situations. How to achieve good light and shadow effects with poor light angles such as smooth light?

How ​​to get a good light and shadow effect

In fact, from the perspective of photography light, the formation of light level is directly related to the object level (where the subject or scene is located) and the camera position (where the camera is located). Therefore, even in natural light photography, in many cases, the poor light and shadow effects caused by the angle of light projection can be turned into excellent effects by cleverly using the relationship between the light level, the material level, and the camera position.

1. Forward light

Under the condition of forward light, the subject, object, and scene are exposed to light in a large area. That lacks the necessary contrast between light and shadow, so the color palette is flat. The performance of close-up characters, especially snow scenes, must be poor. If the subject is the center, and the shooting position is shifted to the left or right by 45°, a harmonious contrast of light and dark and a beautiful front side light effect can be formed. If you turn around to shoot the snow scene from the forward light angle, and form a backlight or side backlight, the tonal levels of the snow scene will appear pleasing and rich.

2. Noon Sun

When shooting portraits or close-ups in the midday sun, due to the top light, the light and shadow effects on the face are unsightly – the forehead is white and bright, the eye sockets are deep, the cheekbones are prominent, and the nose is dark. However, most midday sunlight does not hit the ground at 90°, and is always slightly skewed. Therefore, you can use the skew angle of the top light to make the subject backlight. And the face is completely on the dark side, forming a high backlight. Or no matter whether the top light hangs down or not, make the subject look up (to form the front side light) or slightly lower his head (to form the backlight) to shoot, so as to avoid bad light and shadow effects.

3. Dawn and evening

An hour or so after sunrise or before sunset, the sun angle is not high. If the subject is at a side-light angle at this time, the face must be half-bright and half-dark. And the contrast between light and shadow is large, making it an unsightly face. Therefore, it is not appropriate to shoot from the front, but from the side. Or choose a slightly condescending viewing angle. Of course, you can also change the subject slightly to face the sun or shoot obliquely.

(To Be Continued)

Categories
Studio Lights Education

Photography Skills_Part X

How ​​to Do Bounce Flash Photography

Bounce flash photography has many advantages, especially for portraits, still lifes. It reduces contrast and avoids noticeable shadows caused by direct flash. However, if it is used improperly, it will cause bad results. Therefore, mastering bounce flash requires certain essentials.

1. Location

The photographer is standing not too close to the model. Because of the angle at which the light is reflected downwards from the ceiling, the model’s face cannot be illuminated, or only extremely weak light can be illuminated, and unsightly shadows are created under the model’s eyes and nose.

2. The angle of the flash

Adjust the angle of the flash to prevent the subject or the part of the background close to the subject from being directly illuminated by the flash. The pictures taken this way are very ugly.

3. Use wall reflection

In a smaller room, the flash from the flash only works well against the wall. But the wall must also be very white, otherwise, the reflected light will have different degrees of color. This way you can get more light and a wider variety of lighting angles than bouncing a flash from the ceiling.

4. Two reflections

If the ceiling is too high, or the ceiling is not flat but decorative, you can only use the surrounding walls. In many cases, you can use a white wall  as a reflective surface. If the room is large, you can use a high-power flash to do more than two reflections to make the light more uniform and illuminate a larger area.

5. Self-made reflective surface

If the wall or ceiling chosen as the reflective surface is not white but some other color, that color will appear in the photo. Therefore, it is best to set up a reflective surface yourself. You can fix or place a piece of ordinary white cardboard on top of the flash and adjust to the  position you desire for reflected light.

6. Close reflective surface

When it is close to the subject, using one or several white cardboards as reflective surfaces in the reflected light can obtain excellent light effects.

7. Reflective umbrella

As another lighting method in portrait photography, many people are increasingly using white or silver reflective umbrellas for reflected light. Photographers also make extensive use of umbrellas when shooting still lifes.

No matter what kind of reflected light, there are strict requirements on exposure. It would be better if there is a meter that can measure the flash. If not, take a few more photos with different exposures to gain more experience.

How ​​to Use Flash Fill Light Photography

When we shoot backlit images outdoors, if you don’t use a reflector to fill in the light, or expose from the dark part of the backlight, the effect will be poor due to overexposure of the highlights. This is especially true for backlit portraits. The degree of ideality in terms of layers, particles, etc. is also unsatisfactory.

So the best way is to fill in the shadows. The reflector fill light is more troublesome, and the flash fill light has more relative advantages. The flash is small in size, uniform in light output, and standard in color temperature.

Here are a few good ways to use flash to fill in light.

1. Non-automatic flash fill light method

Set the camera shutter speed to a level that is synchronized with the flash. If the camera has an automatic exposure function, set the exposure mode to manual. Then measure the aperture value of the sunlight part of the subject and adjust it on the lens.

At the same time, divide the guide number of the flash by the distance from the subject to the camera and flash to get the F-number. If the F value is basically equal to or greater than the F value of the light-receiving part by one step, the F value of the light-receiving part can be reduced by one step or half.

If it is two stops larger than the light-receiving part, it is not necessary to reduce the aperture. If the F value of the light-receiving part is manually measured to be 8, the flash guide number is 32, and the distance is 4 meters, the division result is 8, which is equal to the measured value. This will inevitably dilute the fill light and lose the backlight effect. You should reduce the F value  to less than 8. If  increase the distance to 6 meters, the calculated F value is 5.6, which is greater than the F8 of the light-receiving part. And you can reduce it by half or not. If the flash light is on and it is inconvenient to reduce the F value, you can cover the flash head with a layer or two of gauze to reduce the brightness.

2. Using F-number metering

Divide the guide number by the object distance to get the F-number, reduce the F-number by a stop or two and set it on the lens. Then manually on the camera, use the above setting F value metering, also measure the light value of the bright part. If the speed displays on or below the X sync speed file, you can shoot.

3. Automatic flash fill light method

First measure the F value of the light-receiving part and adjust it on the lens. Set the flash to manual mode. If the F value of the flash guide divided by the object distance is equal to or greater than the F value of the light-receiving part by one step, you can use 1/2 step of the “brightness ratio output” of the flash to fill in the light. If it is two steps larger than the light-receiving part, it is not necessary to reduce the amount of light.

4. Correct use of aperture stops

Generally, the automatic flash has two aperture files. And within the given distance range of the two apertures, the flash automatically outputs light to meet the exposure. For example, F4 is 1 meter to 7.5 meters, and F8 is 0.5 meters to 3.5 meters. That is to say, when the camera is set to F4 or F8, within a distance of 1m to 7.5m or 0.5m to 9.5m, the flash can automatically adjust the output brightness to ensure the correct exposure of the film.

When using the flash with automatic function to fill in the backlight, after setting the distance to use the aperture, reduce the aperture by one stop to shoot. If you decide to shoot within the automatic range of F3. That is, within 1 meter to 7.5 meters, set the F4 file on the flash. Then, stop down by one stop and set the lens aperture ring at 5.6. In this way, the flash automatically outputs the light of F4, while the camera exposes at 5.6. Of course, when using the automatic flash to fill in the light in the sun, you should also measure the light value of the light-receiving part in advance to decide which automatic gear of the automatic flash to use.

(To Be Continued)

Categories
Studio Lights Education

Photography Skills_Part IX

How ​​to Determine the Correct Exposure for Flash Photography Based on the Exposure Index of the Flash

Determination of Exposure Index

Both the flash bulb and the electronic flash have a specified sensitivity index. The exposure index, GN24 or GN32, etc. are printed on the product manuals of all kinds of small and medium-sized electronic flashes.

The GN exposure index is determined by the sensitivity of the photosensitive film (usually with ASAI00 as the standard), the exposure distance of the flash and the F value of the aperture. For example, some electronic flashes are marked with GN32, which means that using ASA100 photosensitive film, in the case of aperture Fl, shooting the scene at a distance of 32 meters can get accurate exposure. Conversely, when taking pictures with an aperture of F32, the subject should be placed 1 meter away.

Calculation of Exposure Index

The formula for calculating exposure index is as follows:

Exposure Index = Aperture × Flash Distance

Here we can regard the exposure index as a fixed value. When the aperture is enlarged or reduced, the photographic distance (that is, the flash distance) will be adjusted accordingly. Conversely, when the shooting distance changes, the aperture must also be adjusted accordingly.

In this way, the following calculation formula can be obtained:

Aperture = Exposure Index ÷ Distance

Distance = Exposure Index ÷ Aperture

For example, if the flash guide number is GN24 and the known shooting distance is 3 meters, the aperture=24÷3=F8 can be calculated according to the formula.

However, it must be noted that the index of some products is calculated in feet, so it should be converted into feet as the calculation standard to avoid errors.

The f-factor table is usually engraved on the back of the lampshade of the electronic flash or on the lamp handle. According to the distance between the flash and the subject, it is easy to find out the f-factor that should be used. This kind of photosensitive table is generally formulated according to the photosensitive film of ASAI00. If you switch to a faster or slower photosensitive film, you must narrow or open the aperture accordingly.

How to Eliminate the dark Shadows Appearing Behind Flash Photography Portraits

Shooting portraits indoors, if you shoot from the front, a black shadow will appear on the wall behind the subject, etc. In fact, this shadow is the projection of the subject himself. The closer the person is to the background, the more pronounced the shadow will be. This kind of dark shadow is thick and deep, very stiff, often destroys the harmony of the picture, and is generally not welcomed by people.

The easiest way to get rid of shadows is to keep the characters away from the background. Make the shadow cast to the ground, preventing the shadow from clinging to the back of the character. If the environment does not allow this, try to choose a dark background so that the shadow cannot be seen.

You can also use split lights to illuminate the background from the side to eliminate shadows. In daytime photography, the position of the characters can be arranged in front of the open doors and windows, and the shadows will not appear. However, the outdoor brightness must be estimated at the same time when exposing.

How ​​to Do Multiple Flash Photography

Many photography enthusiasts face interesting subjects, such as tunnels, caves or very long walls, etc., and want to shoot, but the light is too dark. Or a long wall, shooting at night, the effect is peculiar, but it is not easy to solve the lighting problem. With a flash, it is impossible to light up such a large area. As a result, he is often at the mercy of the Yuan policy, and has no choice but to look at the ocean and sigh.

Use the flash correctly

So is there no way? Of course not! How can a flash light evenly illuminate a large area? That is to use the flash for multiple flash shooting. That is, use the flash as a “brush” and use it to paint on the subject.

Implementing this lighting scheme does not require special techniques, nor does it require special fixtures and equipment. Rather, it requires careful design. In order to make all parts of the scene illuminated evenly, the distance from the lamp to the object should be roughly equal for each flash, and the number of flashes and the position of the lamp should also be planned in advance, and there should be no blanks in the photo that are not illuminated by the light.

Use the shutter correctly

Since the flash is moving, and possibly quite a distance from the camera, synchronizing with the camera via the pulse line is impossible. At this point we have to take a rather slow shutter. This means that you need to open the camera’s B door or T door multiple times. And it also means that you have to use a tripod.

If your camera doesn’t have a multiple exposure mechanism, you can’t use the B or T repeatedly. You can only keep the B or T open from beginning to end. Between each flash, you can block the head lens with something like card paper, lens caps, or the like.

Correct exposure

The range of flash illumination is proportional to the distance from the flash to the subject and inversely proportional to the exposure.

The calculation of exposure is quite simple. Just remove the guide number of the flash from the distance from the lamp to the object as usual. Of course, there is another difference from the indoor flash. There is no doping on the four walls, and it is in complete darkness. Therefore, the actual exposure should be opened with a larger aperture. And there are also several flashes at the same position.

This is often the case with adding color chips to the lights. When it comes to overtones, it produces beautiful, colorful images that are much prettier than photos without overtones. As mentioned above, just add a little more exposure. Of course, the arrangement of the color blocks should be suitable for the creative intention and should not be self-defeating.

(To Be Continued)

Categories
Studio Lights Education

Photography Skills_Part VIII

How ​​to Use AF Focusing Method to Take Pictures

Autofocus single-lens reflex camera (AF) is attracting a large number of photographers with its unique functions, and it is a “threat” to traditional cameras. The AF method can also be divided into one-shot AF follow-up method and continuous AF follow-up method.

One shot AF follow-up mode

The one-shot AF follow-up method is a method commonly used by various AF SLR cameras. The working process of this autofocus method is: when the shutter button is pressed halfway, the servo motor drives the lens to focus. After the focus is accurate, the motor stops working. The locking mechanism locks the focal length.

If you do not continue to press the shutter at this time, it will remain in this state. This allows you to adjust the composition. This is its advantage. But tracking the moving body is not suitable at this time.

The main feature of this one-shot AF follow-up method is that every time the shutter button is pressed halfway, the AF system can only perform a focusing action based on the target of the central AF area of ​​the viewfinder. And in this way, the shutter cannot be opened until the focus is in focus. It is suitable for shooting general portraits, still lifes or slow-motion subjects.

Continuous AF follow-up mode

Corresponding to the “one shot AF method” is the continuous AF method. The working state of the AF method is that when the shutter button is pressed halfway, the autofocus system can maintain continuous action and adjust the focus following the subject.

In this way, the photographer can freely track an uncertain target with the focus area in the center of the viewfinder. And it can meet the requirements of quickly shifting the focus point beyond the original tracking focus. The biggest feature of this AF method is that as long as the shutter button is pressed halfway, the autofocus system will automatically track the subject and focus until the shutter is fully pressed. It is most suitable for news, animals, sports and other subjects.

Some models of cameras have both AF methods. Most AF cameras have manual focus in addition to auto focus. This manual focusing method is roughly similar to that of a traditional SLR camera. Manual operation can be selected by switching the focus method. At this time, the AF system will automatically disengage. The lens enters manual focus.

AF and manual focus

These AF lenses are equipped with a manual focus ring at the front, but they are narrow and have a poor feel. The reason for this is to allow AF lenses to be used on older non-autofocus cameras. The second is that the focusing ring cannot be made into the damping amount that the traditional lens has. Otherwise, the servo motor of the AF system will not move the lens group.

In the viewfinder of the AF camera, the split image and the micro-prism ring in the traditional camera are cancelled, so the full-view fine-grained focusing screen cannot be used to focus when manually adjusting the focus. Some cameras are equipped with a manual focus assist function. That is to use the automatic ranging function in the camera and the LFD display focus system in the viewfinder to complete manual focusing.

How ​​to Correct Color Temperature

The effect of color temperature on photography

Color negative film and color reversal film are divided into daylight type and light type. Since they all have strict rated color temperature requirements, during shooting, the color temperature will vary greatly due to changes in the lighting source.

If there is a big gap with the color temperature required by color film, it will cause color cast. In addition, it is possible to use light-type color film in daylight or use daylight-type color film in light, where color temperature balance is a practical issue.

Color film cannot be fixed under a specific light source condition, especially color reversal film, which has stricter requirements on color temperature. Its allowable error range cannot exceed 100~200K at most. In this case, it is necessary to adjust the color temperature of the light source by means of a color temperature correction filter. Such filters for color photography are called “color temperature compensation filters” or “color temperature conversion filters”.

How ​​to correct color temperature

There are two types of color temperature correction filters: one is a blue filter that can increase the color temperature, and the other is an orange filter that can decrease the color temperature.

In the practice of color photography, if we use light-type color film in daylight, a Ryden 85 filter must be used to reduce the color temperature. When using daylight-type color film in the light, it is necessary to use a Ryden 80 filter to increase the color temperature. This allows the color temperature of the light source to be even with the color temperature of the film in use.

Although the color temperature correction filter has the function of converting the color temperature, if it encounters the mixed light of two or more light sources, no matter which filter it is, it will not help. Therefore, when conditions permit, in the shooting process, in addition to the intentional pursuit of a special effect, we should select a light source with a uniform color temperature  as much as possible. Otherwise, the shot will be either partially reddish or partially bluish, or there will be two serious color casts in one shot.

How ​​to Master the Change of Color Temperature in Caiyi Photography

In color photography, in order to obtain correct color reproduction, it is first important to note that the color temperature of the light source must match the color temperature balanced by the color film.

For shooting outdoors in natural light, daylight-type color film should be used. When shooting under incandescent light such as iodine tungsten lamps or tungsten lamps for photography, light-type color film should be used. However, the color temperature of outdoor natural light varies with time and climate, and is far less stable than incandescent light. When shooting, be aware of this color temperature change.

change in color temperature

In general, on sunny days, after sunrise and before sunset, the color temperature of direct sunlight is lower. Near noon, the color temperature gradually increases. The balanced color temperature of daylight-type color film is 5500K, which is the color temperature of direct sunlight at noon. This color temperature is generally relatively stable between three hours after sunrise and three hours before sunset.

In fact, outdoor natural light is a combination of direct sunlight and diffuse sky light. The color temperature of pure sunlight at noon is only about 5000K, and the color temperature of diffuse light in the sky is about 12000-18000K. According to the brightness ratio of these two light sources, the combined color temperature is 5500K. In the weather with thin clouds covering the sun, thin clouds cover the direct sunlight partially, and the color temperature is higher than that of sunny days, about 6500K ~ 7000K. The light on a cloudy day is all diffuse light from the clouds, and the color temperature is about 7000K to 7500K.

As for the color temperature of the light. It mainly depends on the type of lamp, but it is relatively stable. However, fluctuations in the supply voltage can also change the color temperature of the light. For example, as the voltage rises at night, the color temperature rises accordingly.

How ​​to Balance the Light Source in Shooting

We take most photos with a single light source – such as sunlight, light or flash – as lighting. It’s just that when we mix two light sources together, whether this situation is unavoidable or we arrange deliberately , the two light sources must be even. Otherwise it will make things complicated.

Mixed use of daylight and flash light sources

We use flash in daylight, first because of the lack of light. And secondly to reduce the shadows cast by the sun. No matter what the reason is, because the design color temperature of electronic flash is very close to the color temperature of sunlight (except early and night), both are around 5600K. So when we use sunlight and flash together, there is no need to consider the color temperature, that is to say , there is nothing particularly noteworthy in terms of light source balance.

Tungsten light mixed with flash

This is a problem we frequently encounter. When shooting static objects, the light in the room is generally sufficient. When shooting with color reversal film, it is best to use type B (light) film. Because the design color temperature of electronic flash is 5600K, while the color temperature of general photography tungsten filament lamp is 3200K. If we use them at the same time, the color temperature will not be uniform. And the color will not be balanced. There is no single color that we can apply to both light sources of different colors. Therefore, we generally do not mix tungsten and flash. Either use all tungsten, or flash, bounce or direct.

Outdoor sunlight mixed with other light sources

Similar to the problem that arises above. In black-and-white photography, the sunlight projecting from the outside into the room can work as the main light. And the indoor light can work as the auxiliary light. Color temperature doesn’t have much of an effect on black and white photos. But not color films, nor can any color filter. If you must do this, increase the color temperature of the indoor lighting and use it in conjunction with the outdoor sunlight. Even with a flash, you can add a color temperature conversion filter on the lamp head to suit the color temperature requirements of the film.

How ​​to Master the Law of Light Changes in Photography

The effect of latitude and longitude on light

To correctly grasp the exposure of photography, the correct exposure is to grasp the law of light changes. We usually divide the light sources for photography into two categories: natural light and artificial light.

Natural light mainly refers to sunlight, we can divide which into direct light, projected light and reflected light according to the characteristics of sunlight exposure. Direct light is the light that comes directly from the sun. A cast light is a cast light on an overcast or cloudy day or in the shadow of the sun. Reflected light is the light that is reflected back when light hits an object.

Due to different geographical latitudes, different altitudes, different seasons, different times, different weather, and different indoor and outdoor, the brightness of the light is also different. Generally speaking, the southern latitude is low, the light is strong. And the northern latitude is high, the light is weak. For every 10° or so difference in latitude, the aperture should differ by half a stop to one degree.

The higher the altitude, the cleaner the atmosphere, the less sunlight is absorbed, and the stronger the illuminance. Therefore, for alpine photography, less exposure is a must. Generally speaking, at an altitude of 1000 meters, the aperture should be reduced by 1/4 stop. At 2000 meters above sea level, we should reduce the aperture by 1/3 stop.

The effect of season and time on light

Different seasons have a great impact on light. The light is strongest in summer and the weakest in winter, with spring and autumn in between. The light in summer is about 1-2 times stronger than that in spring and autumn, and about 3-4 times stronger than that in winter. For example, shoot at 1/250 second in summer, 1/125 second in spring and autumn, and only 1/60 second in winter.

The time is different, and the light changes greatly. The light is strong at noon, and the light changes the most in the morning and evening. The difference between the strongest and weakest sunlight in a day is about 5 stops in summer. And 4 stops in spring, autumn and winter. Weather changes have the greatest impact on light, and we generally divide them into four categories. Clear weather, strong sunlight, maximum light. Thin clouds cover the sun, and the projection of objects is not obvious, followed by light. The sky is cloudy, objects have no shadows, and lighting is second. Thick clouds, dark scenery, and the worst light.

For the above four categories, the exposure of each category differs by one time. For example, use 1/200 of a second on a sunny day, 1/100 of a second on a thin cloudy day, 1/60 of a second on a cloudy day, and 1/30 of a second on a rainy day.

The effect of reflectivity on light

In addition, the degree of reflection of the subject also affects the exposure speed. For example, white objects have strong reflections, and dark objects have weak reflections. Smooth and smooth objects have strong reflections, while rough and dark objects have weak reflections. Rivers, lakes and seas have strong reflections, while forests and grasses have weak reflections. The reflection of distant objects is strong, and the reflection of close objects is weak. In these different brightness situations, the exposure is often one to three or four stops off.

There is also a big difference between direct outdoor light and indoor scattered light. Indoor natural light shoots in through doors and windows, so the brightness varies greatly from distance to doors and windows. The degree of reflection on the interior walls also has a great impact. Generally speaking, the distance between the light source and the subject increases by one, and the light sensitivity increases by four times.

Indoor photography generally uses lighting. Lights include flash, tungsten, iodine tungsten, bromine tungsten and LED lights. To suit your shooting needs, set the artificial light source. There are single-light photography, dual-light photography, three-light photography, etc. The most used is the flash.

(To Be Continued)

Categories
Studio Lights Education

Photography Skills_Part VII

How ​​to Properly Handle the Background

When the main body of the picture does not fill the picture, there is usually a background. The background of the picture can be a blank (expressed as a single tone such as white, gray, black), or it can be a variety of tangible images such as people, objects, and scenes.

The background is the same as the foreground and other companions, and its primary function should be to help highlight the main body of the picture. Under this premise, in order to make the picture modeling have an artistic specific effect, the processing of the background can be changed according to the needs:

1. Clean up the background

– Shoot close-ups of people, still lifes, flowers, etc. against the sky, white wall or white cloth to form a white background. Black, grey or any other monochrome background can also be used. There is no other tangible image in the background part, just a single empty tone, which is a purified background. The post-processing negatives are painted red and background bleached, also to clean up the background.

2. Lighten the background

——The people, objects and scenes in the background are rendered in light tones. This effect can be achieved by means of air perspective, or by blocking exposure when enlarging the photo, so that the background image is underexposed and faded. If you use a white or light-colored veil to cover the accompanying body when shooting close-ups of portraits, still lifes, and flowers, you can also achieve the effect of diluting the background.

3. Darken the background

——The people, objects and scenes in the background appear dark and heavy tones. The solution is to make the main body of the picture well-lit (in the bright places), and the background lighting is insufficient (in the dark places). Mask exposure can also be implemented when enlarging a photo, overexposing and darkening the background image.

4. Blur the background

——By controlling the depth of field, people, objects and scenes in the background can be blurred. You can also implement occlusion stacking when zooming in on the photo, so that the projection focus of the background image is unrealistic and blurred.

5. Beautify the background

——Choose a patterned or rhythmic scene as the background. For example, use the steps or the stands of the stadium to set off the close-up of the characters, use the sparkling light to set off a light boat, or use the neatly stacked products to set off the portrayal of the image of the worker. You can also use the projection of a flower or just a beam of light to beautify the background. The virtual light magnifies the virtual light effect of the photo, which is also a beautifying background.

How ​​to Express the Three-Dimensional Effect of the Scene in Photography

Photography is a kind of graphic art, which only expresses two dimensions of length and width, and it is easy to form a rigid picture. To make the picture lively, we must use photography skills to make the three-dimensional image of the scene appear on the picture.

Commonly used methods are:

1. Adjust the shooting position to express the three-dimensional effect of the scene.

When shooting from the front, the depth of the scene cannot be seen, and the three-dimensional effect is not strong. When shooting from the side, it can express the front and both sides of the scene, and the three-dimensional effect is strong.

2. Adjust the shooting distance to express the three-dimensional effect of the scene.

When the shooting distance is short, the contrast between the far and small objects on the screen is strong, and the three-dimensional sense of space is strong. When the shooting distance is long, the contrast between the size of the front and rear scenes is weak, and the three-dimensional sense of space will be weakened.

3. Adjust the shooting angle to show a three-dimensional effect.

When shooting at a high angle, the lens captures a wide range and includes many scenes on the screen. The close-up view is larger, and the distant view is smaller, so that the three-dimensional effect of the picture is enhanced. When shooting at a low angle, the foreground is tall and prominent, the background is relatively reduced or covered, the contrast is not significant, and the stereoscopic effect will also be weakened.

4. Adjust the tone contrast to show the three-dimensional effect.

When the tone lacks change, it feels flat. If the tone contrast is large, the three-dimensional effect is prominent. When the subject is bright and the background is dark, the three-dimensional effect is strong. If the subject is dark and the background is bright, it will also increase the three-dimensional effect.

When using forward light illumination, the subject gets equal illumination and lacks stereoscopic effect. When illuminated by backlight or side light, sharp contour lines will appear, and the three-dimensional effect will be enhanced.

5. Adjust the aperture size to express the sense of subjectivity.

When the aperture is small, the depth of field is large, so that the scenes of different distances are very clear, and the photos lack three-dimensional effect. If the aperture is properly opened and the depth of field is controlled, the outline and details of the subject are clear, and the background is blurred, which helps to express the three-dimensional effect of the scene.

6. Adjust the focal length of the lens to express the three-dimensional effect of the scene.

When using a short focal length lens, the picture includes both the foreground and the broad background, forming a strong image size contrast, and the three-dimensional effect will be strong. When using a long focal length lens, the distance between the front and back scenes is compressed, and the picture cannot form a strong contrast, and the stereoscopic effect will be lost.

7. Use different filters to express the three-dimensional effect of the scene.

Different filters can enhance or weaken the perspective effect. For example, the blue filter can speed up the sense of perspective and help to form a three-dimensional effect. Using a yellow filter on a foggy day and a cyan filter on a sunny day can subtly thin the film, make some tones stand out, and weaken some tones, thereby enhancing the perspective effect and three-dimensional effect of the photographic scene.

How ​​to Get a Larger Depth of Field

What is Depth of Field

First, let’s briefly explain what depth of field is. When we pick up the camera to focus, we will find that in the viewfinder not only the scene we use to focus on is clear, but also the scene within a certain distance in front of and behind that scene.

The distance between the scene that can be clearly imaged and is closest to the camera to the scene that can be clearly imaged and that is farthest from the camera is called the depth of field. In other words, the depth of field is the clear range of the depth of the scene.

For the same camera, the depth of field range is determined by the aperture and shooting distance. The larger the aperture and the shorter the shooting distance, the smaller the depth of field. The smaller the aperture, the longer the shooting distance, the larger the depth of field. When the aperture is adjusted from large to small and the shooting distance is changed from near to far, the range of depth of field increases accordingly.

How ​​to get a larger depth of field

If we set the distance ruler at ten meters and the aperture at 8, we can make the scene from five meters in front of the camera to infinity clear. At this time, as long as the main scene (person) you want to shoot is within this range, you can take a picture clearly, not necessarily at a distance of ten meters.

If you want to get a wider range of sharpness, making things clear to infinity at a distance within five meters, you can continue to stop down the aperture, such as 11, 16 or even 22.

Or you can also apply the following method:

First set the distance ruler at infinity. Then you can see that the aperture corresponding to a distance of four meters is 22, then you set the aperture at 22. Then you set the distance ruler at four meters. And you can see from the depth of field table that everything from 2.6 meters to infinity is within the depth of field.

For the convenience of beginners, some cameras have a red dot on the three scale positions of aperture, distance and speed. The red dot is marked in the middle of aperture 8 and 11, between seven meters and ten meters, and the speed is 1/100 of a second. . Putting all three on the red dot when the weather is fine, you can get a clear range from about five meters to infinity.

Obtain a large depth of field range, which is convenient for concentrating and capturing wonderful shots when shooting active scenes.

How ​​to Focus on Moving Objects

In sports games, snapshots and other dynamic photography, the subject is in constant motion changes. This brings difficulties to the photographer to focus accurately. Can you find some shortcuts? The answer is yes.

Hyperfocal distance method: adjust the focus ring of the lens to the hyperfocal distance to take pictures. This method produces very satisfactory results when using short focal length lenses.

Predetermined reference object method: Focus the lens on the area that the moving object will pass through. That can be divided into predetermined depth of field method, area focusing method and predetermined target method.

  1. Predetermined depth of field method:

This method is suitable for moving body photography where the movement speed is not too fast. First choose the aperture and shutter speed according to the scene light. Use as small an aperture as possible to ensure adequate depth of field. The lens is adjusted to a pre-selected distance. And when the subject enters the depth of field, it will be captured immediately.

  1. Area focusing method:

Press the area where the body moves to focus. To get enough depth of field, it is best to take pictures with a small aperture at a distance of 5 meters from the subject. This method can be used for moving bodies with limited range of motion. Such as stage performances, balance beams in sports competitions, etc.

  1. Predetermined target method:

If there is a fixed target in the place where the subject is moving, you can focus on this target in advance. Once the moving body enters this area, the shutter can be pressed. This shooting method is very suitable for sports photography such as pole vault, high jump, hurdles, finish sprint, etc.

Categories
Studio Lights Education

Photography Skills_Part VI

How ​​to Use the Golden Ratio in Composition

An excellent photographic work should not only have a profound theme and content, but also have a beautiful form and harmonious composition consistent with the content. Beginner photography, understand and master the golden ratio when framing. It is very helpful for improving the aesthetic value of the work.

What is the golden section

The golden section method is to divide a straight line into two parts, and the ratio of one part to the whole is equal to the ratio of the other part to this part. The ratio of approximate values ​​such as 2:3, 3:5 or 5:8 is commonly used.

Introducing art design and photographic composition, this ratio is also known as the golden rule. In the photographic composition, the general method often used is to draw two horizontal and vertical lines on the screen that are parallel to the sides and equally divided, and divide the screen into 9 equal squares, which is called the Nine Palaces Diagram. The 4 points where the straight line and the horizontal line meet are called the golden ratio point.

According to experience, arranging the main scene near the golden section point can better play the organizational role of the main scene on the drawing. It is conducive to the coordination and connection of the surrounding scenery, which is easy to cause a sense of beauty, produces a better visual effect, and makes the subject scenery more vivid and prominent.

In addition, people have a habit of looking at pictures and books, that is, they move from left to right, and their eyes often fall to the right. Therefore, when composing the picture, place the main scene and the eye-catching image on the right side, which can achieve better results.

How ​​to use the golden section method

If you are a beginner in photography, you can choose the “golden section” practice composition. After many times of practice, after you have your own experience and experience, you can create your own creations according to the actual situation.

If they are all the same, it is not advisable to copy this form. After a long time, it will constrain one’s creative thinking, so that the photos taken are stable and lacking in changes. Bland and boring, there is no art.

Using the golden section to determine the position of the subject does not complete the entire process of composition. Attention should also be paid to arranging the necessary space, considering the echo between the subject and the companion, and fully expressing the ideological content of the theme. At the same time, also consider the tone, light processing, color performance and so on.

In order to improve the basic skills, there is a very important point, that is, to earnestly study the knowledge of aesthetics and strengthen the aesthetic cultivation. And through shooting practice, constantly sum up, accumulate experience, and take more photos with a higher artistic level.

How ​​to perform partial occlusion when shooting night scenes

When shooting night scenes, we often encounter such a situation: in the pictures to be shot, some places are brightly lit, and some places are dimly lit. Or the lights are few and bright, and the scene is large and dark. In the case of the above situation, measures can be taken to take photos with moderate contrast and good levels of light and dark parts. For example, using partial occlusion to control exposure to reduce the exposure of bright parts and increase the exposure of dark parts.

Occlusion shooting method

The so-called occlusion shooting method is to cover a certain part of the picture (usually the bright part) with hands or other objects purposefully during the long exposure process, reduce its exposure, and make the remaining dark parts more visible. full exposure. Just like partial occlusion when zooming in on a photo, in order to achieve the desired effect.

When blocking, it must be constantly shaken depending on the light conditions, and must not block a certain part fixedly, so as to avoid the phenomenon of excessive or insufficient uniformity of the film.

Partial occlusion shooting

When performing partial occlusion shooting, corresponding shooting methods should also be adopted according to different types of cameras. For dual-lens reflex cameras, although you can directly see the blocking part in the viewfinder of the frosted glass, because it is an upper and lower lens, if the left and right are blocked, a longer blocking tool can be used to block the top and bottom vertically.

Then the blocked part observed in the viewfinder is also the blocked part of the lens. If it is occluded up and down, it can only be occluded according to your own estimation.

With a single-lens reflex camera, although the blocking position can be observed in the viewfinder when framing, but after pressing the shutter, the scene cannot be observed from the viewfinder. Therefore, the camera should be fixed before pressing the shutter, and the blocking position should be pre-determined.

Other types of cameras can only be occluded according to the angle and position of the part to be occluded entering the lens. These are not easy to master accurately, you can practice several times before shooting.

How ​​to use diagonal composition

A horizontal, vertical or square screen has four corners. If the main body of the picture and the important companions are placed in two diagonally opposite corners, or if the main body of the picture itself occupies two diagonally opposite corners of the picture, this is a diagonal composition.

It has the characteristics of harmonious correspondence, lively and vivid, and natural beauty. It is a manifestation of changes in the unity of the composition of the picture, and unity in the changes. This composition is suitable for a variety of shooting content. It can make the layout flexible, easy to master, and achieve better results.

How ​​to use:

  1. The screen is divided according to the word “#”, and the dividing line generates 4 intersection points. At the same time, the screen is divided into 9 small blocks with the same proportion, so that the main body and important companions of the screen are respectively deployed in the upper left and lower right, or the upper right and lower left. Corner points or even diagonal blocks.
  2. The subject and the companion of the picture in the diagonal positions can be intrinsically connected (for example, a person looks up at a picture). It can also be unrelated to each other (for example, a lazy cat is napping in the lower left corner of the screen, and a pot of spider plants is in the upper right corner).

But the opposite of the main body must be an important and eye-catching companion. If the accompaniment diagonal to the subject is not obvious and vivid, but the accompaniment diagonal to the subject is clear and eye-catching, it cannot be a diagonal composition.

  1. Under normal circumstances, the main body and the accompaniment of the diagonal must maintain a directional or visual effect that echoes each other. When the subject of the picture itself forms a diagonal composition layout, there must be appropriate space in front of the movement, inclination, and trend.

    How ​​to use symmetrical composition

    The layout structure of photographic composition mainly includes two series: symmetrical and asymmetrical. The so-called symmetrical composition means that the content of the shot is equal or roughly equal on both sides of the vertical line in the center of the screen or on the horizontal line in the center of the screen. The picture thus has the characteristics of balanced layout, regular structure, beautiful pattern and interestingness.

    Examples of the use of this form of composition are as follows:

    1. In real life and the surrounding environment, there are many scenes, objects that are often equal on left and right . Such as weightlifters lifting weights, swimmers’ butterfly strokes, etc.. Shoot from the center of the left and right angles to form a left-right symmetry screen layout.
    2. The swan floating on the calm lake, the girl lying on the glass plate of the table contemplating, the athlete performing rhythmic gymnastics on the bright terrazzo floor. Because of the reflection of the glossy surface, the subject will have a clear reflection . Taking the image of the entity together with the reflection becomes a symmetrical layout with equal upper and lower.
    3. Symmetrical composition should not be mechanically equivalent, but must be vivid. There are changes in the equivalence, or it contains interesting, decorative, otherwise it will be bland and boring.
    4. The left and right are equal and the bottom is equal. Although there is a symmetrical effect in the form of a pattern, it is generally not desirable. For example, if you shoot a swan head-on, the left and right are equal. If you add a reflection, it becomes a “cross” shape, which will not be aesthetically pleasing, but only rigid.

    How ​​to highlight the subject

    People, crowds or scenery can work as the subject of the photo frame. The subject is the center of the content and structure of the picture. The main object used to express the content on the picture. And the object that the photographer is most interested in and attracts him to raise the camera.

    Therefore, we must use all feasible means to highlight the subject when photographing composition.

    Generally, there are several ways to highlight the subject:

    1. Close-up

    Use the close-up form to shoot the subject at a suitable position slightly closer to the lens. So that the size ratio of the subject is larger than that of the surrounding scene. It occupies a larger area of ​​the frame. So that it highlights the subject from the contrast of the body size.

    2. The change between the virtual and the real

    Use the change of virtual and real. That is, use the change of the aperture to change the depth of field. So that the subject is clear, and the accompanying body or the background is blur. When the surrounding scenery is blur, the clear image will stand out and catch the eye.

    3. Line guidance

    Use the guiding role of lines to highlight the subject. The convergence point or intersection point of the lines of the picture is generally the focus point of people’s eyes. When we manage the subject in this position, the viewer’s eyes can fall on the subject automatically.

    4. Contrast of light and dark

    Use light and dark contrast to highlight the subject. In the use of light, the main light is bright, and the accompanying body is dim. So that we can achieve the purpose of brightening with darkness.

    5. Color contrast

    Use color contrast to accentuate the subject. For example, red flowers will stand out against the backdrop of large green leaves.

    6. Filters

    Use the function of the filter to adjust the tone of the picture, and also make the subject stand out.

    How ​​to properly use prospects

    Anything that is closer to the lens than the subject of the picture can generally be called the foreground. Like the background, it is a companion.

    In terms of enhancing the performance of the main body of the picture, the two have the same purpose. For example, by blurring the foreground, we can highlight the main body by using the virtual to support the real. Exaggerating the foreground, filling it all around the picture to form a closed composition, has the obvious effect of focusing on the subject. Cropping the foreground, depending on the limitation of the frame of the picture, appropriately deletes the accompanying body that appears to be larger in the close-up lens. So that its shape is incomplete, so as to contrast the main body with complete shape.

    However, the so-called proper use of the foreground usually mainly refers to making the foreground play the following three roles on the screen:

    1. Form an apparent sinking space

    Shooting rainy, foggy and other hazy scenery often lacks the sense of depth. Even when shooting distant mountains, near water, and deep houses, the distance, near and depth on the screen may not be obvious. If combined with the close-up, even if it is just a rock, a clump of grass, or a tree branch, it can reflect the distance of other scenes in the picture.

    2. Balanced composition layout

    The screen needs a certain amount of white space. This can be an empty space with a single-tone background of white, gray, and black. Or an open space with the same tone of sky, water, and ground. Photographers use it to adjust the structure of the picture, make the layout balance, and even contain artistic conception.

    However, if there are too many blanks, it will not only give a sense of emptiness, but also cause the picture to lose weight. Therefore, some foregrounds must be properly incorporated to fill in the blanks and make the composition and layout balanced.

    3. Has a decorative aesthetic

    For example, to express the scene of spring ploughing, one or even a peach blossom is taken in the corner of the picture, the quiet lake and mountains are photographed. And a few reeds turn up as the foreground. Or photograph city buildings through the wonderful water jets of the fountain. Similar to this kind of utilization prospect, although it is an embellishment, it is also the icing on the cake. And it can often play the role of beautifying the picture.

    The list of scenes suitable for foreground is endless. However, if it hinders the performance of the main body of the picture, and does not have any of the above functions. We must use such a prospect with caution, or simply not use it. So as not to lose more than the gain.

    (To Be Continued)