Categories
Studio Lights Education

The use of light skills-portrait thematic photography_Part I

What is portrait photography

Portrait photography is a category of photography that takes people as the subject, and mainly shoots people’s appearance, expression and form.

The so-called portrait photography refers to the work that uses the form of photography to depict and express the appearance and demeanor of the subject with a bright and prominent image on the photo. It is an image portrait of the subject himself.

Long ago, people used various needs and various methods to portray their own images. The earliest portraits appeared in paintings, especially in the early 19th century, when oil painting portraits were very fashionable at that time, and their creations matured day by day, and many excellent portrait paintings were produced.

When photography was invented, portraits began to enter the field of photography. Of course, due to the limitations of the technical conditions at the time, the shooting of portraits was only in the initial stage. With the continuous progress of photography technology and the development of people’s artistic concepts, portrait photography has undergone great changes today.

Nowadays, electronic flash devices, high-speed auto-focusing lenses and new photosensitive materials have allowed a photographer to complete some realistic and natural portrait masterpieces for many subjects in one day, greatly enriching the photographer’s creative possibilities.

An excellent portrait photography is the sum of many success factors: look, posture, composition, lighting, exposure and production must all reach a higher level. They are the components of a whole.
The difference between portrait photography and general photography

Portrait photography is different from ordinary photography: portrait photography takes the description and expression of the specific appearance and demeanor of the subject as its primary creative task. Although some portrait photography also contains a certain plot, it still focuses on the appearance of the recipient. Moreover, quite a number of portrait photography works only describe the image of the subject without a specific plot.

Ordinary photography is mainly to show the events and activities in which the subject is involved. Its main task is to express the specific plot, rather than to express the subject’s appearance and demeanor in a clear image. The important difference between the two lies in whether to portray the appearance of the characters in detail.

As long as it is a photo that mainly shows the specific appearance and mental state of the subject, whether it is a single person or a group of people, whether it is captured in the scene or posing in the studio, regardless of whether there is a plot or not , All belong to the category of portrait photography.

The activities and plots that mainly show the characters reflect certain life themes, and the photographic works whose subject’s appearance is not very prominent, whether it is a close-up shot or a whole body, can only belong to the category of ordinary photography. Of course, in a broad sense, portrait photography is about people, and it also belongs to portrait photography.

Portrait photography is to portray and depict the appearance and demeanor of the subject as its own performance task, and the characters should have a clear appearance. It is divided into three categories: studio portraits, indoor specific environment portraits and outdoor portraits. The requirement of portrait photography is to have both form and spirit.
Applicable equipment for portrait photography

  1. Camera

“If you want to do well, you must first sharpen your tools.” Choosing a camera suitable for portrait photography is very important for photographers.

Basically, all cameras, whether it’s a “fool” camera with a side view or a bulky and cumbersome scattered-page camera, can be used for portrait photography.

But if you want good results, it is best to choose a camera that can replace the lens and accessories. Because the more lenses and accessories you can choose from, the more room you can adjust and control when shooting different subjects. In terms of the image quality of the film alone, the larger the negative, the better the image quality of the photo.

In actual shooting, cameras with relatively large negatives are generally relatively large in size and weight, not suitable for carrying and relatively expensive. Therefore, most people will choose a single-lens reflex camera that has a better picture effect, and can change different lenses and accessories at the same time, at an affordable price and easy to carry.

The 135 single-lens camera is light, highly maneuverable, and has a wide range of lenses. Generally speaking, we rarely need to zoom in for amateur shooting, at most 5×7 is enough, so the 135 camera is the best choice. If you are longing for the 120 field, you can choose the 645-frame autofocus camera, which is quite popular recently. Recently, more and more people in the photography industry switch to this type of camera, but its price is high, and the cost of developing photos is higher than that of 135 negatives. If you are a beginner, the entry-level camera in your hand is sufficient for general portrait photography needs. So, whether you have money or no money, take a portrait with your camera on your back!
led-hard-&-soft-2-in-1-lights

  1. Lens

Although the various lenses of the camera can be used for portrait photography, shooting the same scene with lenses with different focal lengths will produce different effects. Strictly speaking, the lens of portrait photography should have the following options:

1) Imaging: The imaging quality of the lens for portrait photography must be both clear and soft. Because portrait photography generally focuses on the expression of the face, the image quality of the lens should be able to meet the requirements of rich layers, real texture, full details, and moisturizing skin.

There are some special lenses that are often used when taking portraits. Such as a soft focus lens, this kind of lens can deliberately increase aberrations, reduce part of the sharpness of the image, and thus have a partial softening effect on the image.

This can not only cover up the blemishes and scars of some characters, but also make the whole part of the picture reflect a soft feeling. The soft focus lens can adjust the degree of softening of the image. When it is adjusted to “0”, the lens has no softening effect. When adjusted to “3”, the degree of softening is more obvious, which is very helpful for controlling the effect of the final image when shooting portraits.

There is also a kind of lens specially designed for shooting portraits, called portrait lens. The imaging quality of this kind of lens is very high, can well show the detail level and texture of the subject, and the picture effect is very bright and clear.ledsfilm-2-in-1-studio-lights
2) Focal length: Generally, standard lenses are installed on cameras. This kind of lens is only suitable for taking full-body or half-body photos. If it is used to shoot half-length figures or close-up portraits, because the distance is too close, it often causes perspective distortion of the human image. In addition, some lenses cannot be brought into a sharp focus if they are taken at a distance close to the specified minimum shooting distance.

Therefore, to shoot avatars or close-ups, it is necessary to use a medium-focus or telephoto lens, whose focal length generally needs to exceed the standard lens by 1-2 times. Taking a 135 camera as an example, the focal length of the lens must be above 105 mm. In this way, the distance between the camera and the person can be maintained at more than 1.5 meters, which not only makes the focus clear, but also avoids deformation such as big nose and small ears. The subject looks larger than the original scene, and the background will be greatly blurred.

If you take a small group photo indoors, if you encounter a lack of regress, you need to use a short focal length lens (that is, a wide-angle lens), but it is prone to defects such as small distances and small distortions on both sides. Especially when photographing the front of a person, this kind of deformation is particularly obvious, which will seriously affect the picture quality.

3) Caliber: Take close-ups of half-length figures and headshots. The effective diameter of the lens should be large to make the subject clear, the background is slightly blurred, and the perspective of far and near space is enhanced to highlight the subject. In addition, the effective aperture of the lens is large, and in the case of slightly dim light and no flash, you can still use a faster shutter speed to shoot dynamic people.1000W-Soft-Panel-LED-Light

  1. Flash

The flash can provide a bright light source in darker shooting conditions. Because of its bright light source, small size, convenient portability and easy operation, it has now become an indispensable accessory in portrait photography.

In sunny weather outdoors, the flash can get a large area of ​​fill light and eye spot light, so you can use reflectors or projection lights without the hassle, but only the face can get light. Therefore, it is recommended to use a flash when shooting portraits. You can add small props such as a diffuser to soften the light. Open the aperture and set the speed to 1/125 second. If the weather is overcast, it can be adjusted to 1/60 second. It will achieve the effect you want.

  1. Film

Generally, the lower the sensitivity of the film, the finer the particles and the more saturated the color. Conversely, the higher the sensitivity of the film, the coarser the particles and the duller the color. When shooting portraits, you can often use 100-degree negatives, which show the most natural skin tone. Of course, there is another reason that it is cheap.

Black and white negatives are convenient for changing the color of photos, and high-sensitivity negatives are suitable for special effects such as intensification and coarse particles. If the weather is dark and you need to shoot and the lens aperture is not large enough, high-sensitivity negatives can also make up for the lack of aperture.

In photography, some films are specifically used for portrait photography, mainly because the portraits they shoot are moderately contrasted, with fine grains, and the level of detail is restored well. This kind of film is called portrait film. At present, many manufacturers have developed this kind of film suitable for shooting portraits.

  1. Tripod

In portrait photography, we sometimes need a stable tripod to prevent blurring caused by hand shaking when the shutter speed is too slow. Famous brand tripods are priced as high as 20,000 to 30,000 yuan. It is recommended that beginners choose a lightweight, stable and inexpensive tripod.

  1. Other accessories

Shutter release, reflector, filter or other small items.

(To Be Continued)
Categories
Studio Lights Education

Portrait Photography Skills-Summer Outdoor Shooting

Overview of Portrait Photography Techniques

Portrait photography is most commonly used in daily life. Portrait photography refers to a type of photography that takes people as the main subject. Portrait photography can be divided into studio portrait photography, indoor portrait photography and outdoor portrait photography according to different shooting environments. Portrait photography usually has two forms of expression: one is a pure portrait that expresses the part above the chest of the character without showing other scenes, and the other is a half-length, full-body portrait of the character.

The key to portrait photography is to have both form and spirit. First of all, to show the appearance of the characters well, we must master the most typical characteristics and show the people as beautiful as possible. Secondly, the natural expression of the person’s inner emotions reflects the person’s character and spiritual outlook. The eyes are the windows of the soul, and they can best embody the charm of the characters.

Successful portrait photography must have your eyes open. In addition to the clear focus of the eyes, there should also be catch light. Eyes without catch light are like two pieces of black charcoal. Catching light can make a person look full of vitality. The soft box and reflector can be used to produce vivid gaze in the eyes of the person being photographed.

The person being photographed must have good dynamics, but also a good demeanor. However, these natural expressions are fleeting. Therefore, photographers must be proficient in using their own photographic equipment. If a worker wants to do his job well, he must first sharpen his tools. The best lens for portrait photography is 70-210mm or 80-200mm medium telephoto lens. When possible, it is best for photographers to use a tripod, so that they can focus on the person being photographed, focus and press the shutter at the fastest speed, capture the personality characteristics of the person being photographed, and leave a perfect moment.

Outdoor portraits are one of the easiest and most difficult subjects in photography. Because a good portrait photo must not only show the personality characteristics of the subject, but also express the photographer’s own creativity and the ability to grasp the surrounding environment. Although there is no certain standard for outdoor portrait shooting in a broad sense, there are still certain rules to be found in general outdoor portrait shooting. The following are some common methods and techniques in outdoor portrait shooting, hoping to bring some help to everyone’s shooting.

Preparation Before Shooting

Indispensable-reflector

For portrait shooting, there are no too many requirements on equipment. Although a large aperture lens can create a more perfect depth of field, this does not mean that without a large aperture, a telephoto digital camera cannot take good outdoor portrait works. . Composition and use of light are the essentials in portrait photography. Besides, there are many other ways to achieve the purpose of highlighting the subject. So don’t worry too much about the performance of the digital camera in your hand. Any camera can produce good works as long as you use it properly. .

The reflector is one of the most commonly used tools in outdoor portrait shooting. It can fill the main character in the backlight, eliminate the shadow on the face, and add eye catching light. Therefore, a reflector is indispensable in outdoor portrait shooting.

  • Best shooting time and location

In addition to preparing for the equipment, outdoor portrait shooting is also very important in the choice of time. The best time to shoot in the summer is between 6 and 9 in the morning, because the sun is soft and the height is moderate at this time, the portraits will not appear strong shadows, and there is no lack of three-dimensionality under the sun. The sunset is also one of the best time to shoot portraits, but due to the high temperature of nearly 40 degrees, it is generally difficult for models to perform normally, so early morning is the prime time for outdoor portrait shooting in summer.

For the choice of location, try to choose a concise place with few people. Parks and green spaces are one of the simplest choices. Open-air bars full of culture and western-style modern architectural scenes are also good choices. If you like a broad view, then the green spaces in the suburbs are the best choice.

  • Shooting angle and composition

For shooting portraits, we usually use a head-up shooting angle, that is, the camera is in a straight line with the photographer’s eyes. A shooting angle that is too high or too low can easily cause deformation of the model’s face. In addition to looking up, another common shooting angle is looking up, that is, shooting from bottom to top. Looking up shots usually use a wide angle, and close up shots can achieve a certain dramatic exaggeration effect. Digital camera users with a wide-angle lens below 28 mm can try shooting. Shooting at this angle may give you some unexpected results.

Pay attention to the combination of the subject’s portrait and the surrounding environment when shooting the composition. The main character should occupy at least one-fifth of the entire photo, because we take a portrait photo, if the proportion of the character occupancy is too small, it will cause the scenery in the entire photo to become overwhelming. Fans who are beginners in portrait photography should pay special attention to this point.

So where should the portrait be placed in the photo? We all know that portrait works can generally be divided into full body, half-length, close-up, and the most common composition is to place the person in the middle of the photo. However, the most popular placement of characters is on the golden grid points of the entire photo, which will make the photo more natural.

One thing to note is that the person’s tilt should be toward the center of the photo, and tilting outward will give people a sense of awkwardness. Of course, if you deliberately want to express a certain style is a special situation, you can shoot according to your own preferences. In short, the conventional golden grid composition has been recognized by most people, who believe that it has a better sense of space and visual effects.

  • Choice of focal length:

For portrait photos, it can usually be divided into several common modes of full body, half body and face close-up. Generally, you can take ideal portrait photos by using these modes and combining with the composition described above. However, one thing worth noting for beginners is the choice of focal length.

A reasonable focal length can reflect a stronger sense of space and three-dimensionality. The wrong use of focal length may make your beautiful model’s face flat or lack the sense of layering in the photo.

When shooting full-length and half-length portraits, we cannot blindly pursue a beautiful background blur and directly pull the 10x optical zoom in our hands to the end. Although this can give you a certain small depth of field, the negative effect it brings is the feeling of narrow space vision.

This is because when shooting with telephoto, the angle of light entering the lens is very small, so you can only take a small piece of scenery behind the person. Therefore, we should choose a standard focal length of about 50 mm when taking full-body photos, and it is necessary to use a telephoto of 135 to 200 mm or more for half-length and partial close-ups.

Commonly used 50mm, 85mm and 70-200 zoom lenses are commonly used portrait lenses. Different lenses have their own characteristics in the horizontal and vertical composition methods, but for general photographers, the vertical composition is more suitable for portrait shooting, because the vertical composition can make the characters occupy a larger frame and better express the model’s Facial details. Oblique composition and diagonal composition are also a kind of common portrait composition, which is more dynamic than the previous ones.

As I said before, there is no absolute fixed theorem for portrait composition. The above are just some common routines for your reference. If you have other favorite shooting methods, you may wish to give it a try. Anyway, digital does not use film and does not waste money. Multiple shots can also sum up experience and improve your own composition level.

The Effect of Light on Outdoor Portrait Shooting:

When shooting outdoor portraits, which lighting method is better? Generally speaking, don’t let the model’s face directly face the direct sunlight. The strong sunlight will make the model look down and squint, unable to show the charm of portrait photos. We can choose to shoot in the shadows. The diffused light in the shadows on a sunny day is also enough to provide the color we need, but one thing to be aware of is to avoid shooting under big trees, because when direct sunlight shines on the model’s face through the leaves, it will produce unsightly spots and bright spots.

Although shaded areas are a good choice, portraits in the sun still have a unique style. The first thing we need to do when shooting in the sun is to avoid the model’s face directly facing the sun, let alone facing the sun, because this will form an unsightly yin and yang face. So in the sun, we usually let the model face the sun, which is what we usually call the backlight shooting.

When shooting against the light, because your back is facing the sun, it is easy to cause underexposure of the face. Due to the excessive background brightness, conventional average metering can easily lead to underexposure of the face. We can use exposure compensation or spot metering to increase the exposure to make the face brighter (the picture below shows the comparison of the effects of two different light-filling methods). However, when using this method, the brightness of the entire photo may become higher. While the face becomes brighter, the background also becomes brighter, causing the background sky to become white or cause other details to be lost.

At this time, we need to fill up the face. The easiest way is to put the reflector near the face so that the reflected soft light shines on the face (the excellent effect brought by the reasonable reflector fill light in the figure below), which can increase the light on the face. At the same time, it creates an energizing look in the eyes.

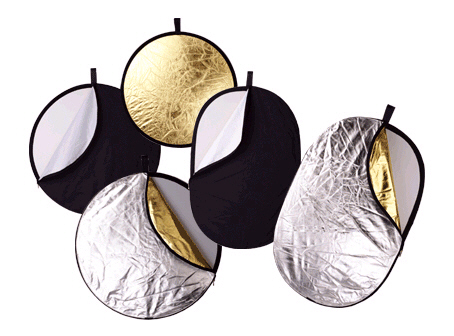
If the reflector still cannot compensate for the strong light contrast between the subject and the background, we can try to move the reflector closer, use two reflectors or use the camera’s flash to superimpose the light. Reflectors are usually white and gold. In sunlight, we generally use the white side of the reflectors to get soft light. If it is cloudy, choose the golden side as it can add a stronger sense of three-dimensionality.

Capture of Demeanor and Others:

Because our outdoor portrait shooters are emotional people, and for some beginner photography enthusiasts, they generally don’t invite expensive professional models to shoot, and most choose pretty friends around them to act as models.

Ordinary girls will inevitably have nervous emotions when they come to the camera. At this time, they often have sluggish expressions and do not know what to do. If you encounter this kind of situation, you, as a photographer, must first keep a clear head. Don’t just tell the model you don’t want to be nervous, but communicate with the model and talk about personal hobbies and other topics. Enough communication can make the model easy and natural. Only in this way can we capture a more innocent and harmonious smile. Portrait shots are generally best for two to four people with one model. A large number of people is not only detrimental to the performance of the model, but also sometimes causes everyone to grab the lens and angle, which affects normal shooting.

The last thing to remind is that the outdoor temperature is often very high in summer, and the temperature difference between it and the air-conditioned room is not small. While doing a good job of preventing heatstroke and cooling, we should also pay attention to the lens condensation problem that the camera is likely to cause when the camera is brought outdoors in an air-conditioned room.

Categories
Studio Lights Education

Lighting Techniques Using Reflective Umbrellas_Part II

Use a reflector umbrella as the main light, and at the same time use a reflector to fill the light

If you add a reflector to the dark side, use reflectors to light the shadows, and reduce the light ratio again, you can get a more natural lighting effect than a single lamp.

Now pull the light back to a 45-degree angle, and then use a 42-inch reflector to fill up the shadow of the model with a white surface.

The double-sided reflector is very useful under the condition of single-lamp lighting. By selecting the reflective surface and adjusting the position and angle of the reflector, we finally think that the supplementary light method shown in the figure is the most ideal.

This is the effect of fill light. The light ratio is further reduced, and the details of the shadows are improved. The model looks more natural, like in front of a window in a large bright room rather than in a dark corner or under a street lamp.

Using a reflector to fill light is an economical and effective way to obtain a perfect light ratio. With the reflector bracket, a double-sided reflector is an all-rounder to improve the lighting effect in many cases.

Use two reflector umbrellas as the main light and auxiliary light

Of course, the reflector can only passively “fill light”. To gain complete control of the light, you still need a few more light sources. Using two flash lamps of the same power, by reducing the output of the auxiliary light, a controllable light ratio can be easily obtained. For example, if the main light source is all output, and the auxiliary light is reduced by half, a light ratio of 1:2 can be obtained; if the auxiliary light is reduced by another half, a light ratio of 1:4 can be obtained.

As for the position of the auxiliary light, the easiest way is to place it on the other side of the model symmetrically with the main light. The important thing is to pay attention to the direction of the auxiliary light, and do not let the light of the auxiliary light overflow into the area irradiated by the main light, so that it is easy to control the light ratio and eliminate unnatural shadows.

First, we turn off the main light source and use only the auxiliary light to take a test shot to determine the lighting effect of the auxiliary light. It seems that the effect is satisfactory. The light illuminates the side of the model very well. From the light metering results, its intensity is the same as the main light.

According to the results of the test shooting, the light ratio is exactly 1:1! There are almost no shadows on the model’s face, which is a perfect “big flat light” effect. With the first light, the background is also lit up, and the test shooting effect also confirms the previous judgment: the power of the two lights is the same.

Let’s reduce the output of the auxiliary light step by step to see the effects of various light ratios. Please note that the brightness of the background changes when we change the light ratio of the model’s face.

The auxiliary light output is halved, and the light ratio is 1:2. The advantage of the dimmable studio light is that you can change the light intensity without changing the position of the light. You only need to turn the output control knob to change the size of the output. At this time, the irradiation angle and coverage of the light will not change.

Now reduce the output of the auxiliary light to 1/3, and the light ratio is 1:3. The shadows that help shape the appearance appear.

Now that the light ratio is further reduced, the effect is close to the effect of supplementing the light with a reflector. The difference is that the current light ratio can be completely controlled at will. This is a typical lighting demonstration of a dual-lamp portrait.

Now we compare the effects of the four light ratios together, and we can observe the change in the brightness of the auxiliary light and the shadow on the model’s face when the main light source remains unchanged.

Use a reflective umbrella for the background light

We used a background light to make the silhouette of the model more distinct

If you want to get a more “professional” lighting effect, you can add another flash with a reflective umbrella, which is used to illuminate the background. Let’s place this background light about 90 cm away from the background and illuminate the background at an oblique angle. In this way, we obtain a background effect with gradual brightness and make the model’s silhouette more vivid.

We have achieved the desired effect, the background is illuminated, it is no longer gray, and the model and the background have a sense of space. Of course, the effect of a light is still limited, and adding more lights can get better results.

Add a background light here to illuminate the background evenly

Now use the fourth light to illuminate the background from the other side, so as to fully control the background and foreground lighting. We want the background to change from a gradient gray to a completely bright background. Originally, our background cloth was pure white. With the illumination of two background lights, the background can completely “disappear” from the picture.

Handicraft arrangement of all four lights

   At this time, the convenience of adjustable output flash is further embodied. Before, we always used the full output of the main light, but if the back light also uses the same specification flash, there is no room for adjustment. At this time, we can reduce the output of the main light. Of course, in order to maintain the light ratio, the output of the auxiliary light Also reduce, correspondingly, the camera’s exposure combination should also be adjusted. From 1/125 second f/11 to 1/125 second f/8. In this way, you can better control the brightness of the backlight.

This is the final shooting effect. As the background “disappears” and the figures are sharply contoured, the use of the photos has also been expanded. Such photos can be conveniently cut out in post-processing software (such as Photoshop) to superimpose other backgrounds, or form a “group photo” with other portraits. Of course, the portrait itself is very beautiful: beautiful light and shadow, rich details, bright eyes, cute expressions…
From single lamp to four lamps, you can choose freely according to your needs. In many cases, you only need one lamp and one reflector to take beautiful portrait photos. I have given so many demonstrations to provide you with one Kind of idea to control the lighting effect. Please remember that there are no rules for lighting portraits, only guiding principles. Practice more and discover that the fun is the essence of photography.

Categories
Studio Lights Education

Lighting Techniques Using Reflective Umbrellas_Part I

Lighting techniques using flash and reflective umbrella when shooting portraits_1

Whether you use a single lamp or four lamps, and no matter what artistic effect you want to shoot, a studio flash that can precisely control the output and angle can help you get professional lighting effects. In this section, we will talk about how to use flash and reflector.

This article includes the following parts:

* How to use flash and reflector umbrella

* Use a reflective umbrella as the main light source

* Use a reflector umbrella as the main light, and at the same time use a reflector to fill the light

* Use two reflective umbrellas as the main light and auxiliary light respectively

* Use a reflective umbrella for the background light

How to use flash and reflector umbrella

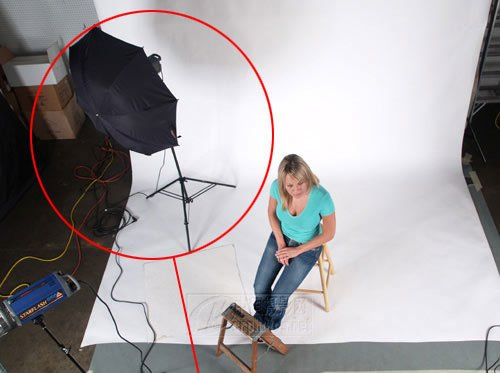
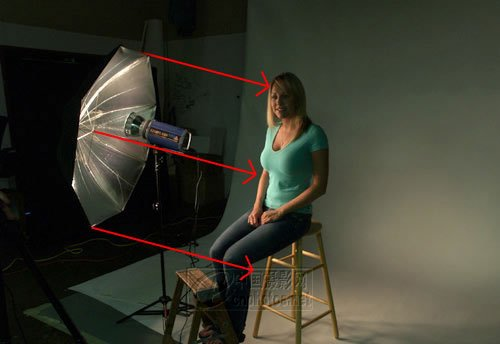
The reflective umbrella was hit too low, illuminating the waist of the model’s handicrafts, and the face has shadows

   The general idea is to use a lamp to illuminate a half-length portrait. Naturally, the light should illuminate the upper body of the model, so there is the lighting method in the above picture: the flashlight is facing the middle of the reflective umbrella, and the reflective umbrella is pointing to the upper body of the model.

This is not an ideal lighting method, but from its effect, it can help us understand the lighting characteristics of “flash + reflective umbrella”: the flash is facing the middle of the reflective umbrella, so the light reflected from this part is the strongest. Toward the edge of the umbrella, the weaker the light, and which part you want to focus on, let the handle of the reflective umbrella point to which part. Understanding this feature is the basis for us to make good use of the reflective umbrella in the next step.

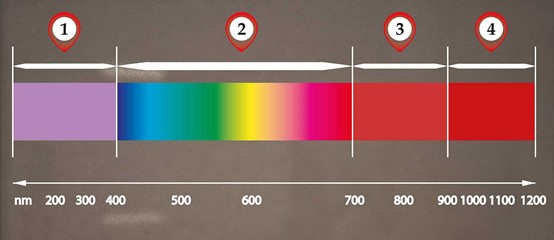
In addition, before introducing the use of flash, I mainly talk about white balance. Any kind of light source has a certain color temperature. Only when the color temperature of the camera is set close to the color temperature of the light source can a more accurate color reproduction be obtained.

The above chart shows the relationship between the color temperature of the light source, the camera’s white balance setting and the final imaging effect. Generally speaking, the color temperature of the flash is close to the color temperature of daylight, which is 5500K-5600K. When using the camera’s built-in flash, the camera’s automatic white balance can be automatically set accordingly. But when using an external flash, because the flash does not emit light before taking the picture, the camera cannot determine the color temperature of the light. According to the ambient light setting at the time, the automatic white balance will fail, so you need to manually set the white balance.

When shooting indoors with a flash, you can set the camera to “daylight” white balance. Of course, it is best to set the color temperature accurately with manual settings. With the same set of lights, the color temperature will not change much, so once the setting is accurate, you can always use this setting.

Lighting techniques for using flash and reflective umbrella when shooting portraits_2

Now back to the lighting problem.

This is the first test sample taken with the lighting method. It can be seen that the brightest part is on the model’s waist. The light on the face is very dramatic, the light ratio is large, and the head is completely immersed in the shadow. However, what we need to shoot portraits is not this kind of drama, but to show the most beautiful side of the model, so the focus should be on the performance of its appearance.

Since the position of the umbrella handle is the center of the light source, now we raise the light source so that the center faces the model’s face.

Now let the light rise gradually, with the center facing the model’s face

This is the result of changing the light position. The center of the light source illuminates the model’s face and evenly illuminates its upper body.

We can also see that after the reflection of the umbrella surface, the light of the flash becomes soft and natural, not as blunt as the flash is directly at the model.

Use a reflective umbrella as the main light source

From the above sample, although the model’s face is well illuminated, and the light is reflected by the reflective umbrella, it is much softer, but if you carefully observe the lighting effect, the light ratio is still too large, and the model’s forehead and nose have bright spots.

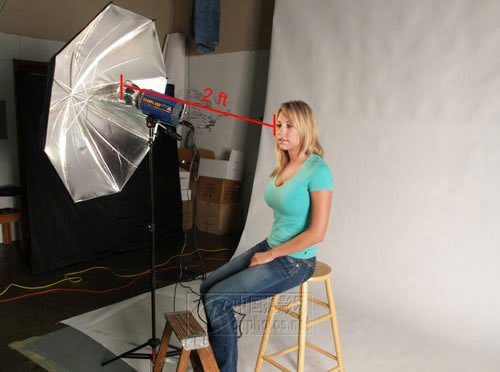
Light source distance 2 feet (about 0.6 meters)

At this time, in fact, the reflective umbrella is acting as the main light source for portrait photography, with an illumination distance of about 2 feet.

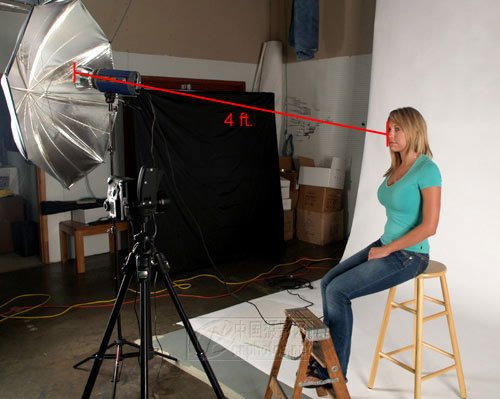
Move the light source to 4 feet (about 1.2 meters)

In order to reduce the light ratio, we might as well move the light source farther, because the closer you are to the light source, the more concentrated the light. Do a simple test and put the light on the wall, you can see obvious spots, even the shape of the filament, if you stretch it farther, there is only an illuminated area.

The use of a reflective umbrella only partially changes the light quality, and the law of distance is the same as that of direct lighting. When the illumination distance is extended, there is no longer an obvious bright area, but the entire range is illuminated.

After the distance is opened, the light ratio is significantly reduced (of course, the light becomes weak, and the camera aperture needs to be opened correspondingly), and the shadows on the model’s face are not so heavy. This kind of light is no longer as harsh as the direct sun, and looks more Like the effect of natural light in a window.

In order to further reduce the shadow on the right side of the model, another method is to change the angle of light, move the light closer to the camera, close to lighting from the front.

In terms of lighting pattern, this result would be more of a loop, referring to the small “loop” of shadow under the nose, and less of a “Rembrandt”, typified by the upsidedown triangle of light created on the cheek from light spilling across the bridge of the nose.

In general, this effect is more satisfactory. If you want to use a single light to shoot portraits, this lighting method is a successful example. Although there are still shadows, it has weakened a lot, and the facial features of the model perform well. This lighting is not too dramatic, but it is very useful.

Now compare the shooting effects of the two lighting angles together. Both effects are good. The key depends on what the photo needs to show, and decide which effect best reflects your feelings about the model and the purpose of the photo.

Categories
Studio Lights Education

Lighting and Shooting of Tri-lamp Portrait

Lighting and Shooting of Tri-lamp Portrait

Let’s demonstrate step by step the lighting method of shooting indoor portraits with three small flashes. The flash used here is not a professional studio light, but a small electronic flash with a soft box. The focus of this article is not to teach you the specific lighting position, but to familiarize you with how to meter the light and how to check the effect of the light through an introduction to the lighting process, and give you some basic guidance on lighting according to your own creativity.

Key points:

The arrangement and metering of the main light

The way to use reflector

How to light up

How to turn on the background light

used equipment:

Camera and accessories

Lexar 1 GB 80x CF card

7-in-1 USB card reader

Manfrotto 3D PTZ

Manfrotto 458B NeoTec Pro Tripod

Olympus 14-54mm f/2.8-3.5 lens

Olympus E-1 SLR digital camera

Incident light meter (with flash metering function)

lighting

3 small electronic flashes

flash brackets x 3 sets

3 soft boxes

a reflector

reflector bracket set

Wireless flash sync device

background

9 feet white non-woven fabric background

Background frame

The Arrangement of the Main Light:

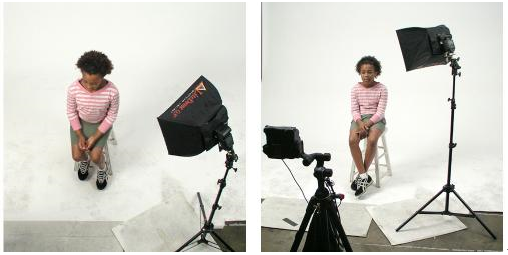
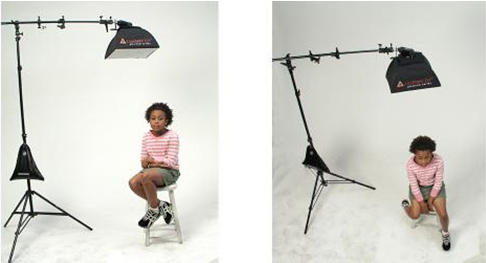
Install the background cloth first, and place a small stool on the left side of the center for the model to use. Put the flash into the diffuser, put it on the lamp holder and place it on the right front of the camera. After the approximate position of the lamp is set, ask the model to sit down. Before the formal shooting, communicate with the model to explain the effect we need to shoot. Communication with the model is very important, no matter how you plan to shoot, make the model feel comfortable and cooperate with your shooting.

After the preparations are completed, the main light will be formally arranged. The main light is placed at a 45-degree angle in the front right of the camera, the height is basically flush with the model’s head, and the light is facing the model’s face.

When the main light is in position, it is ready for trial shooting. Since the color temperature of the flash is close to sunlight, we set the color temperature of the camera to 5500K, the sensitivity to ISO 100, and use manual focus. We first connect the flash synchronizer to the light meter, place the light meter on the face of the model, and measure the incident light in the direction of the lens. The measured exposure combination is 1/60 second, F8. Set the camera according to the metering results, and install the synchronizer to take a test shot.

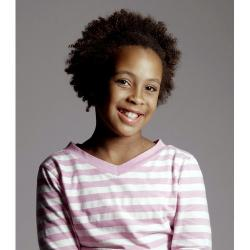
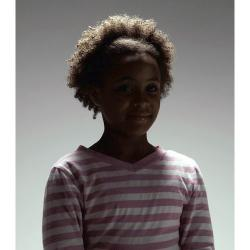
Judging from the results of the test shooting, the results are basically in line with the expected results, and the main light intensity and angle are relatively ideal.

Reflector Fill Light

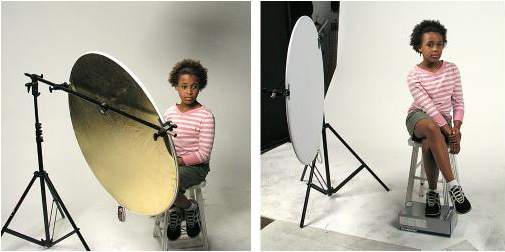
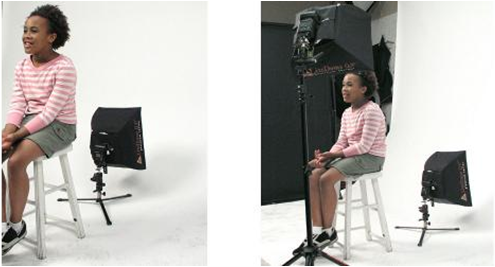
Now use the reflector to fill up the light on the model. Fix a 32-inch double-sided reflector on the shelf and place it as shown in the picture above. Use the silver side to fill up the shadow of the model. The center of the reflector is facing the shoulder of the model. After the reflector is set up, turn off the main light and use the spot light reflected by the reflector to take a test shot:

It can be seen that the original shaded part has details. Adjust the position and angle of the reflector to achieve the best fill light effect.

Arrange Hair Lights:

The next step is to arrange the headlights. Place a flashlight on the left, behind the model, the light hits the model’s hair from above:

After arranging the headlights, turn off the main light, remove the reflector, and take a test shot with the headlight alone. Expose the highlight parts of the hair to see the effect of the headlight:

The lighting effect is as expected. Turn on the main light, put it back on the reflector and try again:

At this point, the three-dimensional portrait effect created by the main light source, fill light, and light has been presented. The only regret at present is that the background is dark, which needs to be solved with a background light.

Set the Background Light:

The last step of lighting is to install a background light. Put the last flash into the soft box, place it on the low light stand, behind the model, and shoot it flat on the background cloth:

After determining the approximate position of the background light, you still have to take a test shot to see the lighting effect, and then make adjustments. Turn off the main light and the light, and shoot the illumination effect of the background light separately:

The brightness and light-dark transition of the background are exactly what we need, just adjust the angle a little.

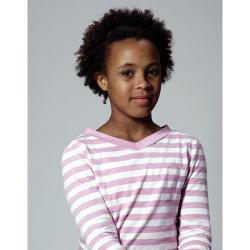
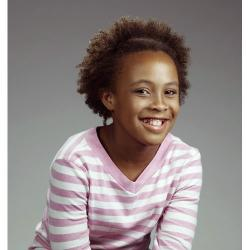
OK, so far three light sources and a lighting reflector are ready, turn on all the lights for test shooting, and a standard “oil painting effect” lighting portrait is presented in front of us. This lighting method is a more classic one. Because the light and shadow effects are very close to the works of the oil painting master Rembrandt, it is also called “Rembrandt lighting method”.

Categories
Studio Lights Education

How to Use Reflector Cleverly

How to Use Reflector Cleverly

I must admit, I like to use reflectors. For many years my strength has been natural light photography. If possible, I would build a studio that only uses daylight and does not use any other light sources. I know that several photographers in the United States have built natural light studios, and I think maybe I will build such a studio in a few years.

Although I like natural light very much, I have to admit that the results of my shots with natural light are not ideal on a few occasions. Maybe it was because of the cloudy sky. When I put the subject in the place I chose, the light mainly came down from the top of my head. Perhaps the light ratio I used is too large, and in order to preserve the details of the shadows, I need some form of auxiliary light.

Maybe my recipient is under backlighting, the sun is dazzling behind him, and the light on her face is too dull. Or it is 5 stops worse than the background exposure. If I press the face exposure, it will overexpose the bright part of the background. How can I solve these problems?

If you answered that you use the auxiliary flash to fill in the light, I would say that maybe you can. I recently held an outdoor portrait photography seminar for professional photographers. When these professional photographers come, they always attach the flash to the camera. I told them that 90% of the time I would rather use a reflector to fill in the light than to use a flash to fill in the light. They all doubt it. By that night, no one insisted on using flash. Let us talk about the difference between the two.

In this photo, the model is facing the stone wall and her head is turned to the camera. The light is very good, but I want some bright spots in the subject’s eyes, so I use a silver reflector below to reflect a small amount of light into her eyes. This photo is very beautiful.

It is crucial to recreate this photo with auxiliary flash. why? Because when flashing along the wall, the light that illuminates the model’s face is reduced geometrically. Walls close to the camera will be severely overexposed, and the colors will not look saturated.

This kind of problem will not be encountered when using a reflector. Please note that I am now comparing the flash mounted on the camera, not the flash or softbox that is separated from the camera and placed on the reflector. The latter is another successful method that is comparable to outdoor light.

However, even compared with this method, the reflector is the quickest and most convenient to use, and can produce a more natural-looking effect. Since we currently do not use flashes or softboxes with reflectors that are separated from the camera, let’s talk about using reflectors.

Type of Reflector

In my photographic equipment, I often use four types of reflectors-white, silver, gold and black. I occasionally use a soft light screen or “screen”, but during the shooting of the illustrations in this article, I have always insisted on using reflectors. Here is a brief introduction to my use of different types of reflectors.

White reflector:

The light reflected by the white reflector is very subtle. Because its reflective performance is not very strong, its effect is soft and natural. I find that when I need to add a little light, I often use this type of reflector to fill in the details of the shadows. This situation is often used when window lighting is used. I just want to make the shadows more detailed.

Silver reflector:

Because the silver reflector is brighter and smooth as a mirror. It can produce brighter light. I find that the silver reflector is my most commonly used reflector because it suits my shooting style very well. I like to “highlight” the subject’s eyes, and the effect of this kind of reflector can easily be reflected in the subject’s eyes, thus producing a large and bright starlight. I use this type of reflector outdoors when it is cloudy and the light is mainly coming from above the subject’s head. I placed it almost directly under the subject’s face, making it just outside the camera’s field of view, reflecting the top light onto the subject’s face. In cloudy light conditions, the white reflector does not have such a strong effect. Sometimes I use a silver reflector when I use window light to illuminate. At that time, the shadow area of ​​the person being raptured appears darker, and I want it to be bright. But be careful not to fill the light excessively. Or you may destroy the effect of the window light due to excessive lighting.

Golden reflector:

I use a golden reflector to fill the light in daylight conditions. Like the silver reflector, it reflects light like a smooth mirror, but in contrast to the cool silver reflector, it produces a warmer light tone.

Although I often use a silver reflector as an auxiliary light, I use a golden reflector as the main light. I shot backlit portraits in bright sunlight many times, and reflected the light onto the subject’s face from the side and a little higher.

Using this kind of reflector has two functions: one is that I can get directional light that can shine on the face of the subject, and it can also increase my exposure to the face of the subject by one stop. The second is to reduce the exposure difference from the background to the foreground, so that the background will not be seriously overexposed.

A few years ago, I used a golden reflector to take a portrait of a model. I asked her to pose in the shade. At that time, the light was very flat, so I asked my assistant to stand in the sun and hold the golden reflector to reflect the light onto the model’s face as the main light. The result of the shot looks very beautiful.

In both cases, use golden reflector or silver reflector with caution. Because the light is very bright, most subjects will squint their eyes. Tell your assistant where to reflect the light, but don’t let the reflector shake before you are ready to shoot. Move fast when shooting.

Black reflector:

This type of reflector is unique because it is not technically a reflector. It is a “dimming board”. The use of other reflectors is based on the light addition method, the purpose is to add light to the scene. The use of black reflectors is the use of dimming to reduce the amount of light.

Why use a black reflector? For various reasons, we have to often use the nasty top light to shoot. Human faces photographed with this kind of light often have “raccoon eyes”. By putting the black reflector on the head of your subject, the overhead light can be reduced.

At this time, the light comes from under the black reflector, just like coming from under a big tree or under a porch, so that you can direct the direction of the light. By using another black reflector on the other end. You can just create a kind of “funnel” light on the subject.

When there are windows on the other side of the room, the light will become dull. Therefore, black reflectors are also suitable for window light. If you want to eliminate this strong light competition, you might as well use a black reflector (or light barrier).

The size of the reflector.

Different sizes of reflectors have different effects. The smaller the size of the reflector, the worse its effect. Not only that, when using light-enhanced reflectors, you must treat them as light sources. That means the larger the light source and the closer to the subject, the softer the light. Small reflectors and lights become point light sources, which will produce hard and clear shadows. As for the light blocking effect of the small black reflector on the portrait. It is almost useless, in most cases simply because it is too small.

The Brightness of the Reflector.

The products of different manufacturers have great differences in brightness. I like the most expressive effect obtained by using gold and silver reflectors. So I checked the reflector very carefully.

I have also seen a hybrid reflector that combines silver and gold. I think. Its purpose is to obtain the maximum reflection, and at the same time, it will not produce the excessive cold color light because you use the silver reflector, or when you use the golden reflector, the warm color light may cause strange color casts in the shadows. . I have not tried this hybrid reflector, but I am very satisfied with the effect of the reflector I have used.

Take a look at the illustrations in this article, they show you that reflectors are a very useful tool. With a little practice, they can produce clearly different effects in your portrait photography.

This set of photos shows how to use the reflector to hit the auxiliary light. The subject is my friend and famous photographer Chris Bertrami. The photo was taken using window light in his room. The window light comes from the left, and the other window is higher, just behind the subject, casting a small amount of contour light on the shadow from behind.

Categories
Studio Lights Education

Light for Photography-Live Light Photography_Part II

Use Light Meter

White objects reflect about five times as much light-about 90% of the light. Therefore, the readings they took from the white object were as high as five times, which is too bright. By opening the sophomore stop, they can regain the readings they should get when they measure 18% gray. Now they have the readings needed for a normal exposure. Since the scene is initially illuminated by dim light, this “normal” exposure will reproduce the darkness of the original scene. The result is a photo with on-site lighting effects.

Live Light and Development

The course “Black and White Film Development” is optional. If you want to get a live light effect, the following on how to develop is also worth learning. However, if you develop your own black and white film, then these contents are very important.

In the weak and dim light of typical live lighting, as we have introduced, you should expose the strong light or midtone part, not the shadow part. The result is that you underexpose the film.

Why does this reading make the film underexposed? Let’s discuss it in depth. As we said, you took the “normal” reading of the shaded area, and the light meter told you to use an aperture of f/2 and an exposure of 1/60 second. Then you close the aperture by one stop to f/4 to get a “normal” exposure. However, under live light conditions, you need to take the mid-tone or strong light readings, not the shaded readings. Now suppose that the light meter tells you to use f/16 aperture for the same scene, 1/60 second exposure. With this aperture, you will make the film get a lot less light. The result is underexposure! You may open the first stop or second stop, but you are still underexposed compared to the “normal” exposure. This is what happens when shooting most low-light photos. Generally speaking, you want to underexpose the film.

Now if you shoot an underexposed black-and-white film, and then press normal processing, then you run the risk of getting an underdeveloped image-an image with few details in the bright part and almost no detail in the shadow part. In the photo made with this film, the bright part may be faint gray, and the midtones and shadow parts may be pitch black. In live light photos, you don’t mind the black shadows, but you like to see some details in the midtones so that they are different from the strong light.

How can you achieve this distinction between midtones and strong light parts? Since the film is underexposed, you can get more details in the midtones by overdeveloping the film. The over-developed part of the strong light may look pure white on the photo, but now the over-developed mid-tone part may show some gray tones on the photo. This is exactly the effect you want.

How Professional Photographers Use Live Light Creatively

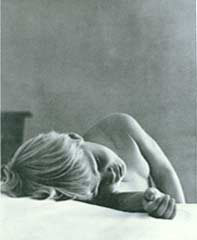
In this live photo taken by Hella Hammid, the light from a nearby window subtly reveals the softness and smoothness of the child’s skin and the air of his imagination. The reflections of the walls and sheets made the child’s room like a holy and ethereal wonderland.

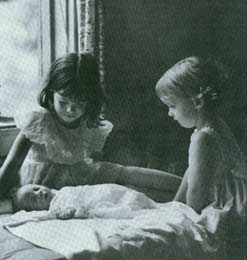
The live light coming in through the window has long been a favorite lighting source for painters and photographers. Fritz Henry (FritzHenle) knows that he doesn’t need to do anything, just find the angle he wants and press the shutter. The white bed sheet under the baby reflects light on the faces of the two little girls and makes the shadows appear sparse and soft.

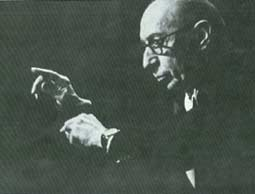
Ernst Haas captured the main features of composer Lgor Stravinsky while conducting his orchestral music. Except for a few parts that can outline the activities of the characters, all other parts are black. We saw the main features of his face, including the outline light that clearly outlined his ears and head, so we could recognize this person.

We see his moving hands, so we can recognize the outline of his body. If a cartoonist wants to paint a portrait of Stravinsky, isn’t it just these basic elements that he has to choose? Ernst Haas uses light here in the way Picasso might use, that is, to draw the image with only a few simple lines-that is to say, in order to depict the subject, he only illuminates Those absolutely important parts are ignored, and other parts are ignored. This is an excellent example of live light photography skills.

Although we usually associate live light photography with black and white images, and in this image, the shadow part loses all the details and is submerged in black without any obvious features, but the live light can also be used for color photography . Let’s introduce the representative works taken by photographer David Hamilton. Hamilton is world-famous for his beautiful color photographs of young and beautiful women. Let’s explore together how Hanmi combines the use of live light with other techniques you have learned in order to achieve a “sentiment” that conveys innocence and sexiness in his photos.

While watching these photos, it should be understood that all of Hamilton’s photos were taken with a 35mm single-lens reflex camera equipped with a 50mm lens. In other words, he did not use any special equipment or lighting fixtures. Even his model is not particularly beautiful. Therefore, when you study these photos, you should ask yourself: “In order to achieve these fascinating effects, how did Hamilton use the three principles I learned in Lesson 1? How can I sample the effects?”

In the photos in this article, you will see examples of David Hamilton’s use of live light to achieve a soft and provocative mood. To our eyes, this picture hints at the sexual mystery of a woman’s maturity. Let us examine the method Hamilton used to express this theme.

The first is the direction of the light. Light enters the room from an invisible window on the right side of the screen. One side of the model is bathed in warm light, but her other side is in mysterious shadows. This kind of light is similar to the side light, and the angled side light creates a strong texture on her skin and pajamas. It also provides the contour light often found in backlighting, thus realizing her profile. This use of light provides a good example of how sidelights and backlights can produce dramatic and textured effects that contrast with shadows.

The second is the color of light. Obviously, the photo was taken at dawn or dusk, because the model was bathed in orange light, which produced a sexy warm tone. You can ask yourself: If the daylight illuminates her at noon, how would this picture be different? Will it cause people to have similar associations?

The third is the pose of the model. She avoids the camera, her eyes are looking out the window. What is she looking for? Is she waiting for someone? That’s the mystery reflected in the photo. What kind of clothes is she wearing, is it pajamas? That is part of showing sex. The neck of the shirt is open, and the belt around the neck is not fastened. This way of dressing enhances the sexy of the photo.

Can you think of any ways Hamilton can simplify this picture? We can’t figure it out. In fact, there are only two components in this picture-model and light. Everything else is omitted.

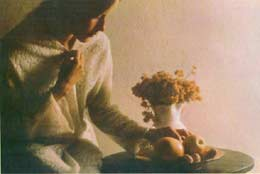
All of David Hamilton’s better photos have the style of old paintings as shown in Figure 10.6. Especially this picture reminds people of the work of a Dutch master painter. In fact, the use of light on the face-the face facing the camera is basically dark except for a small patch of light-is called Rembrandt’s use of light. We will discuss this light method in detail in the portrait photography course.

This photo also clearly shows how light from one direction forms a pattern of light and shadow, thereby providing a three-dimensional effect. Please pay attention to this photo, especially the fruits in the plate, the characteristics of the round objects are clearly depicted. It should also be noted how the side light shines on the wall to show the texture of the wall. Imagine, if you change the background to white seamless paper, what the photo will look like. Will it be so compelling? We don’t think it will. The texture of the walls makes the scene appropriate; an old-school girl lives in an (alludatively) old-style house.

Notice how Hamilton follows the rule of thirds. His subject is not at the center of the frame, but at one-third of one side, with his face facing the wider side. As you learned earlier, this is usually a more preferable arrangement because it is more alive than putting the subject directly in the center of the frame.

Please also pay attention to how to arrange the main body into a triangle, forming an angle from the upper left corner down to the lower right corner. Finally, please notice how Hamilton draws the audience’s attention to private technology to his subjects (girls, flowers and fruits). He framed them with the bright light on the wall. Do you think it is simple? Without diminishing this beautiful picture, we can’t see anything that can be removed.

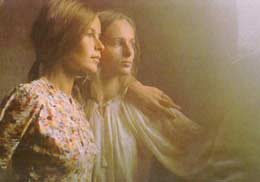
Two young women are looking out the window. This is a picture of innocence and friendship. Let us see how Hamilton expresses this theme.

The first is the use of light. Compared with the “hot light” used in the cover photo, cold light is used here, and diffused light is used, which is the opposite of warm light, which is sexy. Pay attention to how all the shaded parts turn black-a sign of live light photography.

The second is posture. The purpose of this photo is to express harmony. Let us now look at this excellent example. When you photograph two or more people together, you usually like to make them appear as a whole, rather than separate individuals. This is called harmony.

In order to achieve harmony in this photo, Hamilton used some classical techniques. He kept the subjects close together, leaving no space between the two. To enhance their sense of relationship, he put one person’s arm on the other’s shoulder.

In addition, in arranging models, he adopted a classical form of expression-triangle. Notice how the positions they occupy form a triangle with the head at the top and the sloping arms on both sides. This triangular layout is very effective when arranging people and objects in a picture.

Finally, in order to enhance the sense of harmony, Hamilton asked the two subjects to look in the same direction, possibly at the same object.

Categories
Studio Lights Education

Light for Photography-Live light Photography_Part I

Live light

On-site light photography uses only the light present in the scene, not outdoor daylight. For example, the live light can be household light, fireplace fire light, or neon light. The spotlight also includes the spotlight beam hitting the ballet dancer on the stage, or the candlelight that illuminates the face of the lover. The scene light also includes daylight that enters the room through the window. In other words, the live light is just the light already in the scene—in addition to outdoor sunlight—not additional artificial light sources such as overflow lights, flash bulbs, or electronic flashes.

Compared with outdoor daylight or artificial lighting in the studio, the scene light is usually darker. Therefore, photographers must pay special attention to correct exposure.

Why use Live light

Many professional photographers like to use live light for three reasons:

  1. Full of realism and sentiment: Live photos can convey a sense of reality. Because the lighting used in many live photos is limited, not as perfect as photos taken in a studio using artificial lighting, the audience will have a sense of reality that he is looking at the object being photographed.

On-site light can not only convey a sense of reality, but also a sentiment. The scene can be dark while emphasizing the dark shadows, or it can be bright and high-key. It can also be melancholic, bright, vivid, dim, or cheerful.

By observing the light around you at this moment, you can begin to train your eyesight, recognize the different moods of the scene light, and prepare to capture them on film.

  1. The photographer is convenient and free to use: use the live light to shoot, you don’t need to carry bulky lamps, lamp stands, wires or battery packs. You can shoot quickly without waiting for the electronic flash to recharge. You can move freely and try to shoot from different angles and different positions. Although they can be used in live light conditions, because the use of a tripod will destroy the natural atmosphere of the room, often making the expression of inexperienced subjects sluggish.
  2. The subject is easy to relax naturally: under the strong light of the photographic floodlight and sudden flash, professional models may be natural and calm, but “ordinary subjects” often appear unnatural and nervous. It’s much easier to use live lights. Most of your subjects will relax naturally, forget the existence of the camera, you can find a better location, and capture the natural-looking portrait you are looking for.This is a typical live photo. As you can see, the bright part is almost all white, and the shadow part is almost all black. There is almost no gray tones in the middle. This is the characteristic of “traditional” live photos: the obvious black and white tones give the photos a sense of reality and realism.
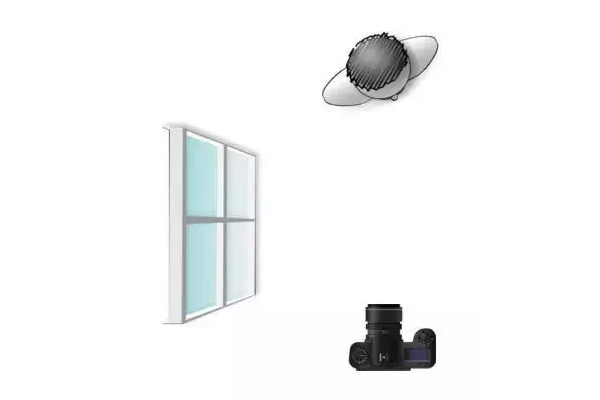
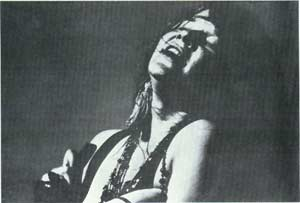
    This is a photo of the rock star Janis Joplin performing live. Do you agree that the typical on-site light and shade of this photo helps to enhance the strength of the photo? Joplin has been dead for many years, but the realism of this photo and its intuitiveness-always capture the energy and pain that made her a legend in the turbulent 1960s.

    Live light photography technology

    Although we are focusing on the photographer’s skills in this lesson, not the camera, spotlight photography is a realm where advanced photographic equipment plays a real role.

    Too long ago, it was practically impossible to perform live light photography under most indoor conditions. At that time, both f/3.5 lenses and ISO50 film were considered faster. Now, it is common to use f/2 and larger lenses. ISO400 film is easy to buy-even using color film (some films can be “forced” and the exposure value can be increased to 10000 or higher), and you can even shoot in a dark room.

    Finally, most of today’s light meters, such as gallium photodiodes, can take readings under almost total black conditions and give accurate exposure combinations (but be aware of the failure of the reciprocity law). Although the light meter can give accurate readings in almost dark conditions, the film may require a longer exposure time in order to compensate for the failure of the reciprocity law.

    Live light photography skills

    We have already pointed out that one of the fundamental purposes of live light photography is to capture the natural state of the scene-the sense of reality. In order to get real photos, it is often necessary to sacrifice the pursuit of technically perfect photos. Of course, you can use flash or overflow light to improve the dim lighting conditions, but this will destroy the natural sense of the scene. In fact, it is the lack of lighting that makes the live photos appear realistic.

    Shooting in low light, you will often find that it is impossible to put the darkest shadow part. The details of the mid-tone part up to the strong light part are recorded. For example, a common on-site light condition is that light enters the room through a window on one side. The side of the person or thing facing the window is bathed in bright light, while the side facing the window is in heavy shadow. The latitude of your film is impossible to reproduce the details of the strong light and shadow parts. So which part of the details do you sacrifice? Usually the details of the shadows. If the strong light part and the midtone part can tell your story, then you have not lost anything here. The shadows without details can provide a real sense of reality.

    When taking this kind of photo, careful observation and understanding are more important than skill. In dim light conditions, your eyes can adjust themselves to adapt to the light. As a result, you can see much more detail than the final photo shows. You can “think beforehand” what the photo will look like. To help you do this, you may wish to use many common tricks used by professional photographers. Squint your eyes while observing the subject before taking the photo. Squinted eyes can “ignore” the details of the shadows. This is a good idea to give you an idea of ​​what the final photo will look like.

    In some cases, the light may only be able to record the important part of the glare. If the picture is worth recording, then take it. Taking a photo is more important than worrying about whether the mid-gray tones can be recorded on film. You may wish to use various techniques commonly used by professional photographers. Choose fast film. When using a slower shutter speed (without using a tripod), to prevent camera shake, you can lean against a wall or chair and hold your breath when you press the shutter. You can use the light reflected from the natural reflective surface. But remember to take photos!

    Use light meter

    As we pointed out on the previous page, the metering of live photos is different from normal metering. In normal light metering, whether you are using color negative film or black and white negative film, you have to expose the shadow part-this means that you have to measure the reflected light readings on the important shadow parts, and then determine your exposure. Using this method of metering, you will shoot negatives that show details in important shadows.

    However, in live light photos, in order to achieve realism, you need to make the shadows black!

    In order to achieve this goal, how should you meter light? In order to achieve this typical on-site lighting effect, use your reflected light meter to take readings on the strong light or mid-tone areas —not on the shaded areas. By doing this, you are actually underexposing the image. You didn’t let the shadows of the film get enough light to produce detail there. Result: On the negative, there is no detail in the shadow part. On the photo, whether it is a color or black-and-white photo, the shadow part becomes black.led-hard-&-soft-2-in-1-lights

    Therefore, this is why when you use negative film, whether it is a color negative film or a black-and-white negative film, you have to pursue a typical on-site light effect when metering. Remember to meter the strong light part or the mid-tone part. What should I do if I use an incident light meter instead of a reflected light meter? It is not difficult. The incident light meter gives a normal reading, and using this reading will produce a “normal” image. However, in order to get the effect of the live light, you don’t need a normal image-what you need is an underexposed image. Therefore, when you take the incident light readings, use the boundary exposure, that is, reduce the aperture by one or two stops in order to take an underexposed image.

    If you use a gray card, the truth is the same. First, take the readings according to the normal method, and then use the bracketing light, that is, reduce the aperture by one stop or two stop exposures to make the image underexposed.

    However, when using color reversal films-slides, you must be careful not to close the aperture too much. The danger of underexposing color reversal films is that you may get annoying color casts. No one likes photos with green faces! If you use color reversal film, our suggestion is to act in accordance with the exposure rules of color reversal film —— expose the bright light part. Then, in order to obtain a slide with on-site light effects, the aperture can only be reduced by one stop.1000W-Soft-Panel-LED-Light

    Finally, if the scene is very dark, no matter you use negative reversal film, you can use the techniques commonly used by professional photographers. The scene may be too dark, and the mid-tone or strong light part cannot be measured with a reflected light meter. The scene may be too dark to take a gray card reading. The scene may be too dark to take a reading with an incident light meter. So what should you do?

    For this very dark scene, many professional photographers will take readings on bright white objects: a piece of white paper, a piece of white handkerchief, and the white side of a Kodak gray board. Then they opened the aperture by about half of the second block. Why do you want to open the second gear? Because their light meter is adjusted to measure 18% gray to reflect light.

Categories
Studio Lights Education

Light Analysis and Lighting Techniques at Different Time

One day is scientifically divided into twenty-four hours, which are roughly divided into four periods of’morning’,’daytime’,’evening’ and’night’.

It will be written on the film production table:’morning scene’,’day scene’,’evening scene’, and’night scene’ time atmosphere, indicating the lighting tendency. Sometimes the symbols are also written as: (M), (D), (E), (N), which are respectively’morning’,’day’,’evening’, and’night’.

In the process of shooting, due to factors such as production and cycle, it is impossible for photographers to shoot under natural light conditions, so lighting is more or less involved.

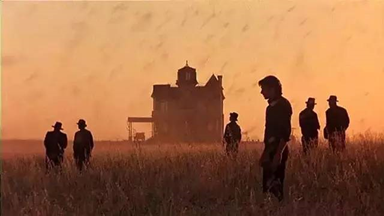
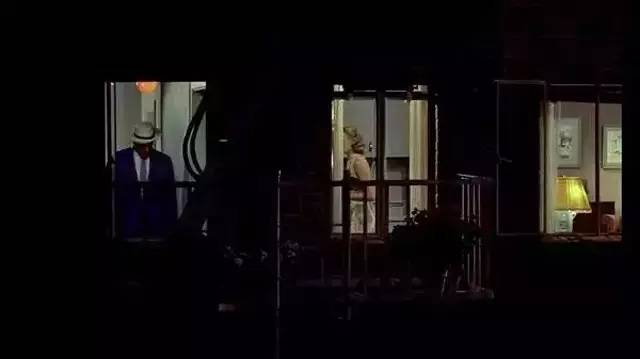
But there is also a movie like “Rear Window” where the sense of time is completed by lighting, and there is also a movie like “Days in Heaven” that is completed in magical moments in the morning and evening.Movie “Day in Heaven”

Morning time light perception

Light analysis: When the sun has not risen in the morning, there is obviously no direct light, the overall color temperature is higher, and the light atmosphere is slightly blue. According to the standard value, the color temperature should be about 1000~1500K higher.

However, it can also be assumed to be cloudy in the morning to deal with the light atmosphere.

Lighting operation: no direct light, to a certain extent, the contrast between light and dark is larger.

If you plan to shoot the feeling of the rising sun, then you need to arrange some red elements in a part of the picture to create this kind of rising sun. But simply making red elements may look like a sunset. Use an orange filter to lower the color temperature, and a slightly reddish tint is better. When the sun rises, the position of the light source should be relatively low, so the position of the light should be arranged at a lower position.

Day time light perception

Light analysis: Compared with the morning, the sun position of the day scene should be higher, and the sun should be stronger.

Knowing the difference between morning and daylight, using the method of dealing with the contrast between the light and darkness of the subject, you can imitate the difference in the daylight from nature.

When shooting indoor scenes, the main light is usually set to come from the window, so that it looks more natural. At the same time, the sun should be shining from a higher position at this time.

In addition to the lighting treatment of the direct light in the window direction, the effect of bright indirect light outside the house scattered into the room from the lateral direction will be better. The quality of lighting depends on the mood of the audience, so instead of dealing with sunlight, it is better to express the mood of light outside the window. Therefore, in actual shooting, diffuse lighting is often used in order to make the picture look better.

When using’scattered light as the main light’, or’the light perception of the skylight outside the window as the main light’, there is no absolute way to deal with direct light and subtle changes in balance. It is necessary to refer to the scene at the time to make corresponding adjustments. .

If there are doors and windows in the picture, the scenery outside the window will be white and there will be a bright atmosphere effect. If the scenery outside the window is accurate and clear, and the brightness is close to normal, it will make people feel unnatural, and there will be a feeling of bad weather outside.

The film “Twelve Years as a Slave” picking cotton at noon, the light perception of the daytime scene

The main light source is outside the window, and the strong light is softened with tulle curtains

Sunset time light perception

There are various types of light at dusk, red from the setting sun, and the environment becomes darker and blue after sunset. To express the feeling of sunset, the best and fastest way is to cover the lamp with amber filter paper. The story script suggests that’evening’, the main light is generally set as the light source of the setting sun.

Lighting method:

Cover the amber candy paper in front of the light. The main light should be from the side light or the back light direction to easily express the presence of the sunset. When dealing with the shadow part of the subject, the auxiliary light should be set to its standard color temperature, so that the main light and auxiliary light will have a color difference effect. If there is no chromatic aberration between the main light and the auxiliary light, a red’color mask’ is applied to the entire screen, which will give the impression of color cast. Sometimes, a brown filter is added directly to the lens, or white balance is set to make the whole picture red to express the evening.

If you are in an outdoor natural environment, there is no main light illumination processing for shooting the’evening’, which is to directly use the natural setting sun to illuminate. It is recommended to avoid the actor’s forward light angle, because the light position is relatively low at sunset, and the equal amount of light tends to be serious when the actor is irradiated from the front. (The key to lighting is to avoid equal amounts of light) The solution is to adjust the shooting direction so that the light-receiving surface of the object on the screen is in the side light state, and at the same time, the actors must cooperate with the face to face the setting sun to act, so that the visual effect is better.

The light perception of sunset time in the movie “Day in Heaven”

Night scene processing under fluorescent light environment

  • The main light is set on the actor’s head
  • The character auxiliary light uses a’foam board’ to reflect the secondary light. It is advantageous to place the foam board at a high place directly behind the camera. Its purpose is to make the projection of the actors fall under the white wall.
  • The foam board is a surface light source, which not only serves as a supplementary light for the characters, but also increases the amount of light in the entire room. (Character auxiliary light, background background light) This will increase the brightness of the background, causing the problem of the distribution of light and shade between the background and the actor’s face, and lack the feeling of night scenes.
  • Use a black flag between the reflector and the actor to intercept a small part of the bottom light-a gradual shadow in the background, so that the upper part is dark and the lower part is bright.
  • Blue filter paper should be added to the light opening of the lamp illuminating the foam reflector, which can increase the color temperature of the auxiliary light and the base light, and express the cold color impression of the fluorescent lamp.

The light perception of night scene time can also be completed by table lamps, candles and simulated moonlight light perception. The atmosphere of the night scene in life changes greatly due to the images of various environmental light sources.

Photographers need to consider: What scene will be used for this lighting? Where must lighting be done? There should be light in real life, but what kind of light can be ignored and need not be processed?

Methods to enhance the light perception of day and night scenes

The difference between day scene and night scene lies in the type of light source and its brightness distribution.

Specifically speaking, in the same place, we did not realize the existence of some kind of light during the day, but at night it will produce a strong sense of light. For example, traffic lights flicker and dim at an intersection, and the light leaking from the car when a city light rail train passes. , The advertising light box in front of the store and so on. These lights should exist both during the day and at night, because the sunlight is too strong during the day and will not attract our attention.

The same phenomenon, the brightness of the fluorescent lights in the store and the light in the refrigerator, whether it is day or night, is the same indoors. If the atmosphere of the script is specified as a day scene, the brightness of the light source in the screen needs to be weakened. If the atmosphere of the script is specified as Night scene, then the brightness of the light source in the picture needs to be strengthened to increase the light perception of the night scene.

Night scene fill light

If shooting night scenes, shooting indoors from the outside, if the room has civil lighting, the lighting is different from the type of lighting envisaged in the movie, and lighting means must be used to adjust. This practice is called’fill light’.

There are two options for this kind of “filling light”: one is to illuminate the curtains from the room; the other is to illuminate the walls of the room instead of illuminating the curtains.

The movie “Rear Window” uses indoor light to fill light

On the basis of natural light effects, the movie “Day of Heaven” uses the lighting in the pavilion as the main light source in the picture


Categories
Studio Lights Education

The Characteristics of Light in Photography

Brief Introduction

Each art form has its own unique means of expression. The photographer’s means of expression is light. If there is no light, they will do nothing like a sculptor without clay or a painter without paint.

Although the art of photography has developed its own different genres and styles in the course of more than 150 years of development, it has always followed art forms such as painting and literature. Especially in the past 50 years, futuristic photography and absurd photography. Editing photography and stereo photography, etc., can find similarities with sister art in form. However, they are still different after all. One of the reasons is that photographers give full play to the unique modeling method of photography-the language of light. Through light, they formed their own way of modeling and determined the expression intention of the picture. Through light, it is not only different from other sister art, but also among photographers, their own artistic styles are also produced.

Creative photographers often say that the knowledge of light is the most important part of the photographer’s artistic talent. Light itself is expressed in many different forms, and photographers can choose the most suitable form to achieve a special purpose. These forms of light are controllable, and they can be used to clearly express the characteristics, concepts, and emotions of a particular subject on the photo. Before photographers can make full use of the great potential of light, they must analyze light, understand the various characteristics of light, and familiarize themselves with the various functions and uses of light.ledsfilm-2-in-1-studio-lights

Intensity of Light

For photographers, light has three main properties: intensity, quality, and color.

The first is strength. The intensity of light can range from bright to dark, and this applies to any light source. For example, in cloudless weather, the daylight at noon is very strong, and in windy and sandy weather, the light is dim. It can be said that there is no light at night. The intensity of the artificial light source varies with the power of the lamp.

Bright light gives people a dazzling, bright and serious feeling, dim light often expresses melancholy, tranquil and reserved emotions. This difference in lighting intensity will be expressed in three different ways in the photo: the brightness of the subject, the contrast range of the subject, and the color reproduction of the subject in a color photo.

When the illumination intensity is high, the subject appears brighter, clearer, and the contrast is greater, and the color appears more vivid than under the light condition of low illumination intensity. If the photographer is good at grasping and cherishing such different changes in the subject, he can use light of appropriate intensity to better highlight the characteristics of the specific subject.led-hard-&-soft-2-in-1-lights

It is important that this characteristic of lighting is shown in the photos. Some photographers often think that very bright light will make the subject look too dazzling, the bright part is too bright, and the shadow part is pitch black. As a result, the contrast was artificially reduced, and relatively low-contrast photos were produced. The result was a complete lack of the typical characteristics under special lighting conditions. For example, in the scene of open-hearth tapping, the hot molten steel is so bright and dazzling that the eyes can’t see anything except black and white.

At this time, as some people have done, using a very strong auxiliary light to soften and reduce the contrast will completely destroy the dramatic effect of this scenery. When a sensitive photographer encounters this subject matter, he will completely abandon all the rules and precepts he has learned about using light, and only consider how to express the hot and dazzling impression of molten steel, that is, by emphasizing the characteristics of lighting, enhancing contrast, Silhouette and halo effects capture this vivid scene.

Light Quality

The second property of light is its different qualities.

The light can be direct light from a hot light source, such as sunlight that is not blocked by clouds, direct artificial light from spotlights, photography lights, and flashlights, or scattered light reflected from the surface of the illuminated object. Such as foggy or cloudy daylight, artificial light reflected from the surface of walls, ceilings or other objects that reflect light, or scattered light formed by adding a diffuser in front of a hot light source.

Direct light is strong and dazzling, with high contrast, which can create clear and prominent shadows. The scattered light formed by the reflection is softer and has low contrast, which can cause gray, fuzzy shadows, or no shadows at all.

Of course, there are countless transitional stages between the two. Practice has shown that the shadow caused by direct light can change with the change of the position of the light source and the subject, or the position of the photographer and the light source. This kind of bright shadow can strengthen or weaken the characteristics of the subject due to its shape, style and size of the part it occupies.

The reflected light can show the shape of the subject, and can reproduce its original appearance delicately and naturally, and has little relationship with the relative position of the subject and the light source. Therefore, direct light is more difficult to use successfully than scattered light, because improper use can make the result worse. However, if used correctly, it will enable photographers to take vivid images with strong contrast and black-and-white pattern effects, far better than the effects obtained with scattered light.

Color of Light

The third property of light is color.

Those color photographers who are dedicated to color reproduction must make it clear that the color of the lighting (its color temperature) must be consistent with the color temperature required by the color film. For example, the light in the morning and evening is not suitable for daylight film, and the photos taken with this film are more yellow or red than the scenery seen by the eyes. In addition, sunlight in outdoor shades is usually somewhat bluish.

American photographer Arthur Goldsmith believes that light has two characteristics: objectivity and subjectivity. It is necessary for photographers to do both. The so-called objective light refers to a narrow band of the electromagnetic wave spectrum that enables us to see and record images. However, Goldsmith pointed out that the use of subjective light—as a creative factor in photography—while accurately measuring this light for correct exposure cannot be ignored. Subjective light is the light that can make us react to emotions.

Nowadays, exposure control-the control of the amount of objective light input-has become an inherently automatic process with the gradual sophistication of photographic equipment. However, the subjective component of light in photography has nothing to do with today’s complex exposure control system. It mainly involves people and extremely rich subject matter, which is very important for any serious photographer.

To understand and master the above characteristics and use good light, it is not enough for photographers to observe only, and they must also be able to feel them. Photographic observation refers to an in-depth understanding of the actual effects of light on the subject. This requires a special visual sensitivity, “How does the sunset approaching dusk show the texture of the sand dunes? How does the lighting covered by thin clouds in the bright cloudy sky soften the wrinkles on the face? How about a spotlight Arouse people’s attention? Or, how does a direct flash sweep away the nuances of the surrounding light, and add its own plain and hard light to the picture…”1000W-Soft-Panel-LED-Light

In this regard, photographers must coordinate with them. Goldsmith believes that one way to increase your sensitivity to light is to learn how master photographers react to light.

Some photographers who are romantic, and even focus on the plot, like dark colors, such as Eugene Smith. In his photography, it can make the shadows vigorous. However, he pays great attention to details, and even in the darkest part, Smith always manages to preserve details and layers.

For Henri Cartier-Bresson, light is a subtle component that can show cool high-key, silver-gray midtones and soft blacks. In addition, it is helpful to pay attention to the light consumption of contemporary color photographers. In Elliott Porter’s forest image, the light shining on tree trunks and moss-covered rocks is soft and penetrating. In stark contrast, Alex Webb used the scorching tropical sun to create deep, painterly shadow effects. Rebecca Black creates dreamlike light for her affectionate fantasy works.

In short, photographers use objective light to leave the image on the film, but the quality of the image depends on the subjectivity of the light. The camera in the photographer’s hands will faithfully record what he clearly sees and deeply feels.