Table of Contents
Use Window Light Skillfully
For centuries, painters have liked to use the sunlight from the windows to paint portraits, because this kind of light has strong modeling ability and good projection. In the future, photographers often use this kind of light to shoot portraits indoors.
The light coming in from the north-facing window is a more directional but still soft light. When you put a reflector on the opposite side of the window light to weaken the shadow produced by the light source, the effect that appears is soft and elegant, which can understate the character’s face. This kind of light is especially suitable for color film, and it is happily adopted by many portrait photographers.
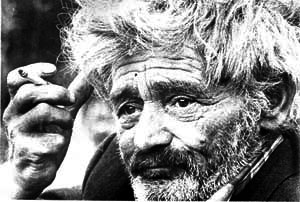
British photographer P. Peizol pointed out that the lighting of the window light is determined by many factors, and its intensity changes much more than what the eyes can see. The distance from the window to the subject determines the type of facial illumination. At the same time, it also depends on the reflective ability of indoor walls and floors. When the subject enters the blind corner of the window light, the reflected light on the wall begins to play a greater role. At this time, the closer the subject is to the wall facing the window, the more fully illuminated.
When shooting indoors, as long as the subject moves a few steps, the contrast between strong light and bright shadow will change greatly. Therefore,’adjusting the distance can solve the problem of uneven illumination. Peizol pointed out that if the subject is in the middle of the window, facing the window, his forehead, nose, cheekbones and chin are all illuminated by white light, which looks very prominent, and the outline can be set off regardless of the background. It’s obvious.
The light comes from the side, the cheek lines are obvious, and the cheeks and jaws can create shadows. The head is slightly turned away from the camera, and the side light can produce the greatest three-dimensional effect. At this time, the best way to express a person’s facial features is to turn the face slightly away from the window and toward the shadow direction so that only the side is fully illuminated.
But at this time, you must also use reflectors or other indoor reflections. If the subject moves to the side of the window, facing the window, the side light and contour light will be weakened, and the face will appear round and even. When the face turned to the camera, shadows appeared on the back window of the face, but the side of the face farthest from the window was more or less illuminated by flat light. When far away from the window, the whole face is in the dark and flat light. The farther the subject is from the window, the more dull the tone.
When shooting portraits with window light, small rooms with light-colored walls reflect more light than large, dark rooms, so the background is brighter. The intensity of the reflected light and the hue of the background can be adjusted by opening or closing the curtains. However, Peizol believes that the most worthwhile pursuit is the luminous effect of direct light. Photographers can use blinds or thick curtains to simulate the effect of hard-tuned direct light according to their wishes. You can also use thin curtains to turn the oblique light into scattered light, and you can also give it a certain color. The lightly-tuned window screen can be used as a diffuser to soften the light. The effect of sunlight on colored curtains is the same as that of floodlights with colored filters.
Use white cardboard, etc. to make a reflector, and adjust the position of the reflector to control the intensity and distribution of the reflected light. But if this technique is used too much, it will lose the characteristics of natural window light. During the day, the color cast caused by changes in light indoors is the same as when taking color photos outdoors. However, some issues that do not need to be noticed in outdoor photography have an impact on indoor window light. For example, if there is a red brick wall near the window, the light of the indoor window will be reddish; outside the window is a garden with tall trees, the light will be greenish; the window facing the blue sky may be bluish. This effect may be more pronounced indoors than outdoors, because windows are more selective and do not have a total balance of colors like outdoors.
If there are windows on both walls of the room and the subject is between the two windows, the cross-lighting at this time will cause various interesting light effect changes. As long as the subject rotates his body while shooting, a series of different changes will be revealed. At this time, care should be taken to try to adjust the light of one window to be slightly brighter than the other window. Equal light from two windows is the worst.
British photographer Ronald Spearman believes that the use of window light to shoot portraits can also be used as auxiliary light. He pointed out that when the subject is exposed to both sunlight and tungsten light, it can produce very satisfactory results on daylight slides, which is generally not realized by beginner photographers. At this time, the only requirement is that the two light sources must come from different directions so that they can illuminate different planes of the subject. In other words, you cannot allow the subject to be exposed to sunlight and light from the front at the same time.
Spearman believes that the best effect can be achieved by entering the window light into a room normally illuminated by tungsten lamps, thus forming a cold beam in one case. If you use a luminaire with a reflector for lighting, it is different from the light in a normal room. Therefore, it is best to let this light scatter, and then it can be reflected to the ceiling or wall and then reflected back.
Of course, if a flash is used as an auxiliary light, there will be no difference in the color quality between the bright part of the subject and the shadow part. But it must be remembered that the strong light part may accept the actual exposure of about 1/30 second, while the shadow part can be supplemented by the flash. The flash time may be 1/1000 second or faster. In this way, you may get a picture with half of the image very soft and the other half with very clear spots and other imperfections. Therefore, it is best to use an umbrella reflector or bounce flash as the auxiliary light in this situation. In addition, you must carefully calculate the light ratio or take a trial shot.
Outdoor Scattered Light
When it is cloudy, the outdoor light is very soft scattered light, and good results can be achieved when shooting portraits with this light. If you can use a hand-held reflector, you can further improve the light effect, that is, use the reflector to increase the light of the eyes and reduce the shadow under the chin, so as to take more beautiful portraits.
The real difficulty in shooting portraits with this kind of light lies in arranging the posture and position of the subject so that the scattered and reflected light illuminate his face as much as possible, while at the same time making the background part free of any obstacles.
The specific process is as follows: Choose an open area and don’t let obstacles block the natural scattered light. Let the subject turn, so that you can observe the light effect on his face, in order to find a position that can get the most scattered light. This light can soften wrinkles and imperfections on the face. Teach the subject how to hold the reflector to reflect the light to the chin, neck and eyes.
If the subject is wearing a hat, in order to prevent the brim of the hat from producing bright shadows on the face, try to tilt his head and adjust the reflector until the shadow is almost invisible. At this time, the exposure can be measured. Every time the subject takes a new pose, the exposure must be measured.
If you are using color film, you can change the exposure to shoot. Check the background carefully and predict the effect of the viewfinder before pressing the shutter. Try to keep the background part completely out of focus, so as not to be distracted by the clear background on the finished portrait.
Use of catch light
When shooting portraits, no matter what light source is used, as long as it is in front of the subject and has sufficient brightness, it will be reflected in the eyes, and reflective spots will appear, thus forming the eye light. The reflective spots shown in the eyes are always different in shape, size, and position. For example, when shooting a portrait indoors, light comes in from a window far away from the subject, and bright window shadows appear in each of his eyes. Using the flash on the camera will create a small white spot in the center of the eye, while using a reflector or umbrella, a reflection area will be formed, and this reflection is usually skewed to one side.
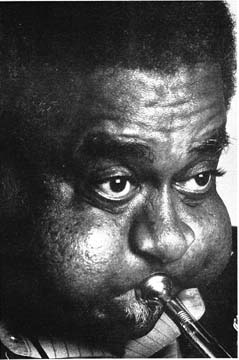
The effects of various catch lights are quite different. The bright and small light is pleasant, the larger light is soft, and the unlit eyes are like a deep pool. British photographer Gordon. Anderson pointed out that in order to take good portrait photography, you must consider the light in your eyes before pressing the shutter. Ask the subject to slightly raise their head or rearrange the light source to determine if there is a catch. The catch light should be balanced, so that there is no light in one eye and no light in the other eye. It is necessary to check whether the light source that produces the catch light is in a sufficient position in front of the subject’s face so that it can illuminate the eyes without being blocked by the shadow of the nose. If the head is turned to one side, it is best to turn the light source of the eyes with it. The position of the light source cannot be too high, otherwise, if the two eyes are not on the same horizontal line, one of the eyes may not be able to illuminate the catch light.
