Table of Contents
Use a reflector umbrella as the main light, and at the same time use a reflector to fill the light
If you add a reflector to the dark side, use reflectors to light the shadows, and reduce the light ratio again, you can get a more natural lighting effect than a single lamp.
Now pull the light back to a 45-degree angle, and then use a 42-inch reflector to fill up the shadow of the model with a white surface.
The double-sided reflector is very useful under the condition of single-lamp lighting. By selecting the reflective surface and adjusting the position and angle of the reflector, we finally think that the supplementary light method shown in the figure is the most ideal.
This is the effect of fill light. The light ratio is further reduced, and the details of the shadows are improved. The model looks more natural, like in front of a window in a large bright room rather than in a dark corner or under a street lamp.
Using a reflector to fill light is an economical and effective way to obtain a perfect light ratio. With the reflector bracket, a double-sided reflector is an all-rounder to improve the lighting effect in many cases.
Use two reflector umbrellas as the main light and auxiliary light
Of course, the reflector can only passively “fill light”. To gain complete control of the light, you still need a few more light sources. Using two flash lamps of the same power, by reducing the output of the auxiliary light, a controllable light ratio can be easily obtained. For example, if the main light source is all output, and the auxiliary light is reduced by half, a light ratio of 1:2 can be obtained; if the auxiliary light is reduced by another half, a light ratio of 1:4 can be obtained.
As for the position of the auxiliary light, the easiest way is to place it on the other side of the model symmetrically with the main light. The important thing is to pay attention to the direction of the auxiliary light, and do not let the light of the auxiliary light overflow into the area irradiated by the main light, so that it is easy to control the light ratio and eliminate unnatural shadows.
First, we turn off the main light source and use only the auxiliary light to take a test shot to determine the lighting effect of the auxiliary light. It seems that the effect is satisfactory. The light illuminates the side of the model very well. From the light metering results, its intensity is the same as the main light.
According to the results of the test shooting, the light ratio is exactly 1:1! There are almost no shadows on the model’s face, which is a perfect “big flat light” effect. With the first light, the background is also lit up, and the test shooting effect also confirms the previous judgment: the power of the two lights is the same.
Let’s reduce the output of the auxiliary light step by step to see the effects of various light ratios. Please note that the brightness of the background changes when we change the light ratio of the model’s face.
The auxiliary light output is halved, and the light ratio is 1:2. The advantage of the dimmable studio light is that you can change the light intensity without changing the position of the light. You only need to turn the output control knob to change the size of the output. At this time, the irradiation angle and coverage of the light will not change.
Now reduce the output of the auxiliary light to 1/3, and the light ratio is 1:3. The shadows that help shape the appearance appear.
Now that the light ratio is further reduced, the effect is close to the effect of supplementing the light with a reflector. The difference is that the current light ratio can be completely controlled at will. This is a typical lighting demonstration of a dual-lamp portrait.
Now we compare the effects of the four light ratios together, and we can observe the change in the brightness of the auxiliary light and the shadow on the model’s face when the main light source remains unchanged.
Use a reflective umbrella for the background light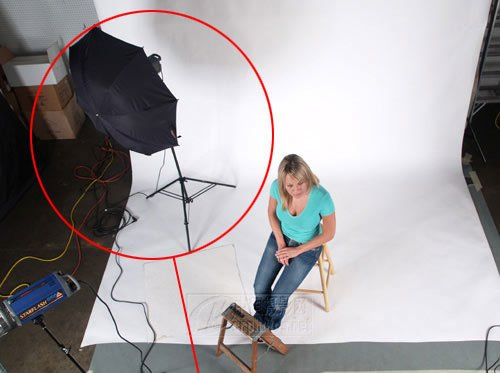
We used a background light to make the silhouette of the model more distinct
If you want to get a more “professional” lighting effect, you can add another flash with a reflective umbrella, which is used to illuminate the background. Let’s place this background light about 90 cm away from the background and illuminate the background at an oblique angle. In this way, we obtain a background effect with gradual brightness and make the model’s silhouette more vivid.
We have achieved the desired effect, the background is illuminated, it is no longer gray, and the model and the background have a sense of space. Of course, the effect of a light is still limited, and adding more lights can get better results.
Add a background light here to illuminate the background evenly
Now use the fourth light to illuminate the background from the other side, so as to fully control the background and foreground lighting. We want the background to change from a gradient gray to a completely bright background. Originally, our background cloth was pure white. With the illumination of two background lights, the background can completely “disappear” from the picture.
Handicraft arrangement of all four lights
At this time, the convenience of adjustable output flash is further embodied. Before, we always used the full output of the main light, but if the back light also uses the same specification flash, there is no room for adjustment. At this time, we can reduce the output of the main light. Of course, in order to maintain the light ratio, the output of the auxiliary light Also reduce, correspondingly, the camera’s exposure combination should also be adjusted. From 1/125 second f/11 to 1/125 second f/8. In this way, you can better control the brightness of the backlight.
This is the final shooting effect. As the background “disappears” and the figures are sharply contoured, the use of the photos has also been expanded. Such photos can be conveniently cut out in post-processing software (such as Photoshop) to superimpose other backgrounds, or form a “group photo” with other portraits. Of course, the portrait itself is very beautiful: beautiful light and shadow, rich details, bright eyes, cute expressions…
From single lamp to four lamps, you can choose freely according to your needs. In many cases, you only need one lamp and one reflector to take beautiful portrait photos. I have given so many demonstrations to provide you with one Kind of idea to control the lighting effect. Please remember that there are no rules for lighting portraits, only guiding principles. Practice more and discover that the fun is the essence of photography.