Table of Contents
Lighting techniques using flash and reflective umbrella when shooting portraits_1
Whether you use a single lamp or four lamps, and no matter what artistic effect you want to shoot, a studio flash that can precisely control the output and angle can help you get professional lighting effects. In this section, we will talk about how to use flash and reflector.
This article includes the following parts:
* How to use flash and reflector umbrella
* Use a reflective umbrella as the main light source
* Use a reflector umbrella as the main light, and at the same time use a reflector to fill the light
* Use two reflective umbrellas as the main light and auxiliary light respectively
* Use a reflective umbrella for the background light
How to use flash and reflector umbrella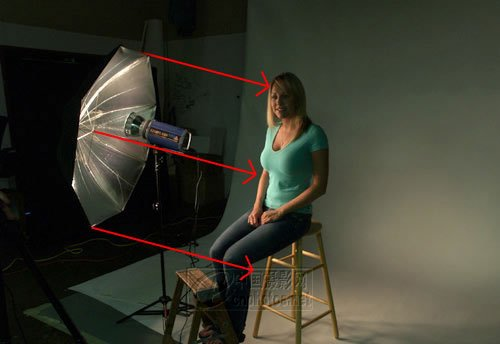
The reflective umbrella was hit too low, illuminating the waist of the model’s handicrafts, and the face has shadows
The general idea is to use a lamp to illuminate a half-length portrait. Naturally, the light should illuminate the upper body of the model, so there is the lighting method in the above picture: the flashlight is facing the middle of the reflective umbrella, and the reflective umbrella is pointing to the upper body of the model.
This is not an ideal lighting method, but from its effect, it can help us understand the lighting characteristics of “flash + reflective umbrella”: the flash is facing the middle of the reflective umbrella, so the light reflected from this part is the strongest. Toward the edge of the umbrella, the weaker the light, and which part you want to focus on, let the handle of the reflective umbrella point to which part. Understanding this feature is the basis for us to make good use of the reflective umbrella in the next step.
In addition, before introducing the use of flash, I mainly talk about white balance. Any kind of light source has a certain color temperature. Only when the color temperature of the camera is set close to the color temperature of the light source can a more accurate color reproduction be obtained.
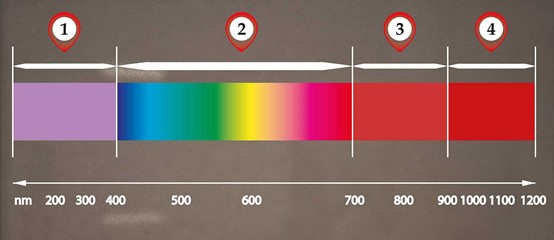
The above chart shows the relationship between the color temperature of the light source, the camera’s white balance setting and the final imaging effect. Generally speaking, the color temperature of the flash is close to the color temperature of daylight, which is 5500K-5600K. When using the camera’s built-in flash, the camera’s automatic white balance can be automatically set accordingly. But when using an external flash, because the flash does not emit light before taking the picture, the camera cannot determine the color temperature of the light. According to the ambient light setting at the time, the automatic white balance will fail, so you need to manually set the white balance.
When shooting indoors with a flash, you can set the camera to “daylight” white balance. Of course, it is best to set the color temperature accurately with manual settings. With the same set of lights, the color temperature will not change much, so once the setting is accurate, you can always use this setting.
Lighting techniques for using flash and reflective umbrella when shooting portraits_2
Now back to the lighting problem.

This is the first test sample taken with the lighting method. It can be seen that the brightest part is on the model’s waist. The light on the face is very dramatic, the light ratio is large, and the head is completely immersed in the shadow. However, what we need to shoot portraits is not this kind of drama, but to show the most beautiful side of the model, so the focus should be on the performance of its appearance.
Since the position of the umbrella handle is the center of the light source, now we raise the light source so that the center faces the model’s face.
Now let the light rise gradually, with the center facing the model’s face
This is the result of changing the light position. The center of the light source illuminates the model’s face and evenly illuminates its upper body.
We can also see that after the reflection of the umbrella surface, the light of the flash becomes soft and natural, not as blunt as the flash is directly at the model.
Use a reflective umbrella as the main light source
From the above sample, although the model’s face is well illuminated, and the light is reflected by the reflective umbrella, it is much softer, but if you carefully observe the lighting effect, the light ratio is still too large, and the model’s forehead and nose have bright spots.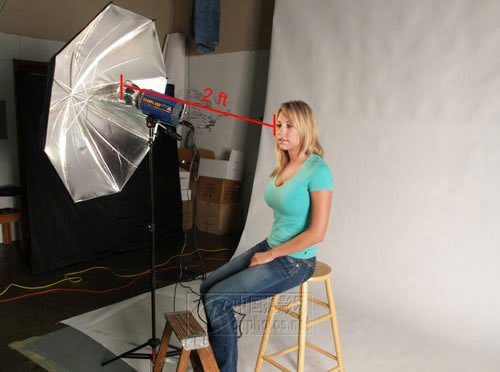
Light source distance 2 feet (about 0.6 meters)
At this time, in fact, the reflective umbrella is acting as the main light source for portrait photography, with an illumination distance of about 2 feet.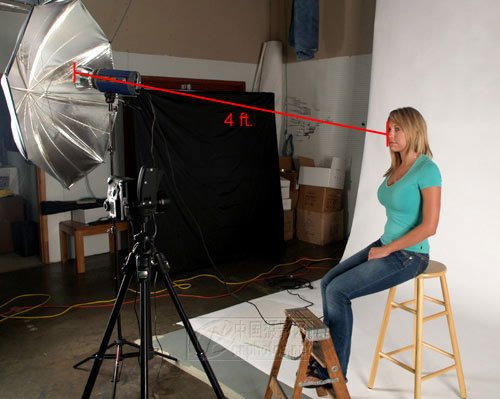
Move the light source to 4 feet (about 1.2 meters)
In order to reduce the light ratio, we might as well move the light source farther, because the closer you are to the light source, the more concentrated the light. Do a simple test and put the light on the wall, you can see obvious spots, even the shape of the filament, if you stretch it farther, there is only an illuminated area.
The use of a reflective umbrella only partially changes the light quality, and the law of distance is the same as that of direct lighting. When the illumination distance is extended, there is no longer an obvious bright area, but the entire range is illuminated.
After the distance is opened, the light ratio is significantly reduced (of course, the light becomes weak, and the camera aperture needs to be opened correspondingly), and the shadows on the model’s face are not so heavy. This kind of light is no longer as harsh as the direct sun, and looks more Like the effect of natural light in a window.
In order to further reduce the shadow on the right side of the model, another method is to change the angle of light, move the light closer to the camera, close to lighting from the front.
In terms of lighting pattern, this result would be more of a loop, referring to the small “loop” of shadow under the nose, and less of a “Rembrandt”, typified by the upsidedown triangle of light created on the cheek from light spilling across the bridge of the nose.
In general, this effect is more satisfactory. If you want to use a single light to shoot portraits, this lighting method is a successful example. Although there are still shadows, it has weakened a lot, and the facial features of the model perform well. This lighting is not too dramatic, but it is very useful.
Now compare the shooting effects of the two lighting angles together. Both effects are good. The key depends on what the photo needs to show, and decide which effect best reflects your feelings about the model and the purpose of the photo.