Table of Contents
Breakthrough Composition in Photography
Avoid tourists
There are always many tourists in popular travel destinations, and they always appear chaotic in the screen. How to do? Teach you three tricks of composition techniques to make these people disappear.
1. Use foreground occlusion
We can try to find some prospects to block other tourists. For example, low shrubs on the roadside, hanging willow branches, beautiful railings, delicate small objects with regional characteristics, etc.
2. Close to the main body
“If you are not shooting well enough, it is because you are not close enough.” This famous quote by Robert Capa is really useful. When we shoot close to the subject, whether with a wide-angle or telephoto lens, the picture will be filled with the subject. Will there be room for passers-by? I think it shouldn’t be too much. Even if there is, it is not so conspicuous because of the perspective effect of near and far.
▼Get close to the subject and use the wide-angle lens to make the person in the distance smaller and less conspicuous.
CANON EOS 1Ds MARK II, EF24mmF2.8, F5, 1/2000s, ISO125. Daylight white balance. San Francisco
3. Low angle shooting
If you are close to shooting and still feel that there are too many people waiting, the second trick must have a better effect at this time-low-angle upside down shooting. Shoot upward from a slightly lower angle, and irrelevant people will run out of your lens. Generally, the sky or landmark buildings are used as the background, and the picture will appear simple and clean and rich in regional characteristics. However, getting too close and the angle too low will cause serious deformation of the opponent, remember!
▼Kandy is a very noisy and crowded city, with people coming and going on the streets. It is not easy to take a picture with a simple composition and a prominent subject. I chose to squat down and take photos of two roadside vendors from a low angle upwards. With the sky as the background, the picture is much simpler.
SONY A900, 16-35mmF2.8ZA, F11, 1/200s, ISO200. Daylight white balance. Kandy, Sri Lanka.
Central Composition
The central composition method is the simplest way of composition. Anyone who takes the first photo will naturally place the subject in the middle of the frame. This kind of composition requires the subject to occupy a large area in the picture, be obvious, and there should be no clutter around to interfere with the line of sight.
CANON EOS1, 28-70mmF2.8L, F4, 1/125s, FUJI RDPIII, automatic white balance. Kathmandu, Nepal
Golden Section
What kind of composition is unique and not rigid? In fact, the ancients had arranged for us a long time ago, and the secret is the golden section.
The golden section has strict proportionality, artistry and harmony, and contains rich aesthetic values. The value of 1:0.618 plays an important role in photography, painting, sculpture, music, architecture and other artistic fields. Our common golden section has the golden section line and the golden section point.
Let’s first take a look at how to use the golden section line and the golden section point. When we divide the four sides of a photo according to the golden ratio, we can get two horizontal, two vertical and four lines. We call it the golden section line, and the four intersections are called the golden section point. The edges of the picture are divided into three equal proportions by these lines, so we sometimes call it the “rule of thirds.” These lines divide the picture into nine grids, sometimes called “Nine-grids” composition.
Golden section line and golden section point
The Location of the Horizon
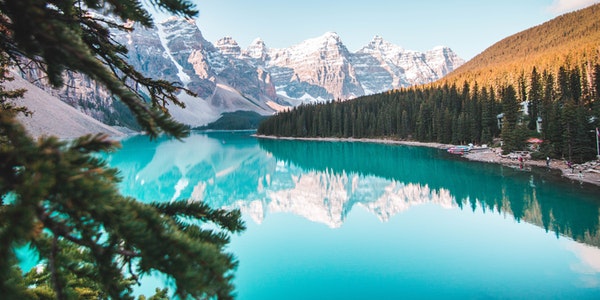
The position of the horizon is very important in landscape photography. In order to avoid the boringness and ambiguity of the picture, it is generally avoided to place the horizon in the middle of the picture. The horizon is located in the lower 1/3, suitable for showing the sky. The horizon is located in the upper 1/3, emphasizing the scenery on the ground.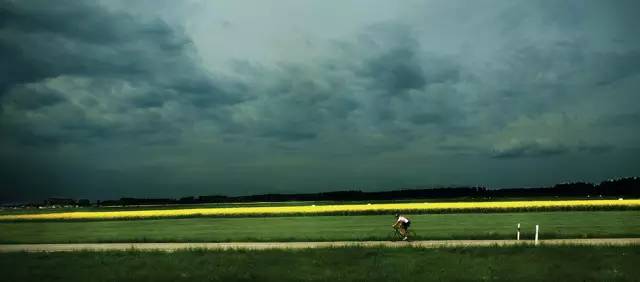
CANON EOS 1Ds MARK II, EF24-70mmF2.8L, F3.5, 1/3200s, ISO320, -0.3EV. Daylight white balance. Munich Germany
When taking portrait photos, the position of the characters can also be arranged on the golden section line in the vertical direction. Usually we leave 2/3 of the area in front of the character’s line of sight to give the vision a sense of extension. 
SONY A900, 85mmF1.4ZA, F2.5, 1/2000s, ISO200, 4800K white balance
▼Sometimes the opposite can be done to increase the imagination of the picture. 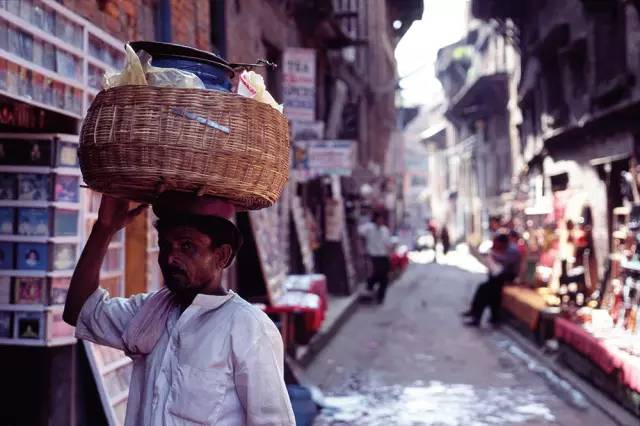
CANON EOS 1, 2 8-70 m m F 2. 8 L, F2.8, 1/500s, FUJIRDP III. Kathmandu, Nepal
Tips: AF Point and Golden Section
Most SLR digital cameras have 9 or 11 or more AF points. The distribution of these focus points mostly coincides with the position of the golden section. Using these focus points can complete the composition while focusing, so that the efficiency is greatly improved. Of course, in some cameras, in order to save costs, the distribution of focus points is closer to the middle of the frame, but it is still necessary to focus first and then recompose the picture.
▼The diamond-shaped focusing system, the four focusing points at the waist are just close to the golden section point.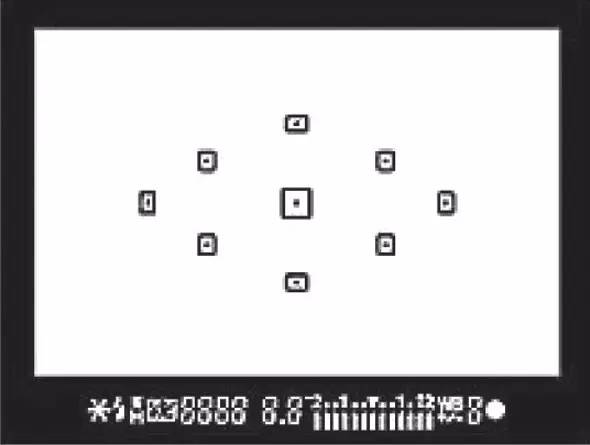 ▼On the right side of this photo is a door, the color is very dark. If the child is centered in the composition, the black on the right is very ugly, and the blue kettle on the left is not fully photographed. With the current composition, the child’s eyes are exactly at the golden ratio point, and there should be no more, no less, just right.
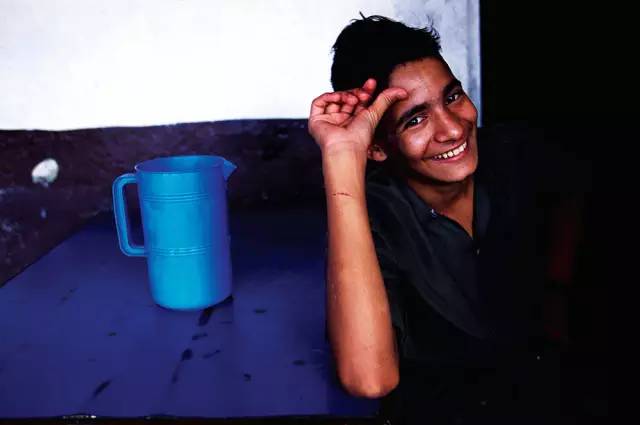
CANON EOS 1, EF28-70mmF2.8L, F3.5, 1/60s, FUJI RDP III. Kathmandu, Nepal
Tips: Press the Shutter Halfway to Recompose the Picture
If you are used to autofocus with the center focus point, you need to learn the technique of half-pressing the shutter to recompose the picture. Use the center focus point to focus on the subject, and you will hear a beeping focus lock sound from the camera after aiming. When the shutter button is pressed halfway down, there will be an obvious sense of resistance. Don’t let go to maintain this sense of resistance. Move the camera to recompose the picture, and place the subject you want to take to the golden section. Note that when recomposing the picture, do not move the camera forward and backward, but pan, otherwise the focusing distance will change and the picture will be unclear.
▼This is a picture that is more elaborate. The figure and the edge of the table are on the vertical and horizontal golden section lines, and the face and the pot are on the two golden section points. Just this kind of composition picture still has a sense of imbalance that is too heavy on the right side, and the cart frame at the edge of the picture appears to be much more balanced.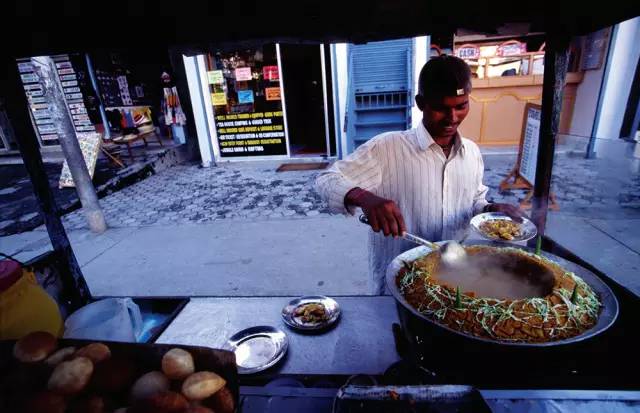
NIKON F100, 17-35mmF2.8, F5.6, 1/200s, FUJI RDP III. Pokhara, Nepal
Threaded golden section
▼The ratio of the diameter of each thread on Nautilus to the diameter of adjacent threads also meets the golden ratio. So when we photograph some thread-like objects, we can also apply the golden section method to compose the picture. The curvature of the spiral staircase is fixed, but as the shooting angle changes, the curvature of the line of the staircase in the picture will still change. We can choose the right angle to make the curve match the visual effect of the golden section.
CANON EOS 5D, EF24mmF2.8. Paris, France
The golden section of the triangle
▼Let’s look at this triangular spiral staircase. Generally, the spiral staircase is more beautifully photographed from top to bottom. But this one is quite special. It’s very common from the top down, but it’s quite charming when you look up at the bottom of the building. The triangle is similar to the spiral, but it has higher requirements for line control.
When taking this photo, my first reaction was to place the vertices of the triangle on the right side of the screen at the center of the vertical direction of the screen.
However, the bottom of the upper part of the stairs is too dark and will appear top-heavy. So I rotated the picture a little bit to make the vertices go up, the dark area was reduced, and the power ratio between it and the space below and to the left became more balanced.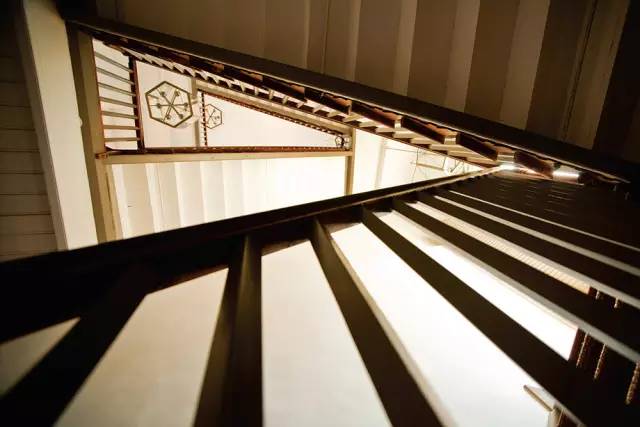
SONY A900, 16-35mmF2.8ZA, F3.5, 1/25s, ISO 320, 5000K white balance, Galle, Sri Lanka
Golden Section in Area
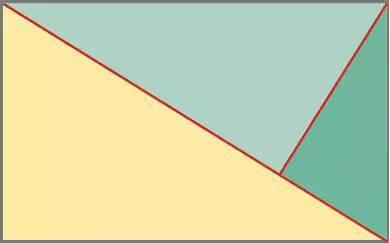
In addition to the common points and lines, the golden section also has the golden ratio in area.
Draw a diagonal line in the picture, and then draw a vertical line from a vertex. This divides the rectangle into three different parts. Now, in theory, the golden section has been completed. In the next step, you can arrange the scenes you want to shoot roughly according to these three areas. You can also flip the schematic diagram by 180° or rotate or rotate it by 90° for comparison.
Summary of golden section technology:
- Do not place the horizon in the center,
- Leave 2/3 of the space in front of the face,
- Pay attention to the balance and power ratio of the picture.