Table of Contents
Introduction to Photography
Photography is an amazing experience. In the journey of life, every unrepeatable moment, we can use the camera to freeze it forever, making this moment a beautiful memory that can be preserved and shared for a long time.
Before the advent of automatic cameras, photography was often seen as a professional technique, and the process of learning this technique was so tedious and difficult.
With the development of photographic equipment technology, the development and popularization of automatic cameras has brought great convenience to people, and shooting technology is no longer the threshold for photography enthusiasts. However, for beginners, even with an automatic camera, in the face of the beautiful scenery and beautiful moments of Xun Li, the photos taken are often bland or even unsuccessful. Why?
A successful photo is not only obtained by skilled shooting technology, but also needs to pay attention to the conception and composition of the external and internal performance. But mastering the necessary shooting techniques is definitely the basis for getting satisfactory photos.
This article aims at the key basic knowledge of light metering, trying to use simple words and legends to explain, hoping to be helpful to beginner photographers.
What is Exposure
First let’s talk about what exposure is. In a very simple way, exposure is when a film or a digital photosensitive component (CCD, etc.) receives light from the lens to form an image. When we take a photo, if the scene in the photo is too bright, and there is no layer or detail in the bright part, this is overexposure. On the other hand, if the photo is dark and cannot truly reflect the color of the scene, it is underexposed.
In Figure 1, since it was not considered that the screen is mainly white, the exposure needs to be increased. This photo shoots the light pink and white Phalaenopsis into off-white, which is a failed film with insufficient exposure. When shooting, increasing the exposure by half a stop to 1 stop will make the photo get the correct exposure. It`ll show a romantic pink and white tone.

Figure 2. Although the foreground exposure of this film is basically correct, as the main part of the performance, the color and cloud details of a large area of the sky are lost due to overexposure. So it is an overexposed failed film. If you can use the exposure of the sky as a benchmark, and reference the exposure of the mountains and the foreground, you can get a quiet morning photo of the rising sun slanting the mountains, the foreground forming a silhouette, and the purple-blue sky and white clouds as the main performance.
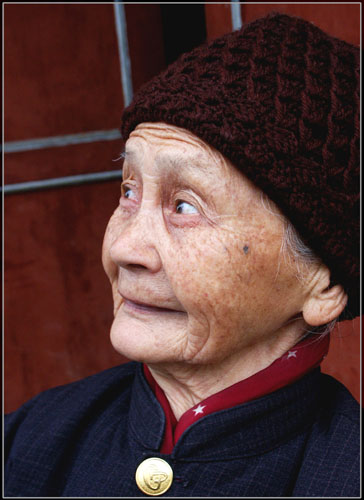
Figure 3. In this portrait photo, the face part is exposed correctly, which captures and expresses the character’s demeanor very well. The darkening of the background accentuates the characters and is a properly exposed photo.

What is Correct Exposure
Correct Exposure
We already know what exposure is, so what is correct exposure?
In fact, correct exposure is relative. Under the same lighting conditions, the light and dark parts of an object reflect differently. In order to correctly represent objects with film (or electronic photosensitive devices such as CCDs), the exposure for light and dark parts is also inconsistent.
That is to say, within the same shooting framing range, as long as the reflection of the object is different, there must be some areas underexposed and some areas overexposed. So in this case, as long as we can achieve the correct exposure of the subject we want to express, this photo can be said to be correctly exposed.
Cameras these days basically have automatic metering, which allows us to take photos with the right exposure in most situations. But in some cases, there are also unsatisfactory exposures. It is often the scene that our human eyes can see. After taking a photo, the gap will be very large. What is the reason for this? We also need to understand the knowledge of photosensitive latitude.
Sensitivity Latitude
The human eye can see a wide spectrum of color spectrum, from brightest to darkest. But film (or an electronic photosensitive device such as a CCD) can represent a much smaller range than the human eye can see. This limited range is the sensitivity latitude.
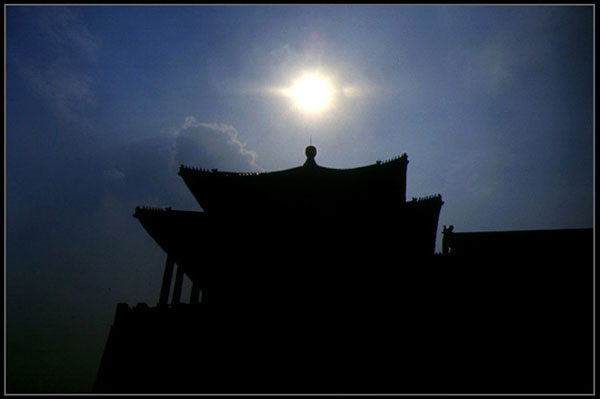
After understanding this concept, it is not difficult to understand why the human eye can see the backlit buildings (dim) and the dazzling sky clouds (bright) under the condition of backlight. Once shot, either the clouds are gorgeous and the buildings become black silhouettes. Or the buildings are clearly detailed and the originally beautiful clouds become white.
Correct use of photosensitive latitude
Figure 4. Because the contrast between light and dark is too large, the cloud layer is exposed correctly. But the building is severely underexposed, and there are no color details, and it becomes a black silhouette. But that’s exactly what this image wants to show. So even though the building is severely underexposed, this image can still be said to be “correctly exposed”. In fact, the human eye can basically see the details of the building. The photographer used the principle of “sensitivity latitude” to correctly expose the clouds. And made the building a silhouette, giving the film a mysterious and majestic feeling. If the architectural color details need to be expressed, then the sky will be completely white.
Correct use of photosensitive latitude
Figure 5. Considering the problem of light sensitivity, when taking this photo, the photographer chose to shoot on a cloudy day. So that the light difference between the front and the back is not much different. As a result, the exposure of the foreground is correct, and the background is also reflected in the details. If you shoot at a time when the light is strong, the foreground may be exposed correctly while the background is almost completely black with no detail.

It can be seen that with proper use of exposure and understanding light sensitivity issues, you can create high-quality photos. The next shooting class will tell you about light metering.
(To Be Continued)
