
Table of Contents
Brief Introduction
As the team of photography enthusiasts continues to expand, many people use their own digital cameras.
Photography is no longer an advanced art, and it has become a part of people’s daily life with continuous popularity. The feeling of being superior in the past no longer exists. Instead, the relaxing experience photography in the streets and alleys in the park and historic sites brings us happy people.
With the love of photography, a digital camera with manual functions has become a must. In actual use, I believe everyone uses shutter priority as the most important shooting control method. With the support of the fast autofocus system, it is very convenient to be able to capture many wonderful moments around you that are just a little bit lost.
While easily obtaining the photos we need, we also found some problems. Because the advantages of digital cameras no longer need the support of film, shooting is much more casual. In a more complicated environment, the metering may be inaccurate, resulting in a lot of waste films. Although it can be deleted at any time, the wonderful moments will also be gone.
So, how can we minimize the chance of this phenomenon happening? The answer is this, we can control the output of the photo by adjusting the amount of different exposure compensation, so as to solve the problem of underexposure or overexposure simply and effectively.
Of course, the method is easy to say, but the actual application requires a lot of empirical judgment. Let’s talk about how to manage this easy-to-operate and powerful exposure compensation function.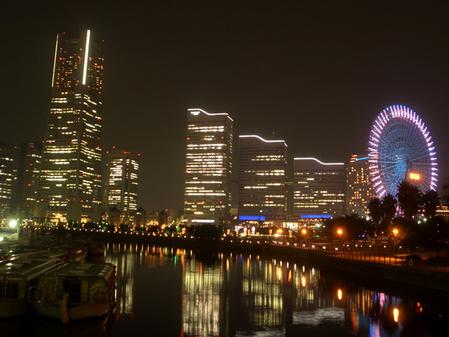
What is exposure compensation
Speaking of exposure compensation, we must first mention a term-exposure. The so-called exposure is EV (Expose Value), and the exposure compensation adjustment is actually this EV.
The adjustment range of exposure compensation is generally around ±2 EV. When adjusting, you can jump in steps of 1/3 EV or 1/2 EV, which can be roughly divided into -2.0, -1.7, -1, -1.0, -0.7, -0.3 and +0.3, +0.7, +1.0, +1.3, +1.7, +2.0 and other 12 levels.
During the shooting process of the digital camera, when the shutter is pressed halfway, the effect picture displayed on the LCD screen is basically the same as the actual output picture. If the displayed effect is obviously brighter or darker, it means that the automatic metering test result of the camera is quite different from the actual one. At this time exposure compensation comes in handy.
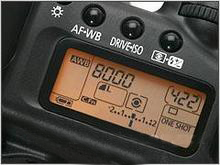
20D exposure compensation adjustment display window
When the exposure compensation is actually adjusted, the shutter speed will change. Simply put, the exposure compensation adjusts the EV, and the final way of adjustment is achieved by increasing or decreasing the shutter speed.
As mentioned above, the adjustment range of exposure compensation is generally around ±2 EV, so when we adjust EV step by step, the shutter speed will also change. Taking 20D as an example, we fixed the aperture of the lens to F4. When shooting objects with fixed light sources, assuming that the shutter speed is 1/20 S under normal Ev, it is 1/30 S when EV-0.5, and when EV+ At 0.5, it is 1/15 S.
Based on this principle, we can appropriately reduce the EV in some environments that require a high shutter speed, thereby increasing a certain shutter speed, making the picture clear and effectively avoiding the blurring of the picture caused by the shaking of the hand.
In addition, because we are using a digital camera, we have to pay attention to the relationship between exposure compensation and ISO. This is also some experience summarized by many photographers in actual use. Judging from the actual photos taken, when the EV is lower than the standard value, the picture looks purer due to insufficient exposure. When the EV ratio reaches the standard value, the exposure will increase and the relative purity of the output photos will decrease.
In actual use, we can lower the EV by one gear in advance, and then adjust it to a normal level in post-processing. In this way, you can effectively reduce the problem of noise affecting image quality.
Application of exposure compensation in actual shooting
Exposure compensation feels simple to say, but when it comes to the practical application stage, it is often at a loss.
What effect do you want for a scene to be shot? What style? These factors often determine the rigor of EV operation. When should it increase and when should it decrease, it is crucial to master this degree.
As the scene changes, the effect of EV adjustment changes is also very obvious. In general, there are the following general frameworks, mastering these can well reflect the creative intentions.
Firstly, Manually adjust the exposure
First of all, with the advent of winter, many friends like to shoot snow scenes. Especially after the snow has just fallen, the entire city is covered by white snowflakes. This is when the exposure level needs to be adjusted manually.
We know that today’s cameras are basically using TTL metering, with 18% mid-gray as the metering standard. And because the surface of snow is more reflective, after normal metering, the shutter speed will be higher than usual, so that the photos taken will be somewhat darker.
At this time, by increasing a certain EV value, the whole picture can look much more beautiful, and it can make your shooting process full of imagination.
So how much EV should I increase? We said that under normal daylight conditions, after adding 1EV, we can basically get the effect under normal standard EV.
In addition, some friends may consider using CPL (polarizer) to reduce the reflection of the snow surface, which is also a very effective method.
Secondly, how to shoot black and white background
When taking photos with black and white as the theme, we should lower the EV to make the black and white tones of the photo more pure. Because in most cases, we don’t want to see the originally black objects become dark gray.
When shooting with white as the main color, since the camera we mentioned above uses 18% mid-gray as the metering reference, we need to continue EV, so that white looks more “white”. This “white plus black minus” theory is particularly obvious when shooting product photos for some products. Through “white addition”, the background can be made white and clean, and the product itself can be more prominent.
Thirdly, the effect of contrast on exposure
In high-contrast conditions, in many cases the background is too bright, but the subject is very dark. At this time, whether to add EV or subtract EV, we say that we need to create according to the actual shooting needs.
If you need a silhouette effect, then there is no need to increase the EV. Conversely, if you want the subject to be shot clearly and accurately exposed, then you have to increase the EV at the expense of the background, that is to say, in order to make the subject accurately exposed, the background is overexposed.
To extend it, let’s talk about many people shooting at dusk, sunset and other landscapes, because the brightness close to the sun is very high, and the exposure is based on this, so it is difficult to imagine how many classic light and shadow effects come out. The correct way is to reduce at least 1EV to make the whole picture under-exposed, so that the sunset has a more layered feeling and can better reflect the artistic conception.
Fourthly, use face metering correctly
When shooting people, in order to make the people’s faces more fair, the method of directly metering the face and increasing the EV is often used. Using this method will make the face look more transparent under normal circumstances. If combined with the use of auxiliary equipment such as reflectors, the effect will be more obvious.
When we are shooting flowers and plants, although it feels similar to the feeling of shooting people, we have to lower the EV to shoot. Why? Because the flowers and plants are more beautiful, if you follow the standard EV exposure, the details of the flowers and plants may be lost. In order to retain more details and increase the texture of the flowers and plants, appropriately reducing the EV will have a good effect.
In short, the control of exposure compensation is not only a digital knowledge, but also an understanding of photography. Whether you increase or decrease the exposure, it is all about taking great photos. The above experience is only the most basic common sense, and does not mean that it is completely accurate. Because, more experience still depends on the fun that everyone brings through photography creation.