In many articles that involve lighting in portraits, it is recommended that you use various methods to soften the light, such as putting a soft cover on a flashlight, or using a soft box to create soft light in a large area of scenes.
The reason is also very simple, soft light is not easy to produce too bright highlights and too dark shadows, large-area soft light can create a beautiful and dreamy effect with low contrast;
In addition, the soft light can “smooth” the blemishes of the characters’ faces, making them look less obvious, and it has a better expressive power on the texture of the skin, which is very popular among female friends.
Large area soft light beautiful private portrait
Soft light does have a lot of benefits, and it’s not easy to make mistakes. So, do you just need to use soft light to shoot portraits? (Editor’s note: Many newcomers really think so~)
Here I want to solemnly declare that hard light is also an organic part of the light used in photography. It is very wrong to use soft light instead of hard light, just like a painter using red instead of green.
In fact, hard light also has its own unique effects. It is very good at adding contrast to the picture and creating drama and connotation. Learning to apply hard light is of great significance to improving the level of photography.
This article will start with a set of fashion blockbuster shooting scenes, and explain how to apply hard light and related precautions.
Let’s take a look at the final film effect first, who said that only soft light is good?
The final film, before and after retouching
For this shooting, this group of photos needed to show strong contrast and at the same time be dramatic. And soft light doesn’t do much in this respect-especially in smaller spaces.
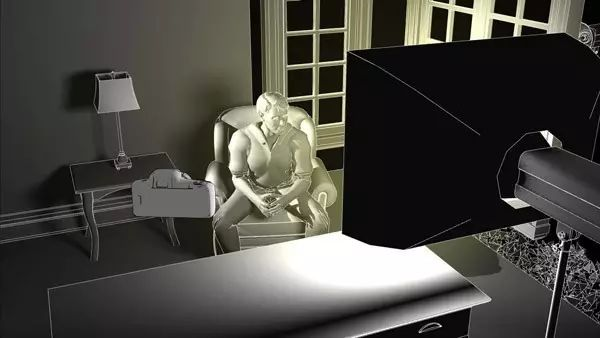
The scene shot this time was in the office of a local businessman. This high-end office provides a good background for photos, but there is not much space for equipment.
Therefore, the photographer decided to use reflectors and honeycomb covers (the role is to filter out the scattered light to form a directional area lighting) to complete the shooting.
Shooting scene, gorgeous decoration but lack of space
When considering and planning before shooting, the photographer chooses a simple three-point lighting, including main light, auxiliary light and side light. The main light source is placed in the house space on the left side of the camera, but because there is not enough space, there is a window on the right side, and the side light source cannot be placed.
Fortunately, there is a terrace outside the window, and there are power sockets on the terrace, so the photographer stretched the light stand to the longest, hung a sandbag at the bottom to ensure stability, adjusted the flash to the maximum power, and placed it outside the window.
In the office, the photographer used an exposure meter to measure the light in the direction of the light side light, and then set the camera to ISO100 and f/5.6 according to it.
Since the flash is used and the scene environment is not too bright, the photographer set a relatively high shutter speed of 1/160 second to ensure that not too much ambient light is captured.
This first light will act as a side light at the shooting scene.
First, take a test shot on the spot under the condition of “side light only” to observe the lighting effect of the side light.
The results of the test shooting with only the side light are as follows:
There is a problem with hard light as the main light source: you may need to brighten the shadows so that they are not too dark. Use a large soft light source to fill the shadow area, because this soft light is very similar to ambient light.
At the shooting scene, the photographer used a medium soft box to soften the auxiliary light and placed the auxiliary light behind the camera slightly to the right.
The position of the auxiliary light
Since the tone of the shooting scene is dark brown and the model is also wearing dark clothes, it is easy to get dark, so the output power of the auxiliary light cannot be too low, otherwise the shadow part will appear black.
Finally, the reading of the auxiliary light on the light meter is f/3.5, which is slightly lower than the camera’s reference value of f/5.6.
After setting the side light and auxiliary light, test shooting, the effect is as follows:
Finally set the main light.
The photographer placed the main light source in an open space at the door, with the light facing the left side of the camera, slightly above the model.
According to the shooting requirements, the photographer needs to focus the light on the model while not illuminating the wall too much, so a 20-level grid is installed on the lamp to control the light distribution.
Also, since most of the shooting scenes are dark brown, the photographer set the main light at a level higher than the camera’s reference value of f/5.6. After adjustment, the aperture value displayed by the exposure meter is f/8.
There are main light and metering, test shooting without auxiliary light. Note that the shadow is completely black without auxiliary light:
You may have noticed that although the main light aperture value is one level higher (left: f/8, right: f/5.6), the main light on the model’s left face is not as bright as the side light on its right face.
This is because the side light is placed further back, while the main light is directly on the left side of the model. Due to less reflected light, the side light shining on the model’s skin appears brighter than the main light.
Once the light placement and output power have been set, the model can be put on the designated clothing, POSE is placed, and the formal shooting begins.
After the three light sources are set, the effect comparison before and after the software is used to retouch the picture:
There is a big advantage of arranging the positions of the main light and the side light in this way, that is, they can both “play two roles”: when the model’s face changes direction, they can exchange roles and complement each other.
This kind of lighting setting makes it possible to have suitable short-distance light hitting the face no matter where the model faces, creating a picture effect that meets our needs:
Whether the face is facing left or right, the light is quite suitable
Finally, we want to encourage photography enthusiasts to innovate, experiment, and use new methods to apply hard light to their photos. Hard light is not limited to male photo shoots.
The lighting settings in the picture below are the same as the lighting settings in the male photography described above, and the effect is also good:
But it is still necessary to say with caution, hard light will completely expose wrinkles and spots. If you use hard light to shoot women, you must be very careful with the placement of your lights.
