Table of Contents
Live light
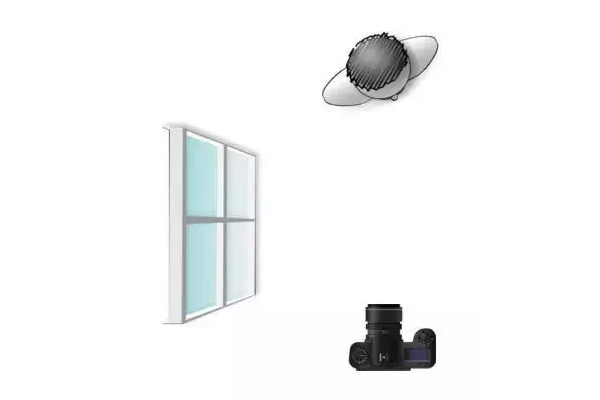
On-site light photography uses only the light present in the scene, not outdoor daylight. For example, the live light can be household light, fireplace fire light, or neon light. The spotlight also includes the spotlight beam hitting the ballet dancer on the stage, or the candlelight that illuminates the face of the lover. The scene light also includes daylight that enters the room through the window. In other words, the live light is just the light already in the scene—in addition to outdoor sunlight—not additional artificial light sources such as overflow lights, flash bulbs, or electronic flashes.
Compared with outdoor daylight or artificial lighting in the studio, the scene light is usually darker. Therefore, photographers must pay special attention to correct exposure.
Why use Live light
Many professional photographers like to use live light for three reasons:
- Full of realism and sentiment: Live photos can convey a sense of reality. Because the lighting used in many live photos is limited, not as perfect as photos taken in a studio using artificial lighting, the audience will have a sense of reality that he is looking at the object being photographed.
On-site light can not only convey a sense of reality, but also a sentiment. The scene can be dark while emphasizing the dark shadows, or it can be bright and high-key. It can also be melancholic, bright, vivid, dim, or cheerful.
By observing the light around you at this moment, you can begin to train your eyesight, recognize the different moods of the scene light, and prepare to capture them on film.
- The photographer is convenient and free to use: use the live light to shoot, you don’t need to carry bulky lamps, lamp stands, wires or battery packs. You can shoot quickly without waiting for the electronic flash to recharge. You can move freely and try to shoot from different angles and different positions. Although they can be used in live light conditions, because the use of a tripod will destroy the natural atmosphere of the room, often making the expression of inexperienced subjects sluggish.
- The subject is easy to relax naturally: under the strong light of the photographic floodlight and sudden flash, professional models may be natural and calm, but “ordinary subjects” often appear unnatural and nervous. It’s much easier to use live lights. Most of your subjects will relax naturally, forget the existence of the camera, you can find a better location, and capture the natural-looking portrait you are looking for.
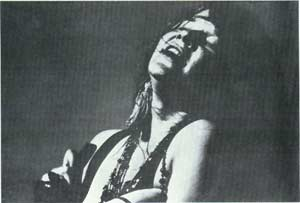 This is a typical live photo. As you can see, the bright part is almost all white, and the shadow part is almost all black. There is almost no gray tones in the middle. This is the characteristic of “traditional” live photos: the obvious black and white tones give the photos a sense of reality and realism.
This is a photo of the rock star Janis Joplin performing live. Do you agree that the typical on-site light and shade of this photo helps to enhance the strength of the photo? Joplin has been dead for many years, but the realism of this photo and its intuitiveness-always capture the energy and pain that made her a legend in the turbulent 1960s.
Live light photography technology
Although we are focusing on the photographer’s skills in this lesson, not the camera, spotlight photography is a realm where advanced photographic equipment plays a real role.
Too long ago, it was practically impossible to perform live light photography under most indoor conditions. At that time, both f/3.5 lenses and ISO50 film were considered faster. Now, it is common to use f/2 and larger lenses. ISO400 film is easy to buy-even using color film (some films can be “forced” and the exposure value can be increased to 10000 or higher), and you can even shoot in a dark room.
Finally, most of today’s light meters, such as gallium photodiodes, can take readings under almost total black conditions and give accurate exposure combinations (but be aware of the failure of the reciprocity law). Although the light meter can give accurate readings in almost dark conditions, the film may require a longer exposure time in order to compensate for the failure of the reciprocity law.
Live light photography skills
We have already pointed out that one of the fundamental purposes of live light photography is to capture the natural state of the scene-the sense of reality. In order to get real photos, it is often necessary to sacrifice the pursuit of technically perfect photos. Of course, you can use flash or overflow light to improve the dim lighting conditions, but this will destroy the natural sense of the scene. In fact, it is the lack of lighting that makes the live photos appear realistic.
Shooting in low light, you will often find that it is impossible to put the darkest shadow part. The details of the mid-tone part up to the strong light part are recorded. For example, a common on-site light condition is that light enters the room through a window on one side. The side of the person or thing facing the window is bathed in bright light, while the side facing the window is in heavy shadow. The latitude of your film is impossible to reproduce the details of the strong light and shadow parts. So which part of the details do you sacrifice? Usually the details of the shadows. If the strong light part and the midtone part can tell your story, then you have not lost anything here. The shadows without details can provide a real sense of reality.
When taking this kind of photo, careful observation and understanding are more important than skill. In dim light conditions, your eyes can adjust themselves to adapt to the light. As a result, you can see much more detail than the final photo shows. You can “think beforehand” what the photo will look like. To help you do this, you may wish to use many common tricks used by professional photographers. Squint your eyes while observing the subject before taking the photo. Squinted eyes can “ignore” the details of the shadows. This is a good idea to give you an idea of what the final photo will look like.
In some cases, the light may only be able to record the important part of the glare. If the picture is worth recording, then take it. Taking a photo is more important than worrying about whether the mid-gray tones can be recorded on film. You may wish to use various techniques commonly used by professional photographers. Choose fast film. When using a slower shutter speed (without using a tripod), to prevent camera shake, you can lean against a wall or chair and hold your breath when you press the shutter. You can use the light reflected from the natural reflective surface. But remember to take photos!
Use light meter
As we pointed out on the previous page, the metering of live photos is different from normal metering. In normal light metering, whether you are using color negative film or black and white negative film, you have to expose the shadow part-this means that you have to measure the reflected light readings on the important shadow parts, and then determine your exposure. Using this method of metering, you will shoot negatives that show details in important shadows.
However, in live light photos, in order to achieve realism, you need to make the shadows black!
In order to achieve this goal, how should you meter light? In order to achieve this typical on-site lighting effect, use your reflected light meter to take readings on the strong light or mid-tone areas —not on the shaded areas. By doing this, you are actually underexposing the image. You didn’t let the shadows of the film get enough light to produce detail there. Result: On the negative, there is no detail in the shadow part. On the photo, whether it is a color or black-and-white photo, the shadow part becomes black.
Therefore, this is why when you use negative film, whether it is a color negative film or a black-and-white negative film, you have to pursue a typical on-site light effect when metering. Remember to meter the strong light part or the mid-tone part. What should I do if I use an incident light meter instead of a reflected light meter? It is not difficult. The incident light meter gives a normal reading, and using this reading will produce a “normal” image. However, in order to get the effect of the live light, you don’t need a normal image-what you need is an underexposed image. Therefore, when you take the incident light readings, use the boundary exposure, that is, reduce the aperture by one or two stops in order to take an underexposed image.
If you use a gray card, the truth is the same. First, take the readings according to the normal method, and then use the bracketing light, that is, reduce the aperture by one stop or two stop exposures to make the image underexposed.
However, when using color reversal films-slides, you must be careful not to close the aperture too much. The danger of underexposing color reversal films is that you may get annoying color casts. No one likes photos with green faces! If you use color reversal film, our suggestion is to act in accordance with the exposure rules of color reversal film —— expose the bright light part. Then, in order to obtain a slide with on-site light effects, the aperture can only be reduced by one stop.
Finally, if the scene is very dark, no matter you use negative reversal film, you can use the techniques commonly used by professional photographers. The scene may be too dark, and the mid-tone or strong light part cannot be measured with a reflected light meter. The scene may be too dark to take a gray card reading. The scene may be too dark to take a reading with an incident light meter. So what should you do?
For this very dark scene, many professional photographers will take readings on bright white objects: a piece of white paper, a piece of white handkerchief, and the white side of a Kodak gray board. Then they opened the aperture by about half of the second block. Why do you want to open the second gear? Because their light meter is adjusted to measure 18% gray to reflect light.
